Greetings!
Welcome to Scifi-Meshes.com! Click one of these buttons to join in on the fun.
Quick Links
3DBlender - tough starts
Hello there,
on monday I decided to start learning in Blender... I watched some videos and some pages with tutorials and started making my first model in blender. As almost everyone here can say, starts are tough and make simple wood screw took me 3 hours and it even has no screw thread this is my second model (first, that I can name "model"). Finally I found how to make exact proportions
here it is
COMPLETED WORK:
Colonial Viper Mk.II

Babylon 5 universe station

Colossus class tank: Piecemaker Mk II

WIP:
SSV Normandy SR-2 papercraft

on monday I decided to start learning in Blender... I watched some videos and some pages with tutorials and started making my first model in blender. As almost everyone here can say, starts are tough and make simple wood screw took me 3 hours and it even has no screw thread
here it is
COMPLETED WORK:
Colonial Viper Mk.II
Babylon 5 universe station
Colossus class tank: Piecemaker Mk II
WIP:
SSV Normandy SR-2 papercraft
Post edited by Dr.Sleep on
Tagged:
Additional credits
- Icons from Font-Awesome
- Additional icons by Mickael Bonfill
- Banner background from Toptal Subtle Patterns
© Scifi-Meshes.com 2001-2024
Posts
As for the model. it's looking nice. I assume that those things on the sides are engines.
Just stick with it. It will come together. For me it didn't happen until I started my B5 Station.
-Brian
Looks like your off to a good start. I found most of the text tut's are out of date. Though You Tube has a lot in the most recent version of Blender.
Also a good learning guide is Blender for Dummies. It has everything you need and written for the most recent version. (Not the Beta version as everything has been moved around in that.) Even if you know most of the stuff in the book, it is also a good ref guide.
I decided to listen to BrianSzep and start meking something, that means to me instead of models without future... here is render:
_________________________________________________________________
I know IAâm just raping BSG Viper here, but I need to start on something
please, can anybody tell me, how to pose "left click cursor" to default position?
progress on top engine...
and please, can anyone tell me, why it makes this "ugly" shapes on render?
What I see, itAâs because hull is created from cylinder, extruded and flattened on one side. Cylinder is made from a nice flat rectangular faces, when one side of cylinder is flattened, faces canAât maintain its flat surface. Blender, doing this so add "virtual" diagonal edges, and breaking face into two triangles. It creates this efect on render, because triangels does not have the same normal and reflect light on diferent angles. You can rid of it, if you set "smooth" on object.
One little note under line. Though looks easier use on objects like this, cylinder, I think better is not to do this way, because it can bring other problems. I use cylinders, only if thing I make, remain cylindric.
bory: Hello Czech brother
Im quickly thinking it may be better than 3Ds!!
Looks good mate!! One thing i would say. try and get some indentation on the cockpit to make it stand out more
meugen06: that could help me, thanks.
new renders:
and added one render of weapons:
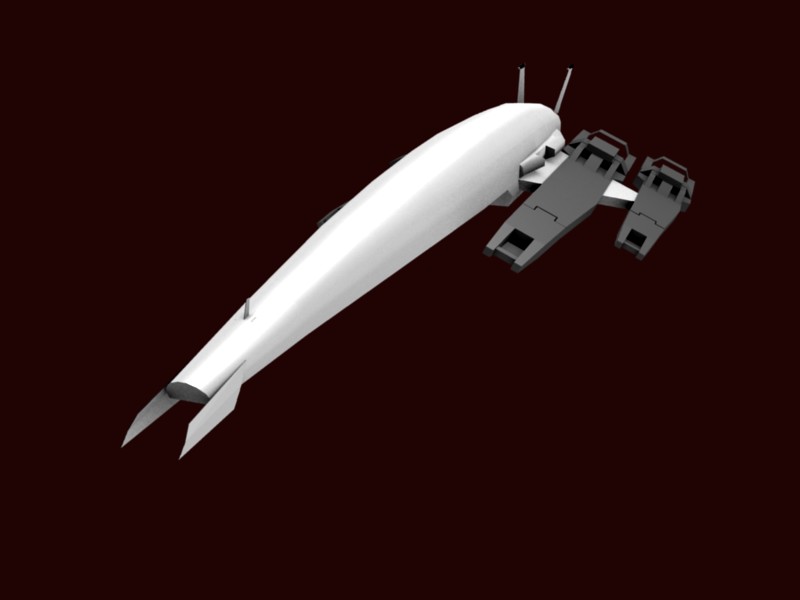
here is render of completed low-poly viper MK.II:
IAâll try to modify it to look more smooth, but so far I think my firs real work is done
secondly on to your model and settings, to make it look more smooth while in 'object' mode
hit f9, on the bottom of your screen there is a tab that says 'links and materials'. Hit the 'set smooth' button
then on the next tab to the right in the same screen called 'Mesh' there is a autosmooth button, click that.
that should make your entire mesh smooth, and the auto smooth will make sure flat surfaces look flat and round looks round...and will get rid of that 'ugly' face looking thing that you stated...
also for lighting try this method (it works extremely well good...)
1) go to object mode and delete ALL your lights, for good measure while in object mode hit shift-c
2) in object mode, hit space bar and add a hemi light, under the lamp selection (it will it will be placed where ever your 3d cursor is). If you did the entire first step above skip to step 5.
3) if its not where you want it, hit 'n', a small popup will appear on your 3d screen. in there under LocX LocY and LocZ is where your hemi is at, place it where ever you want.
4) it also has this straight line coming from the hemi. hemi is litterally like a umbrella lamp and works extremely well and works to make light in all directions the same intensity, meaning you wont get funny shiny spots where you dont want them (great for clay renders like yours)
5) i usually put it near my camera so its not in the way and make that line from the hemi light point towards your object by using the rotation 'r' in the front/left/top (keyboard shortcut, num pad-7,3,1) view settings so that you can line it up (takes about 5 seconds...)
6) Go to your shading settings by hitting, f5. Once there click the world button.
7) There should be a tab labled 'Amb Occ', select it. And of course select the ambient occlusion button in that tab. Now a whole list of settings pop up.
8) under samples select 8. Max Dist set to 1 or 2. And the button labled 'both' select that.
9) Under the world tab in the same area your at, click the standard blue and make it a very dark grey almost black...
this will get you from this...to this...
finally "normal" render here:
Brian