Greetings!
Welcome to Scifi-Meshes.com! Click one of these buttons to join in on the fun.
Quick Links
3DLoknar Refit (USS Phobos) Conversion to Blender
 GuitarEC333
Posts: 44Member
GuitarEC333
Posts: 44Member


Greetings everyone, and Happy Holidays!
So, with some experience converting Dennis Bailey's Refit Enterprise from Lightwave to Blender format, and being a complete lover of TMP era Trek ship design, I've decided the next ship to convert and release (pending the author's approval, of course) will be the Loknar Refit USS Phobos.
I've been toying around with it for quite a while now, but never stayed with it until completion. I figure the best way get it done, it post my progress and rely on the demands from the forum to push it through.
With time off for the Thanksgiving holiday, I will hopefully get quite a bit done.
Keep checking back, and I look forward to hearing words of encouragement, or suggestions for improvement.
Eric "GuitarEC"
Post edited by GuitarEC on
Tagged:
Additional credits
- Icons from Font-Awesome
- Additional icons by Mickael Bonfill
- Banner background from Toptal Subtle Patterns
© Scifi-Meshes.com 2001-2024
Posts
Should I convert with the original material settings, or alter the settings to be more inline with the material used on Dennis Bailey's Enterprise (for continuity)? Or should I release 2 versions?
I'd love to hear your opinions.
Eric "GuitarEC"
However, I hope you get the approval. I'd love to see a WIP on a conversion, so I can see how you go about doing it.
"I've decided the next ship to convert and -release---> (pending the author's approval, of course) <--- will be the Loknar Refit USS Phobos."
I'm sorry I was not more clear in my initial post - but davidnevue is correct in that I wanted to get Kevin Riley's permission to release the final conversion (after he has had the opportunity to review the final work to ensure it is something he'd want his name associated with!
And to clarify this issue, here is the text from the Original MAX release ReadMe file:
"Feel free to modify, mangle, distort, improve, post, host, and render this model for whatever you want. Just don't charge for it or use it commercially. Well, actually, I'd love for it to be used commercially as long as I get a cut of the money. I think Paramount would want their share too. A credit would be nice, but lets not forget Brian Gillies, FASA, Paramount Pictures, and Big Gene himself."
Thanks for being sure to keep things on the straight and narrow Crimson.
I do have a feeler or two out there to see about getting in direct contact with V'Ger.. er, um ...Kevin... to get a 1st person blessing on top of his ReadMe indications. (want to be DANGED sure that I'm not stepping on folks toes!)
And perhaps a few surprises are in store with this release as well... More on those developments as soon as I gain those blessings as well.
Alright, well - hopefully I'll have a few pics to post in the next few hours,
Eric "GuitarEC"
Good point - I've put in an e-mail to Fabio asking for permission (and I'm hoping he has email contact with Matthew Christou - I was unable to find any contact info for him when I reviewed the ReadMe file included with the Lightwave conversion - although... Matthew Christou... MattC.... hmmmm?)
Eric "GuitarEC"
Edit: I'm an idiot, by the way... ...and Google works.
Eric "GuitarEC"
Every model is a learning experience, and the techniques I worked out on that model years ago I still use today at work (A powerful ally, Lofting is).
As for the Material settings, IAâm obviously partial to the way I made them. They closely reproduce the look of the first movie (TMP) with layers of anisotropic glossy surface and iridescent sub-panels lighting up in the specular.
I got BillAâs email and will be contacting you for more direct communication.
I'll go back and redo the LW one in 9.x one of these days to redo the surfacing to match the max one....well, when I have the time anyway.
M.
Specifically, I was going to try and match the greens and blues as used by Dennis Bailey in his TMP Enterprise mesh. However, I wouldn't be against releasing a version of each color variation (with your approval)...
Eric "GuitarEC"
GEC, I'd say go with the time honored tradition of both flavors, the original and the "Bailey" edition.
Various Work: U.S.S. Constellation - Matt Jefferies Concept Shuttle
If I remember correctly the Aztec pattern on the Lightwave saucer was rotated 90deg in the first version but corrected in a second release. Just something to be aware of in an update. I probably rotated some of the UV coordinates in Max (long ago, I donAât recall) which might not survive the initial translation between platforms.
I exhaustively researched the color scheme to be as accurate to TMP as possible. ThereAâs always debate over these things, as the reality is it surely changes over the life of a franchise. I seem to remember finding actual color chip reference from the original ship. IAâll have to dig through my files to see if I can find it.
YeahA⦠the StriderA⦠IAâll finish itA⦠somedayA⦠reallyA⦠:rolleyes:
IAâll probably start over as a Maya learning project (Maya being my new arch enemy. In fact the icon on my desktop simply reads AâWorst Program EverAâ). These days running my R/C racing club and maintaining four cars in race-ready trim keeps me busy full time. I even made my first website! Mini-AZ . Weee! (IAâm AâDustyAâ in the racing world instead of AâLt. RileyAâ, that crowd typically wouldnAât get the connection).
Eric "GuitarEC"
Yeah, i fixed all that stuff a while back. Just experimenting with a nodal surface model at the moment to replicate and enhance the pearlescent effect. Looks quite nice so far.
As for Maya, I agree. Not my favourite application either.
M
1. I'm using Blender v2.48a Optimized build for SSE2 (found at GraphicAll.org)
2. I have Python 02.5.2 installed
3. I am using the supplied Lightwave import script (v.00.4.0 I believe)
4. And finally, I'm using the Layer Manager Script v01.3.1.
I have my layers set up like so for the preliminary work:
Layer 20 - Import Layer: this is where the initially imported LightWave mesh will be.
Layer 19 - Corrected Geometry: Sometimes, there are minor geometry errors that occur in the import process. After each object is checked and the geometry is judged to be good, I place the object into this layer.
Layer 18 - Correct Orientation: After the initial import attempts, I've found that for non-UV textures to map correctly, I need to re-orient the mesh (rotation on the axis 180 degrees) and clear the ObData back to 0. Additionally, I create an Empty object, center and scale it to enclose the whole mesh, and set it as the parent for all objects.
Layer 17 - Smooth Objects: Next, I go with each object and set the correct smoothing options on an object by object basis.
Layer 16 - Textured: As each object gets it's textures applied, it's deposited into this layer.
I know it sounds somewhat convoluted, but it helps me to see the process as an 'Assembly Line' and gives me a sense of perspective of how much I've done instead of 'Oh, Dear lord, will it ever END?!?'
Images to come...
Eric "GuitarEC"
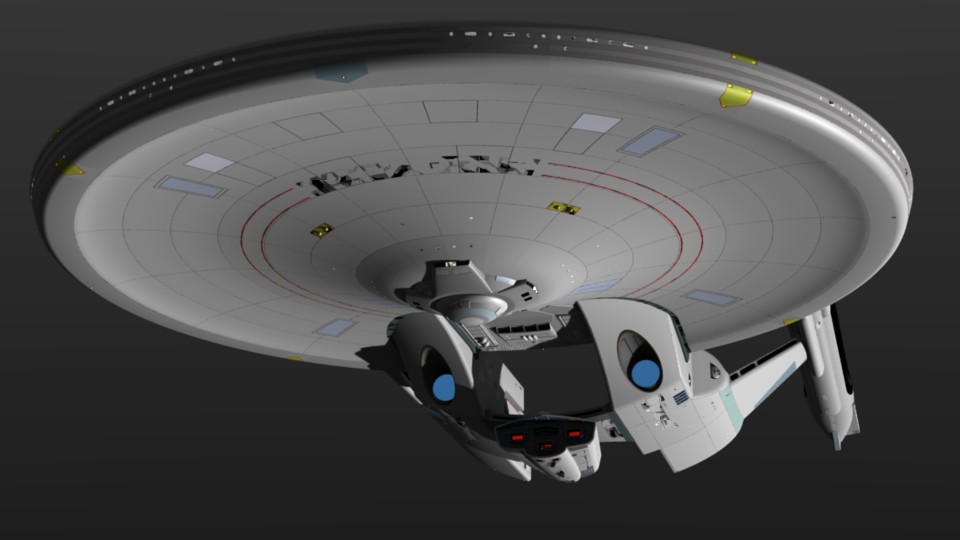
174 Objects
131,056 Verts
126,005 Faces (or Polygons)
And here's what I'm starting out with:
Please note these images are screen renders - no antialaising - no lighting other than the OpenGL of the interface.
Eric "GuitarEC"
When do we get some renders?
EDIT: Ahhh, there they are!
Various Work: U.S.S. Constellation - Matt Jefferies Concept Shuttle
That would be cool - I think FASA really planted a potent seed when they drafted up the original Loknar Class for ST:TRPG...
...however, your request would be just a bit outside the scope of my conversion...
Eric "GuitarEC"
Various Work: U.S.S. Constellation - Matt Jefferies Concept Shuttle
I have the latest version of Max, and the mesh loads fine in it, and renders fine as well. However, the Video Post fx don't work so well.. but nothing some time and tweaking can't fix. :thumb:
- Mike Oldfield
Well, one of the biggest geometry import causalities was what I affectionately refer to as the "Greeble-Garden" on the tops of the Engineering Hulls.
Below you can see the before and after screen shots. Seems to be going along swimmingly, though...
Eric "GuitarEC"
...however it does illustrate an issue I will have to figure out: Blender doesn't handle parallel faces all that well, especially with raytracing (thus, the black splotches you see on some of the markings)...
Eric "GuitarEC"
Various Work: U.S.S. Constellation - Matt Jefferies Concept Shuttle
Sorry I wasn't more clear - what I mean are 2 faces that are both parallel and overlap on the same plane...
Simple way to see this: Create a plane in an empty scene and scale it up a bit. Create a second plane, but don't change anything. When you render it with ray tracing, they look all messed up...
Phobos uses quite a lot of this to add the various panels, windows, and registry labels...
Should be fun to figure this out... :rolleyes:
Eric "GuitarEC"
All of these surfaces should be set to only receive shadows, but not cast shadows. In addition, the name/registry type surfaces use the alpha channel in the specular/diffuse channels to prevent double highlights. The blotchy shadows that may appear on the markings anyway are dealt with in Max with the Shadow Bias settings, which of course will be entirely different in Blender.
I just had to experiment to find the optimal settings and geometry offset distance in Max (0.1in works in most cases to render right but not be obviously offset).
Good to hear Jayru. I tried to build for long term platform independent survivability. I figured the Video Post settings would become obsolete though, theyAâre just a render perk anyway.
Oh, and when I said 5.5 I was thinking of my old Photoshop. Doh. The original Phobos model is Max 3.1.
I have to thank you for creating the Loknar class mesh. Absolutely fantastic.
BTW, it loads and renders perfectly in 3ds max 2009 as far as I can tell.
I took advangage of the separated maps and changed the ship into the USS Churchill to represent my Star Trek fan club chapter. I hope you don't mind. I credited you for the mesh in every image, and will do so in the credits of any animation I create with her.
This is probably one of the tom Star Trek meshes ever released to the public, and I salute you for it.
And why not? After all, there are several Excelsior and Miranda class vessels still in service.