Greetings!
Welcome to Scifi-Meshes.com! Click one of these buttons to join in on the fun.
Quick Links
3DGalaxy Class in Blender


Well, I don't really have any business trying to model this ship yet... she's far too well known and far too difficult to model, with her organic lines and complex geometry. I'm hopelessly out of my depth. But of course I love this class and sooner or later I have to have my own mesh of the Galaxy class.
I'm actually pretty pleased with myself that I got even this far. I have been trying on and off to figure out a basic approach to this lady for years. I have tried modeling the main hull literally dozens of ways. I finally found an approach that works pretty well. She's probably about 80% accurate, which is about all I can expect from my skill level. I will probably be adding to this thread for years to come.
I'm actually pretty pleased with myself that I got even this far. I have been trying on and off to figure out a basic approach to this lady for years. I have tried modeling the main hull literally dozens of ways. I finally found an approach that works pretty well. She's probably about 80% accurate, which is about all I can expect from my skill level. I will probably be adding to this thread for years to come.
Post edited by Polaris 004 on
Additional credits
- Icons from Font-Awesome
- Additional icons by Mickael Bonfill
- Banner background from Toptal Subtle Patterns
© Scifi-Meshes.com 2001-2024
Posts
You've done more than I can currently do. I have a hard time figuring out how to approach building things. This years task is to become proficient at Blender.
Looking forward to seeing how you progress. Best of luck with it.
-Ricky
I swear, I must have come within a hair of giving up on this project at least a dozen times already. Something that really helped was when I downloaded the most recent version of Blender, it had some new knife tools that really helped me out.
Anyway, I am going to want to move on to detailing soon, so feedback please.
Books: [ Ashes of Alour-Tan | Embers of Alour-Tan ] | Blender Tutorials | Blog
Sure. Here's some screenshots to start with, let me know if there's anything else in particular you want to see.
Yes, I have a troublesome triangle on the side of the neck. Everything I do to try to fix it makes it worse. This was the best compromise i was able to come up with. I will pick at it a bit more, but i don't know if i can make it go away.
Thanks. The whole trick with this mesh is the neck. Does anyone else remember Don Music from Sesame Street? That's been me for three weeks: "oh, I'll never get it, never, never.. *head bangs down on keyboard.*"
Here's the neck already hardened and cut.
Same thing, different angle.
Here's the neck as a subsurface mesh, pre-cut. You can see that problem triangle on the side of the neck, right above the cursor circle. How I hate that bastard triangle...
Here's the main body mesh, it's still subsurface.
The body from the top.
Pylon supports. Eventually, I want these to be integrated seamlessly with the body. I may have to re-build them to achieve that.
Here's the Pylon support mesh. Even if I end up using this mesh, I can cut the front of that triangle tongue off once it's hardened to a mesh.
Looks fairly good from behind?
The separation plane came out pretty smooth on the top.
1) The neck, engineering hull, and pylons should all really be one unified piece. You can do it separate, but it'll never look quite as good as a when it comes from a single well-constructed subsurf cage.
2) Avoid freezing your subsurfs until you're 100% absolutely dead-set-certain you can't possibly do anything more to refine the shape and you're ready to start cutting in detail that would be impossible to do in the subsurf itself.
3) Look into "Crease" to help control your subsurf edges. I wrote a tutorial on subsurf hull modeling in Blender here. (Check out the video link at the bottom of that page, too, to Grant Warwick's Hard Surface Essentials. Lots of great demonstrations on how to tackle subsurf issues.)
4) If you're planning to do a separable saucer, definitely put at least the major geometry into the subsurf for the "cobra head" on the engineering hull.
5) If you don't have them, definitely get the addons mentioned here, as they make many modeling tasks significantly more straightforward. In particular, LoopTools > Curve, LoopTools > Space, and LoopTools > Relax are indispensable when it comes to smoothing out subsurf cages. I see a fair amount of distortion on your secondary hull mesh that a few minutes with these tools would fix right up.
I know, that's a deluge of things. You've got a solid start, though, and I think you can definitely make this thing really shine.
Books: [ Ashes of Alour-Tan | Embers of Alour-Tan ] | Blender Tutorials | Blog
1) I agree. I tried a number of times to integrate the neck and the Stardrive body, but never could get it to work. I will try again, though. I know the shape of the neck by heart now, so maybe this time I will be able to get it. As for the Pylons, I always intended to rebuild them from polygon extrusions at the back of the mesh.
2) This is good advice in theory, but I find with this mesh I often have to skip ahead and see how things are going to work out later on. For example, I wanted to know if the new cutting tools I got would let me create the separation plane in the hardened mesh. Or could I model the seperate saucer and stardrive each as different sub surface models? It seems like the best way to go is to model the saucer and the neck together or at least joined at the back of the neck, and then to cut it apart as a hardened mesh? There was no way to test these ideas out without hardening the mesh. But in any case I always save every step of every mesh i do. Whenever I am about to do something irreparable, I save that session as a separate Blender file.
3) Thanks, I will look into this. I could never really get crease to do anything, and still don't even really know what it's for. I'll definitely look into it.. Fantastic tutorial resource! Thank you so much for creating it, I will be studying it carefully.
4) Yes, that would have to be done with a subsurface build. I think I know how to do it, I just didn't build it yet for this particular neck.
5) Thanks! These are some great tools that I have yet to explore. Some of them are new to this version of Blender. I don't recall seein the option to "Dissolve" edges and faces before, for example. I should have upgraded sooner... Maybe they can chiropractor my neck...
That was not a "deluge" at all. I think you have a really good sense of where I am at in my skills and gave me exactly the right amount and kind of feedback.. Thanks so much for taking the time. I hope I can use it to take this mesh a level or two higher.
I would model them as two separate pieces, as IRML did, yeah.
Good!
Crease is weird, because you don't use it where you'd think you would. Never* use crease on an actual corner, or you'll just get a hard edge and defeat the entire point of using subsurf. Instead, use crease on an edge loop next to a corner to control the density of polygons along that corner. The big graphic at the end of the tutorial I linked shows this in a simple case and I'd be happy to consult on any problem areas you run into.
Thanks!
Dissolve is a must-have.
I wish there were a better way to keep Blender up-to-date on a Windows machine than "check the site and download a new version if it's available." On Linux, Blender keeps itself up-to-date more-or-less automatically, thanks to the magic of Synaptic repositories.
I'll be over here cheering!
Books: [ Ashes of Alour-Tan | Embers of Alour-Tan ] | Blender Tutorials | Blog
I draw on numerous sources. I have orths of Tobias' mesh for my background guides. So that's providing my rough silhouettes. Then for any particular part I am unclear on, I Google around for resources. Also, I have very old Ertl model that I can actually handle take apart. I have found that useful when trying to come up with general modeling approaches. In general, I find I like the detail of the 4 foot model better than the 6 foot, so when I detail and texture my Galaxy family meshes, that raised detail is the overall "look" I aspire to.
This might also be of some use. It's a "trick" I use for figuring out complex joins in subsurf cages. The lines in the image are meant to more-or-less represent your Neck join from the angle of the first of the two preceding images. If it's not clear, let me know and I'll try to do an actual 3D mockup.
Books: [ Ashes of Alour-Tan | Embers of Alour-Tan ] | Blender Tutorials | Blog
Nightfever: Likewise your mesh screen capture gives me a much clearer idea of what a clean approach to the shape would look like. I am going to try to get my mesh as close to this level of clarity as I can. I appreciate you sharing your work in order to help me out.
Thank you for the encouragement, everyone. I will be going back to it shortly.
I still am going to tinker a bit more with this mesh. I want to extrude the impulse engine block at the back of the neck, re-build the top of the battle bridge/ connection plane area (that piece that's there was just a temporary placeholder) and just generally fiddle with some of the points a bit. But it's already much better than my wildest hopes when i started out. So, thanks again, everyone for the help so far.
See if this helps explain what Crease does:
LoopTools > Space takes your existing selection and evenly spaces all of the points in it. This is a really crappy example I knocked together, based on your screenshot:
Books: [ Ashes of Alour-Tan | Embers of Alour-Tan ] | Blender Tutorials | Blog
McC, you sir, are awesome for pointing out everything like that. I'm thinking of switching to Blender since I won't have Max much longer and your explanations make the program much less intimidating to me to learn from scratch. Kudos, man.
It's by no means an easy program to pick up and I dare say that it might even be harder to pick up after you've already learned other 3D packages (this coming from someone who "learned on" trueSpace and LightWave, and then used Maya and Max professionally for several years). There's a lot to unlearn about the way those programs do tings, but once you've wrapped your head around Blender's methods, I've found it to be incredibly rewarding to work in!
Books: [ Ashes of Alour-Tan | Embers of Alour-Tan ] | Blender Tutorials | Blog
I have worked some more on my subsurface mesh, continuing to delete extra verts and make the shape as smooth and regular as possible.
Here's an up-close view of the deflector area. It isn't 100% perfect, but I think it's about as close as I can get it.
Here are some pics of the hardened mesh with some details added in. I took two or three tries at them, and I can always go back and try again, but I think this last attempt is pretty good:
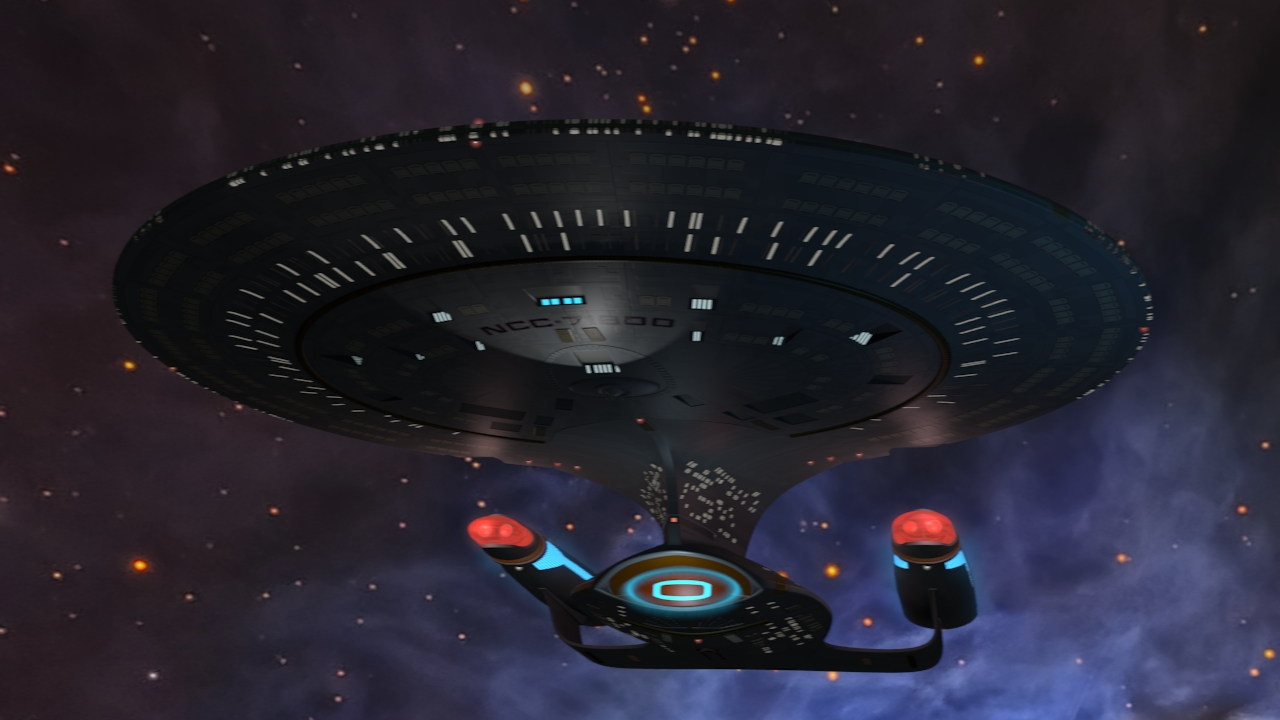
I got rid of the old nacelles, which were hold-overs from my nebula class mesh, and built her her own. This lady is worth the extra effort.
Here are a couple Stardrive shots.
On the whole I think I can proceed onward from this point. I think I have the rough mesh in place and can begin detailing it at a hopefully more leisurely pace. I have been working since mid-December to get to this point, but it has definitely been worth the effort.