Greetings!
Welcome to Scifi-Meshes.com! Click one of these buttons to join in on the fun.
Quick Links
3DPercheron class (tos era)
 psCargile417
Posts: 620Member
psCargile417
Posts: 620Member


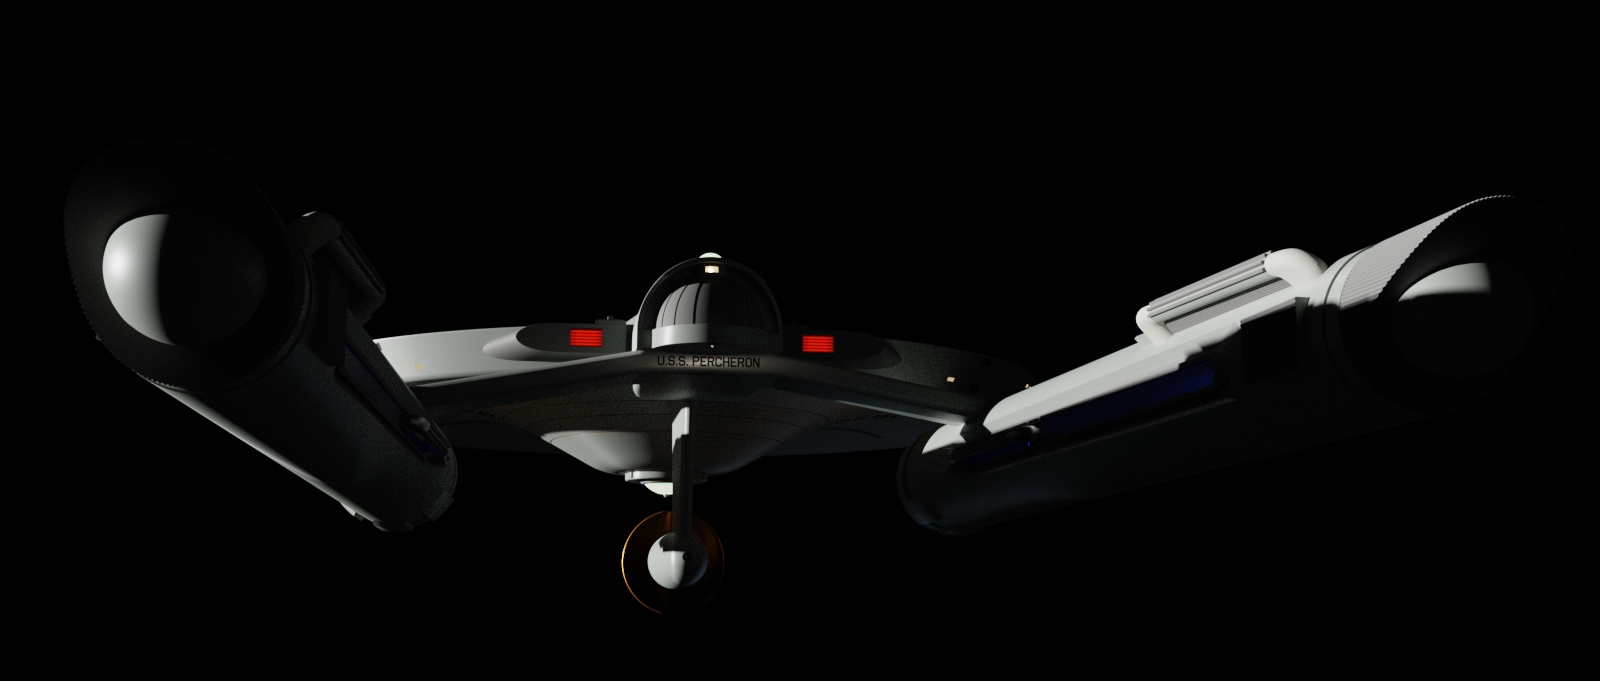
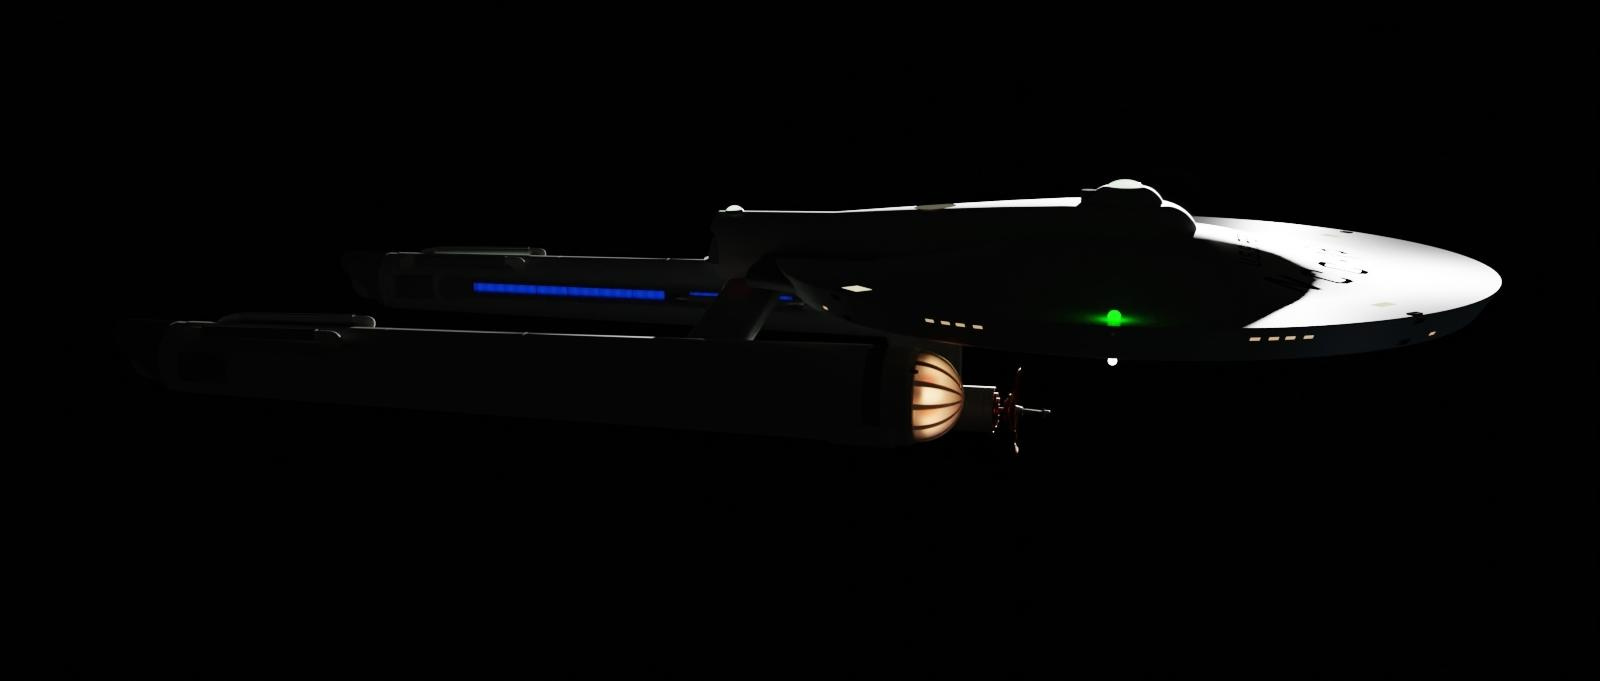
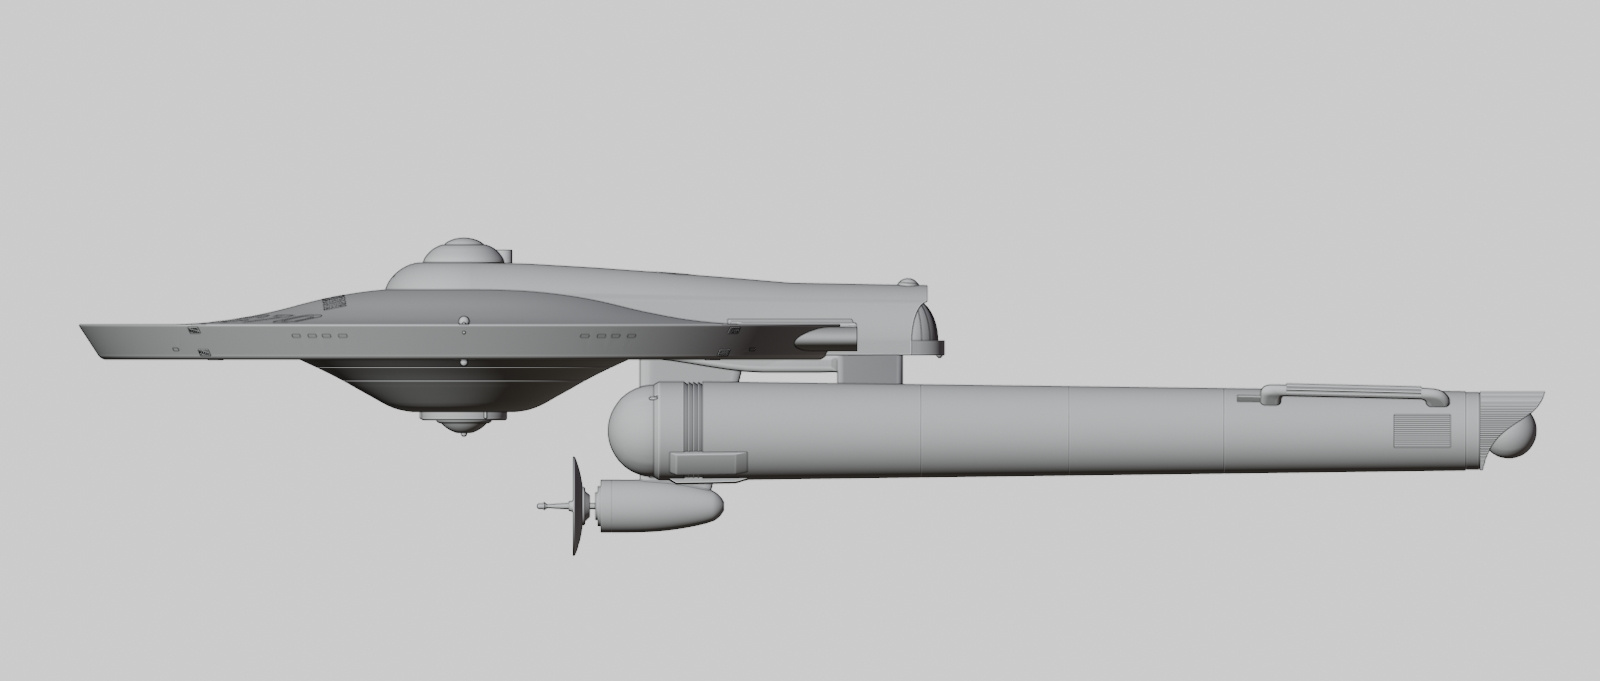
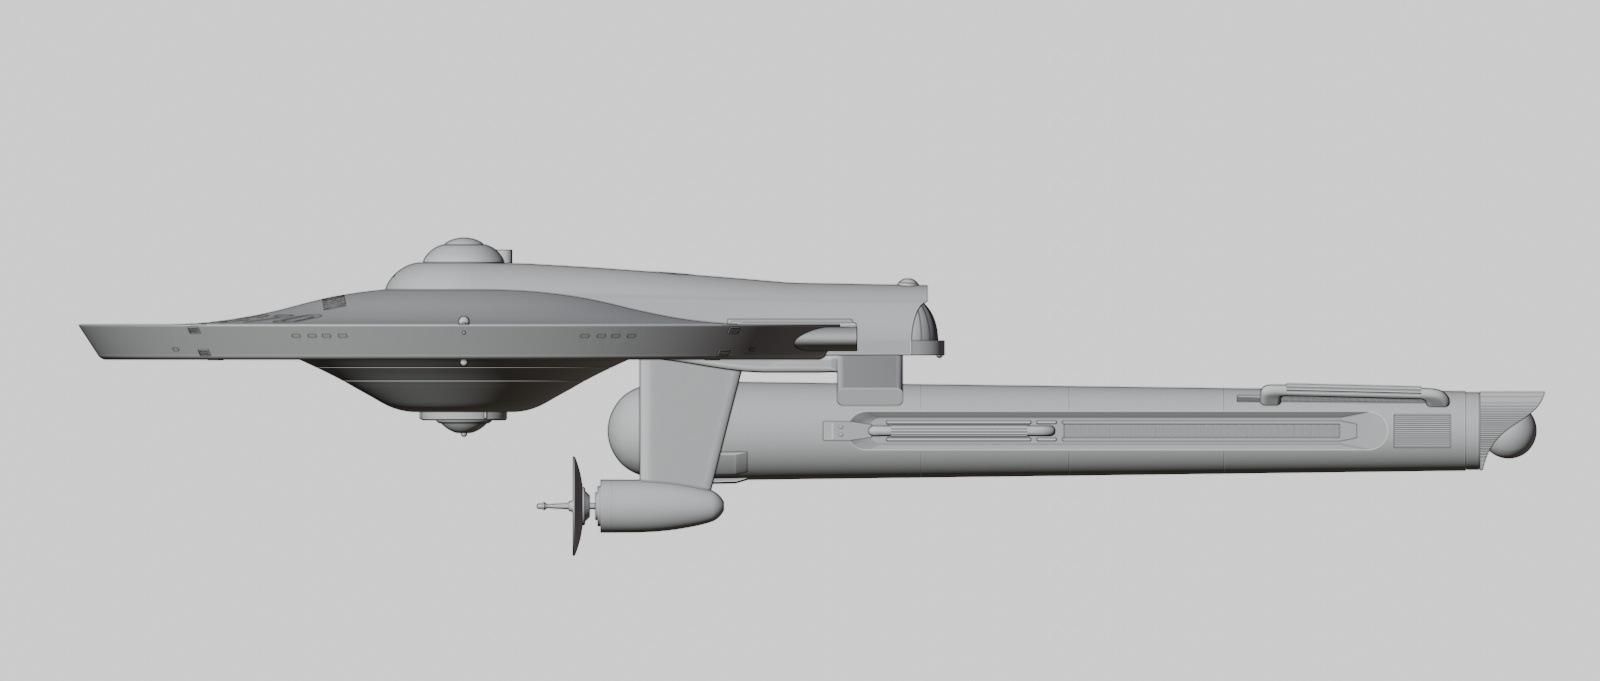
I was looking at my 22 year old MSPaint image of Constitution class predecessors and "kitbashes" and figured I make a model based on the design with the shuttlebay on the saucer. I downloaded some of the Alan Sinclair blueprints and called up scifieric's YouTube channel for guidance. My goal isn't to make an exact replica of the 11 foot studio model, but make it a smidgen more realistic without straying from the Jefferies' aesthetic.
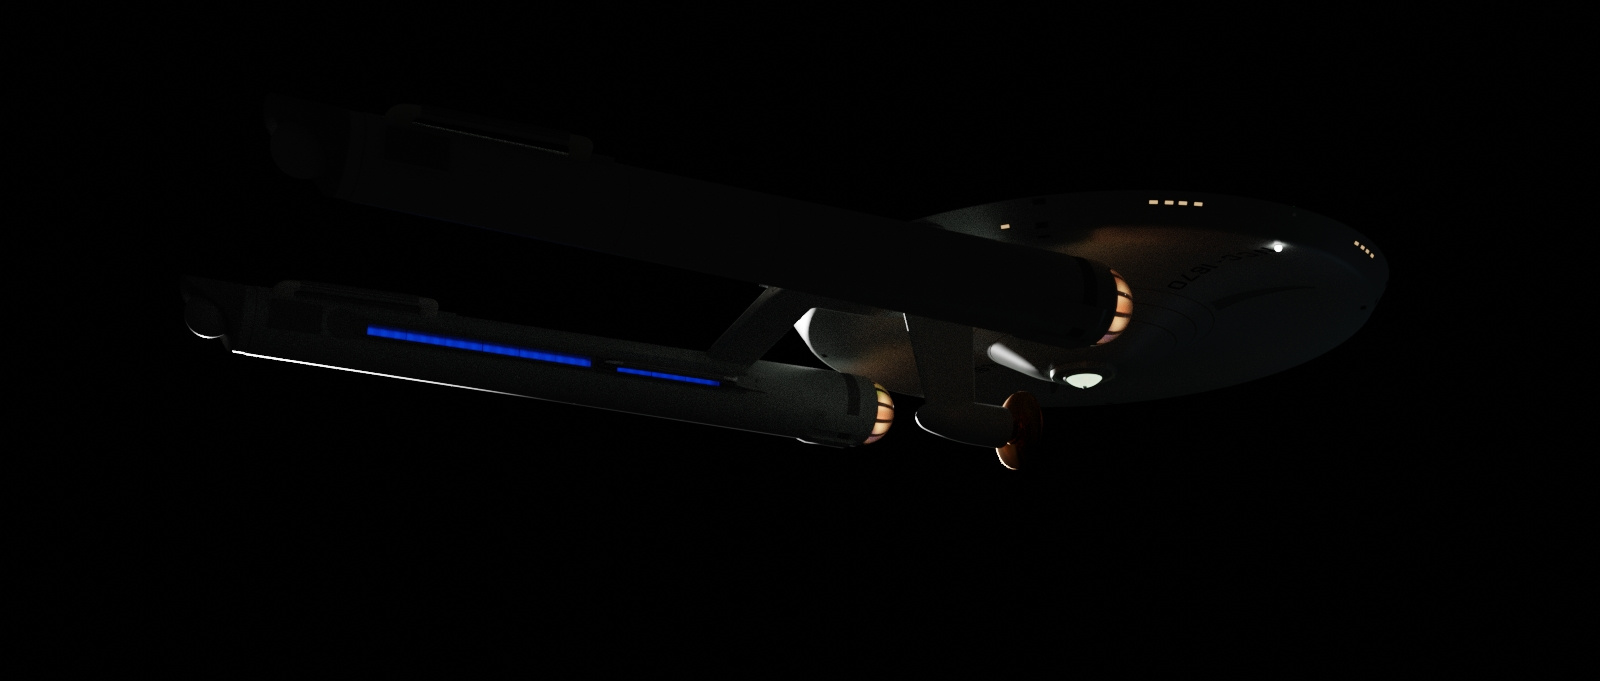
As you can see it's 80% to 90% done. Only thing left is small details like windows and hatches, and minor details I may decide to add. The gray rectangles are the maneuvering thrusters which I decided were going to follow the simplicity of the impulse engines. I wanted the warp glows to have a darker, buried appearance as if the energy is coming from the center of the nacelle as opposed to right there at the grill. I'm thinking about going back and making the nacelle caps truer to the studio model with double domes to soften the look of the vanes, which research says were tape, but mine are modeled solids, as I suppose everyone's are.
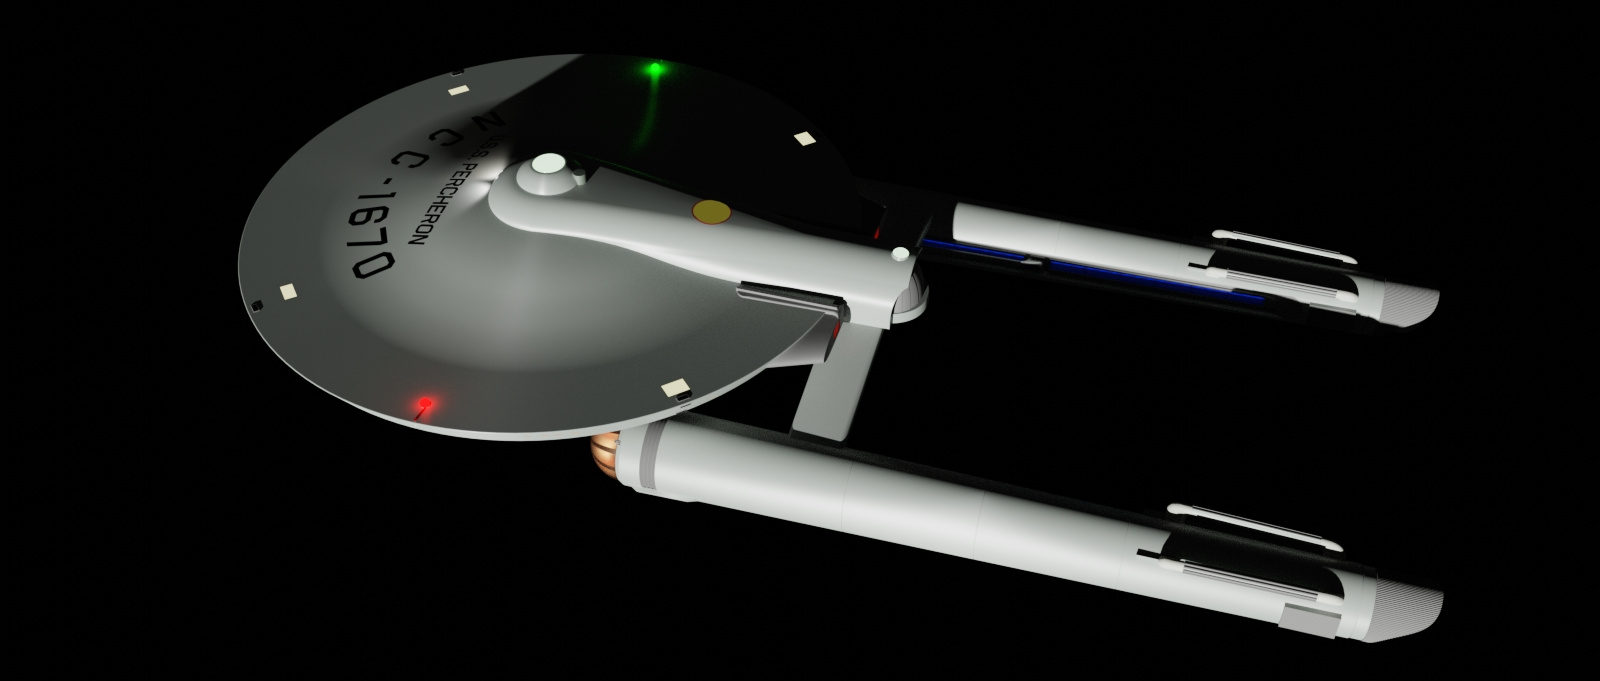
No textures are used anywhere on this model. Not the impulse and warp glows. And not the lettering. The lettering are Blender's text objects with a shrinkwrap modifier and shadows disabled, because they are slightly above the surface as text objects they are not subdivided very well. And I don't want to convert them to meshes because I can still edit them to change name and number. I'm using airborne2 as a font, and anyone who has made a TOS saucer knows center alignment doesn't match. At least the Sinclair b/p don't match up to the font spacing. For the name, you can get close with adjusting character and/or word spacing. I would have rather the registry be one text object, but I was only able to match it as close as possible to the prints by splitting it into the prefix and number because it requires different spacing on either side of the centered hyphen. Oh, the pains we go through. Plus being able to conform the text to a curve is a tremendous help. I tried a texture at first but it was a lot more work to get it close, and they are permanent unless you want to spend a lot of time making and swapping out textures. I don't. I like hitting that edit button, making the change, and going back to object mode. So much easier. But, hey, they were painting letters on a curved surface, and they did a helluva job.
The yellow hatch is also a shrinkwrapped face without shadows.
I had an idea the shuttlebay doors would open by one set sliding over the next. These give the appearance that that may be the case, but in reality their pivot point doesn't allow that to happen. If I want them to work as real doors, I would have to redesign them and they may not have the same curvature. They were cut from sphere that matched the outline of the prints, so. . . .
The warp glow is achieved by a number of emitting faces shining through a translucent material, and then near the grill through faces with a glass material. The glass sections I borrowed from the Franz Joseph prints of the warp nacelle. It gives it a nice separation behind the grill.
That troublesome trough, I tell you. I tried a Boolean difference. I tried knife project and extrusion. I came to the conclusion that you can do things with wood working tools you can't do in Blender. A Boolean difference will not make that front curve a half circle. I took a shower, and my relaxed brain said, "You idiot, you knife project for the edge of the trough, and delete that shit. And then you build the back wall, and from there, create faces. Slide those verts in the front to scallop it, without proportional editing because that will move too many at once, just one curve section at a time scaled in Y. It came out better. The aft clamshell shape is not perfectly flat because the outer edge is curves of course. But with sharpen edges it's unnoticeable.
I also wanted the pylons to connect to the nacelle in the same region they do on the Constitution class because it's the same engine, and I imagine that specific segment of the interior has the components to mate with plasma conduits. Other sections have other stuff that is there because that is where they need to be.

And credit were credit is due, though its a trick Eric (scifieric) learned, I learned it from him, and grids so easy from a small face with a hole in it, or a funky star pattern, just pops. Yay for arrays!
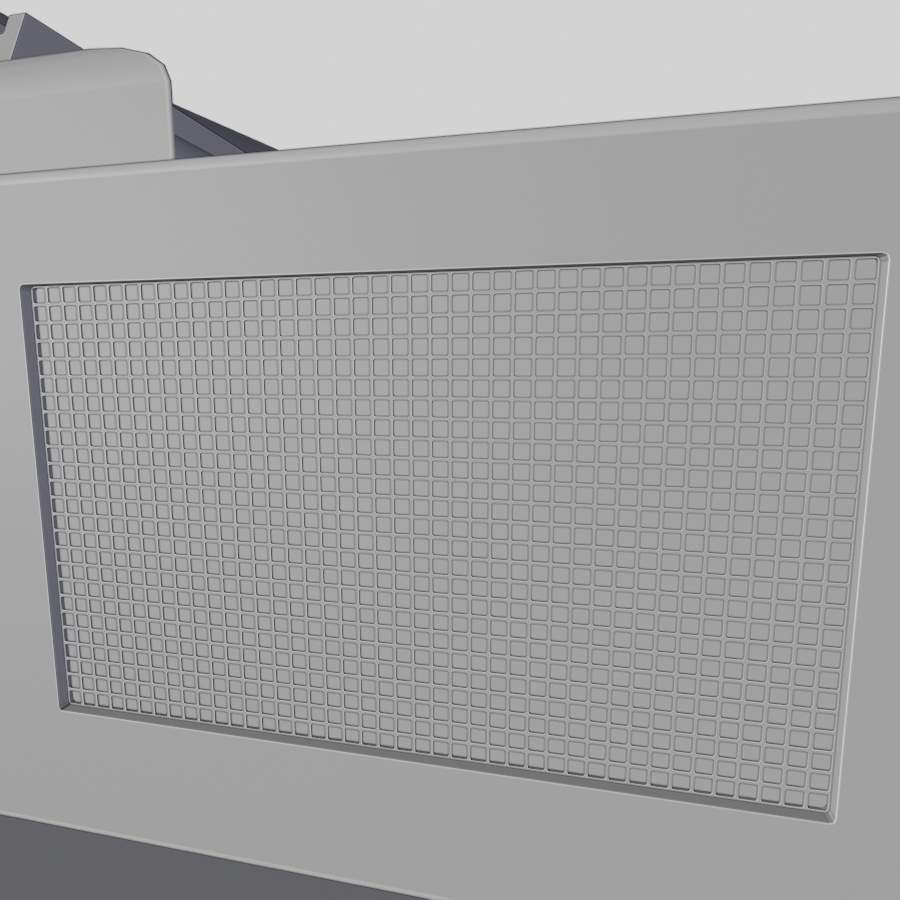
Carried the technique over to the impulse grills because I hate the way the wireframe modifier looks with its angled surfaces. I did not replace the RCS grids because they are joined meshes which would be too much work (for me), and too small to notice anyway. Gotta love super easy techniques.
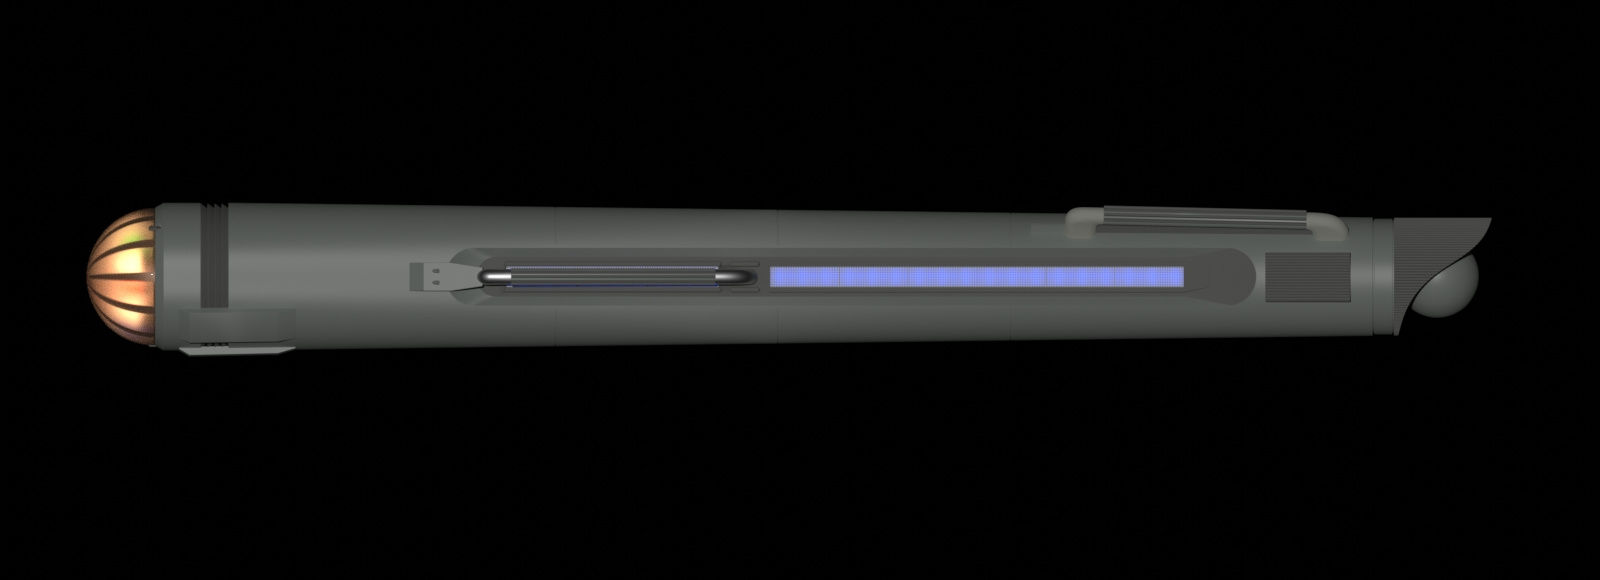
No texture impulse engines. One of the things I have always wanted to achieve was a good impulse glow with falloff at the edges that did not rely on textures or complex node systems. I thought, (not in the shower that time) what if I take a face that is to be the glowie, and add a loop cut as a fold edge, and then rotate that face back?

Here is the arrayed geometry with the negative space shaped like the grills on later drives.
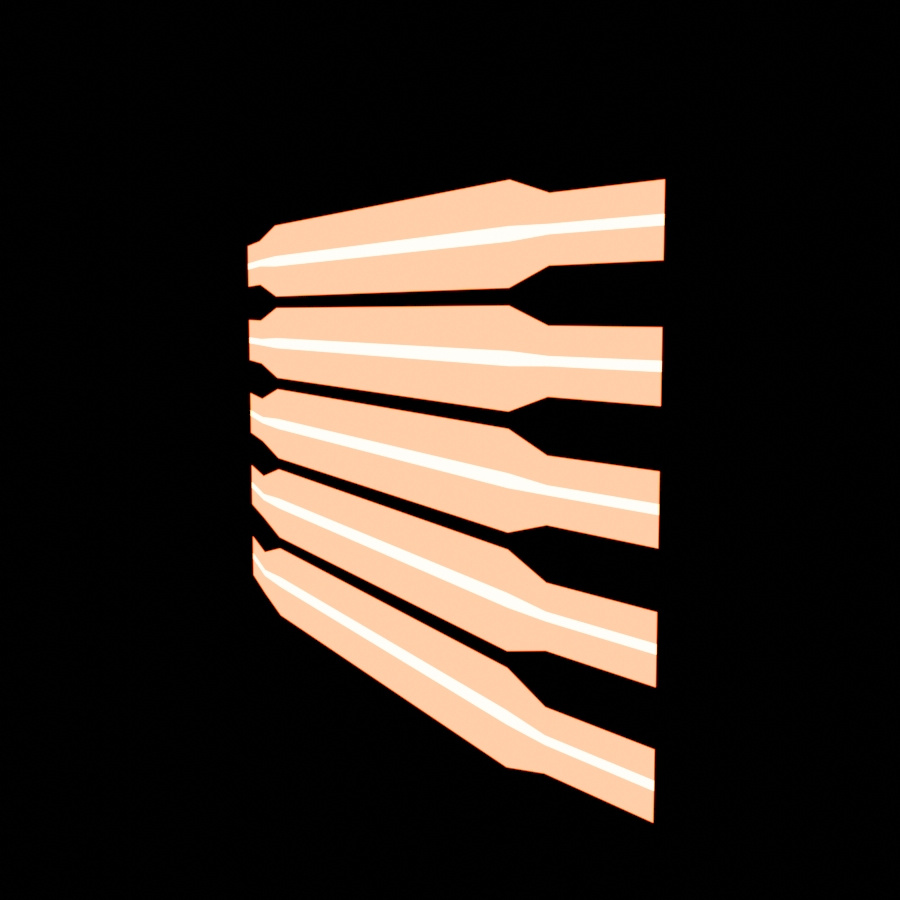
Two emission shaders with blackbody color imputs. I wanted a hotter center.
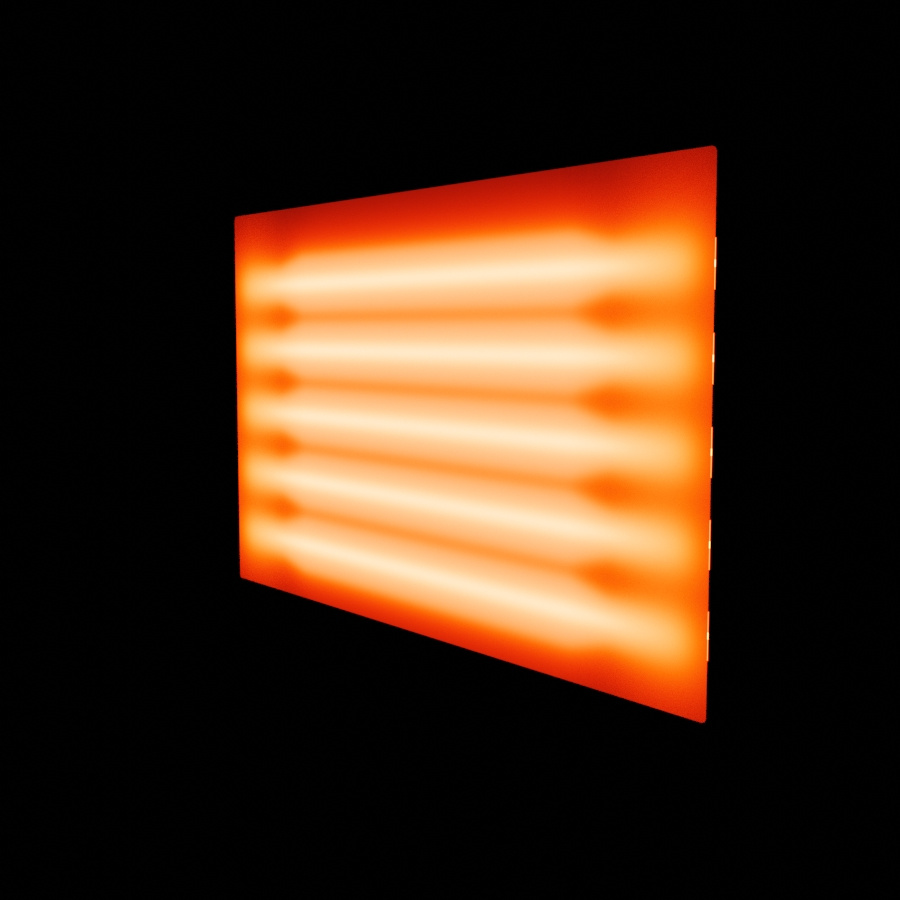
Glowing through a translucent shader. The different colors blend nicely.
Finished product. I say it works well.
Good thing about this technique is that if you have enough space in front of it, you can change the brightness by how close you are to the translucent surface, which means you can animate the brightness with motion, either with shapekeys or changing position as opposed to lamp settings. The warp glowies are also angled faces.
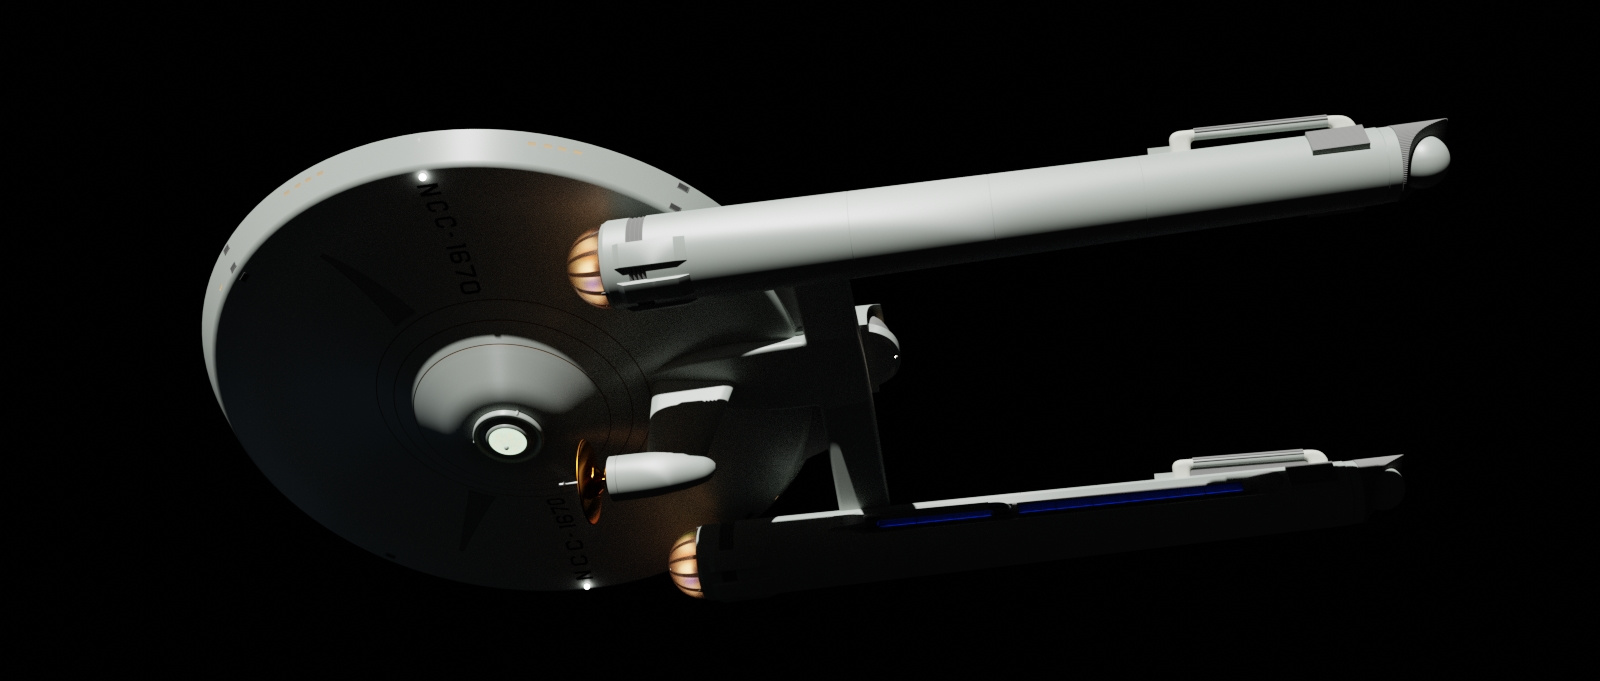
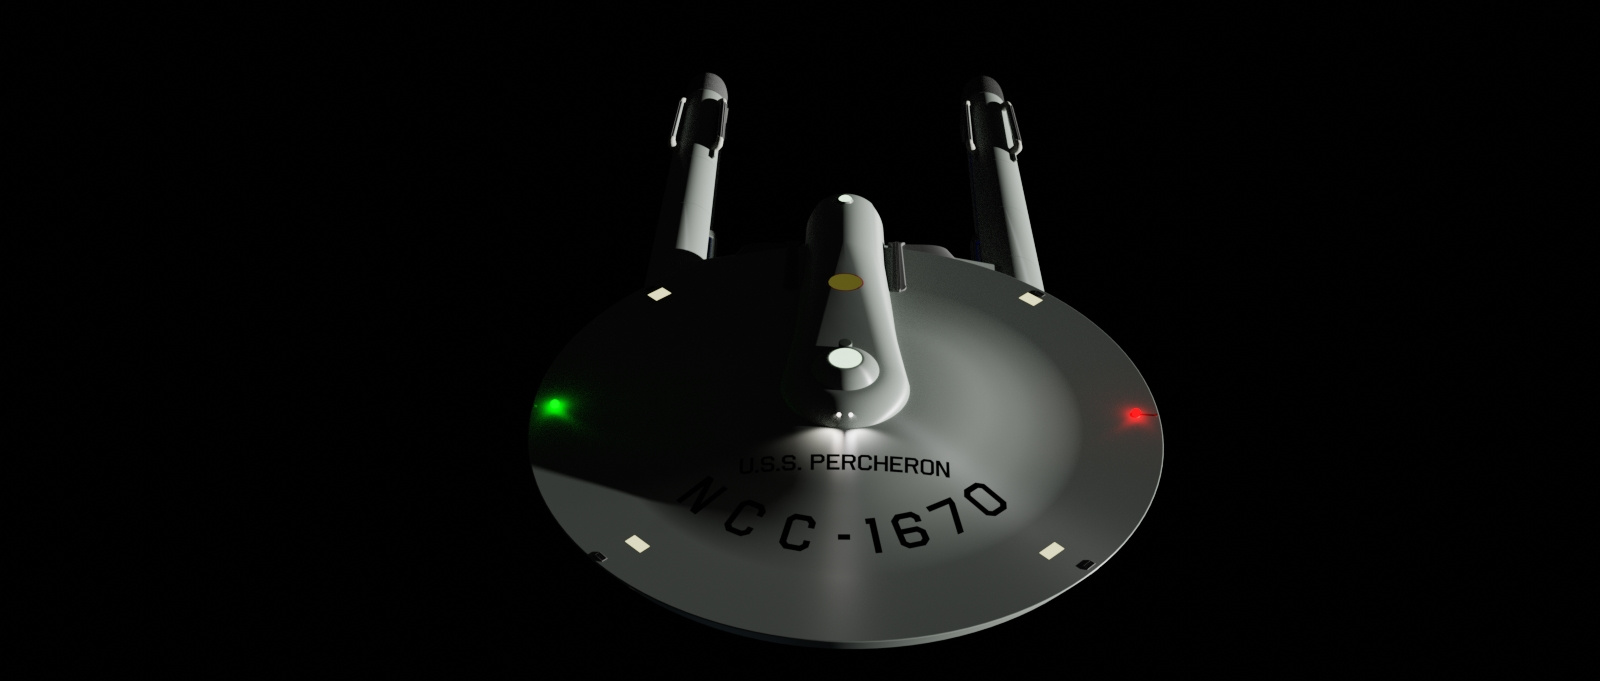
Okay, so the Percheron class is a light cruiser, that most likely carries out the same missions and tasks as a Miranda class, but I don't intend it to be the class that was refit into the Miranda. I know artists have done TOS Mirandas, and that's fine, but I think the Miranda doesn't necessarily need be a refit of something else. The Percheron is a workhorse, and they are thus named after horse breeds (I have a list). The registry was going to start at 1680, but with around 22 ships that would hit the 1700 wall. I went with the 1600s thinking that when this design style was developed, ships smaller than the Constitution would be completed first. Though they could be subsequent to contracted Constitution classes. I'm not trying to find a place in fanfic registries were it could fit. Because it won't. Almost every number has been used. I do know it is close to the Axanar USS Ares' 1650, but I'm also not trying to fit into that fanfic branch of the Trek Universe.
The design has gone through some changes. First I had a proper BC deck, but there was this ugly intersection line between it and the extended engineering/shuttlebay fuselage. Rebuilt it to merge as one superstructure. There was also a half pill shaped engineering hull up against the bottom of the aft saucer to complete the shuttlebay because I needed somewhere reasonable for the pylons to extend from, but it looked like a dorky first pass of a very bad Ares class, and I did not want that. I got renders and will show them upon request. It did not look good behind the conical structure under the saucer, especially intersecting those three channels. In that version, the pylons were extremely raked back. I really didn't know what to do with the pylons when I killed the lower engineering hull, so I shot them up under the shuttlebay and connected them, but how are the plasma conduit going to work? Well, extrude that forward under the sensor pod fin, and shape to something sexy. I played around with deflector dishes on the pylons as I had done in the past, but it wasn't appealing. So just put it on a pod and hang it from the bottom. I tried it up top, but it didn't look good.
Post edited by psCargile on


Tagged:
Additional credits
- Icons from Font-Awesome
- Additional icons by Mickael Bonfill
- Banner background from Toptal Subtle Patterns
© Scifi-Meshes.com 2001-2024
Posts
but you got some good results either way.
Current Projects:
Ambassador Class
And I confess I need to read with more attention the minu-tut about the impulse engines, and try to adapt it to 3dsmax.
That's more for Blender users, there are a few out here.
Would be interesting to see if it carries over to other modeling programs.
When it comes to registry numbers around the TOS age, you're right: between technical manuals and fanon designs, they are pretty much covered, and there's really only a few unused registries (or registries used by copy/paste designs that nobody really cares about).
Current Projects:
Ambassador Class
Yeah, JES, I knew where the shuttlebay was going to be, and that I'd split the impulse deck into two, but for the dish, nacelles, and pylons, I made mockups and moved them around until I found an arrangement that looked best. With the nacelles lower, it looked too much like the Cerrito, and I didn't want to draw that connection. So compact won the day.
And some pylon grills.
Added another dome inside the caps to try to diffuse the vanes more.
Oopsie. Doesn't make a lot of sense to have a window at waist height. Just going to have to deviate from the model and the plans.
Windows for the saucer are placed and cut. At the moment I'm using scaled down duplicated hull mesh sections with an emitting glass shader as room glow, but I plan to put some simple rooms behind those windows for realistic brightness. As you see in the prior post, the windows between the middle and bottom inset rings are, according to the plans, in the center of the deck, as discovered using a MBLabs add-on human male figure. I have the saucer scaled to 417 ft dia., and as far as I know that is proper, so I set the windows in that area up under the inset ring. I think the bottom most portholes had to be lowered. A person's head would be about 4.5 meters to the window given the angle of the wall, so I don't know why there would be windows there anyway.
I rebuilt the BC-deck/shuttlebay superstructure because, as you may be able to see in a few post above, the geometry looked bad.
Working on some minor details like the "hatches" on the underside of the saucer. Had my "Duh!" moment doing the text for the nacelles. Idiot, put a subsurface modifier before the shrinkwrap, and set it to simple. So I did that to all the text, remember I want to keep them text objects so I can edit them for different ships.
Because the Sinclair prints have the details showing the starboard nacelle, I have everything in that collection (layer(s) for non-Blender users), and I'm using a collection instance for the port nacelle. I couldn't mirror the text for the port nacelle, so I had to make new text objects, but you can't use a collection instance as a shrinkwrap target, so I first I made the instance real objects, which of course works, but if I was to add anything to the starboard nacelle, or in that collection, it would copy over to the port nacelle, and I want that option. So I undid making the instance real, and copied the faces of the nacelle under the text and flipped it to the port side to use it as a shrinkwrap target with it hidden from view and rendering. A neat trick to shrink something to something that isn't really there.
Got the lower saucer details complete. I had made the gray hatches (or whatever they are) incorrect because as I had misunderstood the prints. What the prints showed as a square, which I took to be an inset back wall, were text as seen on the many restoration photos. So I had to fix that. And I made some lamps for the registry spotlights.
Now I have to figure out how I'm going to do the phaser banks and photon torpedo tubes. Can't say I'm a fan of them coming from the sensor dome.
The back of the cowling looked a little too boring, so I brought the edges out a little bit. That was a bit labor intensive, but I discovered the ball was off-center.
I did these first, using some modern laser pods for the design. And while they look functional. . . .
They looked like googly eyes. That's just not the look I want. Plus they looked too modern and not enough TOS. I want to keep to the TOS aestetic, so I took some elements from both the phaser rifle and pistol.
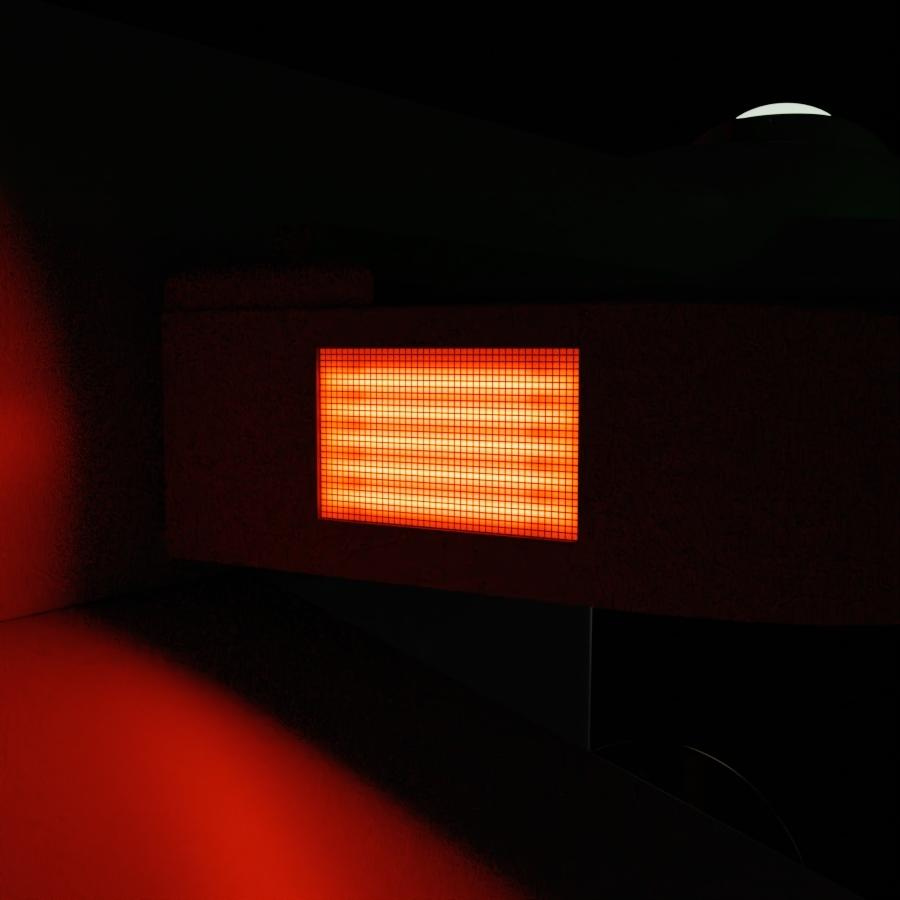
HDRI lighting isn't really realistic, but I how it shows transparencies better than the Blender lamps.
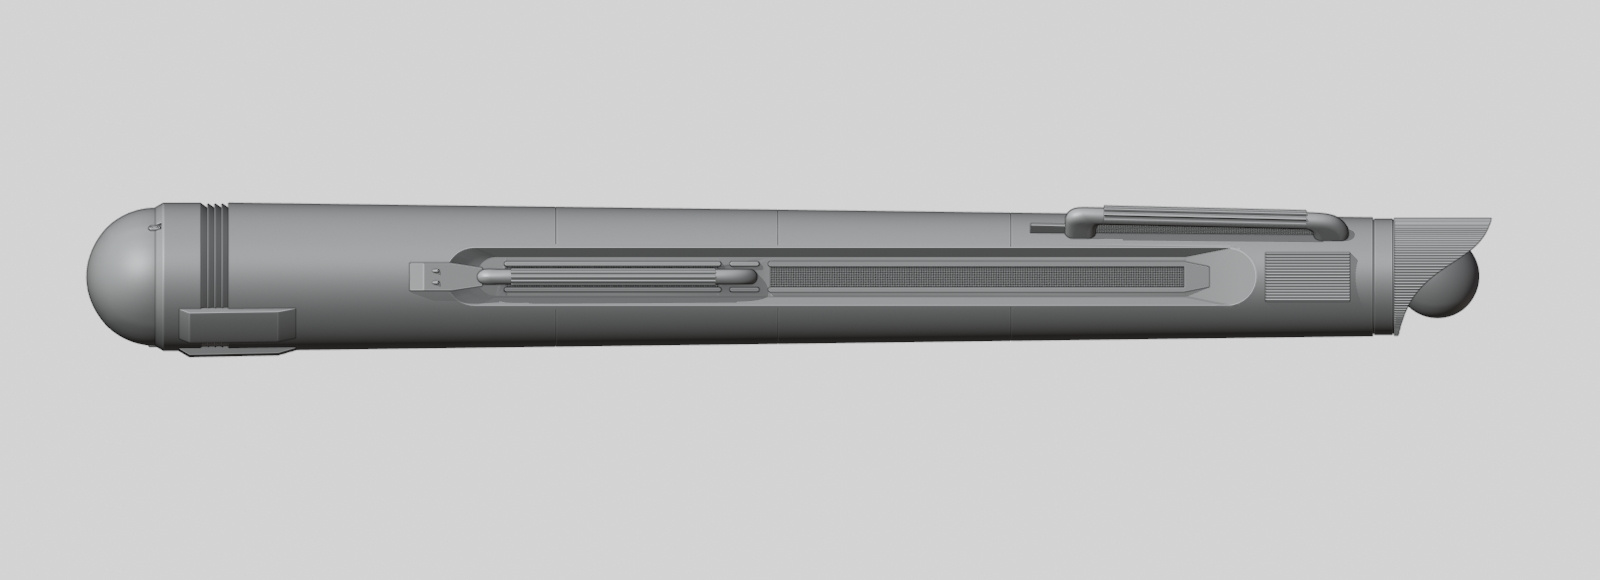
Torpedo tubes are next on the list.
Also, I discovered my USS Appaloosa NCC-1672 is in canon conflict with the Exeter thanks to the restored TOS episodes.
Books: [ Ashes of Alour-Tan | Embers of Alour-Tan ] | Blender Tutorials | Blog
It´s here: https://3d1.com.br/forum/tira-duvidas/perguntas-de-computacao-grafica/104042
André told me how to do it using the V-Ray Render and material, not the default tools and render engine of 3dsmax.
I applied all the modifiers except Bevel, and cleaned up the geometry so it all shades purty. Those Josh Gambrell tuts came in handy. Got them rigged to bones and tracking to a target bone roughly 1500 meters away. And a scale figure doing a God pose.
Finally upgraded to 2.90.1.
After punching holes into the lower saucer with Boolean cutters under the phaser turrets, and seeing how ugly they came out as stretched ovals, I began to realize why putting them on the neck of the refit made a lot more sense other than just a good place from which to fire torpedoes. I thought about putting launchers on the nav deflector pod fin, but that fin only serves as a boom for the pod. I figured I'd make a launcher and put it under the phasers.
First one I made was boxy, and I thought it didn't match the style, so I made something that visually rhymed with the impulse deck. The torpedo is stand-in for a better model. It it slightly smaller than the standard (2m x 0.75m x 0.4m), and is simply a beveled cube without the scale applied until after the bevel modifier was applied. It was the easiest way to get the shape. Animated for motion blur.
Using shape keys to animate the doors.
Having to fix stuff while I make this post. . .
The arrayed method I used on the impulse and nacelle grills would be a challenge to match the curvature of this moldline penetration, so I used the wireframe modifier with a bevel of 2 segments and angle limit set to 89 degrees to make it flat and rectangular as opposed to the usual mess a wireframe makes. The grill faces were taken from the boolean cutter that was arrayed and mirrored but did not take into account the slope of the bottom of the launcher, so when I was adjusting the height, the arrayed grills were deeper inset in the back. I want them at a uniform depth from the hull surface. I had to apply the array, and in edit mode use link select to move each grill into place. But I also want them at the same distance, so I put the cursor on the lowest vertex of the forward grill and added a single arrow empty, and rotated it to match the fore to aft angle of the forward grill, and used it as a guide to adjust the height of the other three. Arrow empties always come in handy as guides. Will not be discernible from a distance, but why be sloppy if you can be meticulously accurate?
Have all the windows I want, next step would be to add simple rooms behind them for realistic lighting. Maybe add some additional details to some of the empty spaces here and there. Was also thinking about mission packages like a pod rollbar, and extended range fuel sponsons.
Just a few added details, some rollbar pylon attachment point covers, RCS thrusters on the nacelles, some "things" on the pylon sled.
Warp core idea.
Just the general idea. After mulling over what a TOS core might look like, I decided instead of taking cues from the TMP and TNG cores, go the other direction toward the NX-01 core. It's compact, and I needed something that could be installed, removed, or jettisoned in the best likely place. This is just a rough proof of concept. I don't have any plans to do a full up engineering room, just wanted to know how it would all fit together. What's missing is the plasma conduits that would run out of the bottom.