Greetings!
Welcome to Scifi-Meshes.com! Click one of these buttons to join in on the fun.
Quick Links
PracticalTIE Standard - Revell


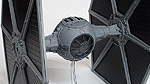
Just started laying primer down on this thing. Also did some paint touch up on the pilot. A good bit larger than my previous TIE build.

Post edited by PixelMagic on
Tagged:
Additional credits
- Icons from Font-Awesome
- Additional icons by Mickael Bonfill
- Banner background from Toptal Subtle Patterns
© Scifi-Meshes.com 2001-2024
Posts
Here is a better look at the pilot.
Different brand of kit, his DV TIE was a Fine Molds. If I remember rightly both Revell TIE kits are to scale, but it has been a while since I followed the physical kit scene, so correct me if I'm wrong.
One thing that annoyed me back in the day (when I was a kid/young adult building these things, circa 80's/90's) was that the X-Wing and TIE Fighters were built to a completely different scale. What Muppets.
Now, before painting my own model Haze Grey, I wanted to see what it looked like on a TIE model that was not studio scale. I had an old Revell snap together that I don't really care about, so I painted it TS-32 Haze Grey. To my eye, it looks way too dark at such a small scale. It looks even darker in person than in this photo. On a studio scale model it would probably look correct. The smaller a model is, the lighter you have to paint them to look correct.
So to that end, I'm going to have to make a compromise in matching the studio model, which is usually my goal, to match what looks "correct". TIEs in the movie look grey, almost white, not near as dark. What I will probably do is a mix of Haze Grey and White. Perhaps 2 parts white, 1 part Haze Grey.
Indeed. If I ever build a studio scale TIE, I will probably use Haze Grey. I am also right now building an X-wing model as well, and there is still some debate on the colors used on it. I'm just going to have to eyeball the colors of the X-wing like I did with the Snowspeeder. I think I can get a close match.
I however wanted to spray my color with an airbrush, because I feel that Haze Grey is too dark for a model smaller than studio scale. What I did in this test below was take XF-2 Flat White and XF-82 Ocean Gray 2 (RAF) (which looks very near identical to Haze Grey, just slightly darker) and mixed them 1:1...
This produced the results below...
As you can see, the results are VERY close. In person they are even closer than these photos do justice. My mixture on the left, and Haze Grey on the right. Now mine is a little lighter in shade than Haze Grey because I believe I mixed in too much white. If you did say 1.5 or 2 parts XF-82, and 1 Part XF-2, I believe you'd have a pretty much dead on match to Haze Grey. In person these spoons are almost identical.
I however, going for a smaller scale, will probably even add more white to the mix to lighten mine more, but I wanted to let you guys know what I found out.
Yeah, and I think that's it's typically a way to more accurately represent the color as you'd see it in real life given the scale. The smaller the scale, the more the colors should be subdued because if you were to see the subject in real life and it were to appear at that size given it's distance from you, there'd be more atmospheric haze between you and the subject, subduing the colors. So, the smaller the scale, the further it would be away from you if you were to observe the actual object at that size, the more subdued the colors should be.
At least that's how I understand it.
Here is an article on Color Scale Effect if you want more info...
http://www.cybermodeler.com/color/scale_effect.shtml
Stonky pretty much got the gist of it. Using the same colors as you would at full scale, when using those same colors on smaller scale, the contrast is just too much and the colors are too saturated making the model look toy like and odd.
I don't understand the full science behind, it, but I know when I've painted tiny models, such as a TIE fighter with studio scale correct paint, they look way to dark to my eye. When I take that color as a base and lighten it with white, say 1 part or 2 parts white, then the scale model suddenly looks to my eye "correct".
I try to find out what color an object really is, and use that as a starting point, and then just eye ball it from there. It has served me well thus far.
I also completely repainted the pilot, because his factory paint job was crap.
The wing looks great so far. The pilot looks frakking awesome. I'm always impressed when people manage to get such tiny details painted so cleanly.
Excellent job on that TIE Pilot too, what scale is this again? Paint job looks good enough to be an action figure.
:thumb:
Thank you for your kind words. The scale isn't listed on the box, but most model makers agree it's around 1/37th scale.
The Revell model is pretty accurate for the most part, but a major part on the back of the TIE ball is not represented by the kit. It is a detail part right behind the cockpit hatch.
Come to find out, ILM actually used a model kit part from a Sherman Tank bogie (suspension) for the detail piece.
To that end, I found a 1/72nd scale Sherman Tank for cheap on ebay and purchased it for it's suspension part.
Now, some versions of this tank have the suspension piece separate from the wheels, but unfortunately it was not the case for me. The piece was also considerably thicker than the studio model piece, but the detail was right.
I used a sprue cutter to cut off the wheels and shave down the thickness of the part considerably. I then cleaned up the roughness with an Xacto.
After noticing the thickness was still too thick, I started shaving off layer after layer with a strong Xacto again. Finally, the thickness was nearing where it should be, so I then started grinding it on wet 220 grit sandpaper laid on a strong flat surface (bathroom sink). This flattened the bottom nicely and leveled the shaving marks from my Xacto.
Unmodified pieces and the final piece...
And how it looks on the TIE itself...
One nice thing about Star Wars is that they kitbashed everything, so at least you replace missing details, if you know what kits they came from, like this one.
I also noticed the top cockpit hatch was missing a few details, and there was also no detail for the hatch bolts. I used a teeny tiny drill bit to drill the bolts and I used styrene strips to add some missing details.
New detail bits are white. If you look closely, you will notice little bolts drilled into the plastic.
And fully primed...
Seriously, that's looking great. The added details on the hatch really add a lot to it. I see some of the holes you drilled in the unprimed piece, but they really show up after you added the primer.
I suppose they had two different ones for options of how you want to build the tank. So to that end, if you guys get the same Sherman tank kit I did, you will not have to do any modification on the part like I did in my previous post. I was just being a blind dummy.
Along those lines, if any of you guys out there are building the Revell TIE Standard or Revell Darth Vader TIE, simply email me and perhaps I can ship one of the spare parts in an envelope to you.
I also went ahead and knocked out the TIE cockpit. Since the cockpit is SO inaccurate, I did not try to accurize it. I would have basically had to scratch build the cockpit to be accurate. I don't really care that much since a TIE cockpit is too dark to see into anyway.
I also did a couple of things on the TIE ball. Firstly, the panels lines on the cockpit ball seem quite too thick, so I used many coats of high build filler primer on the ball while masking everything else with tape and liquid mask to prevent their details from being covered.
I also noticed that some of the TIE ball details were represented on the kit as low detail raised areas. I wanted them to have a more accurate shape, so I cut them off and sanded the area down. I then replaced these details with scratch details built from styrene sticks.
Test fit with finished hatch...
To give the primer a bit more surface, I lightly sanded the rim with 600 grit sandpaper. Then masked off the clear areas...
After a light coat of primer, I was disappointed to see that while panel line detail from the studio model was present on the piece, it was very soft, and not well defined at all. After putting on the dark grey paint, I was certain this detail would be obliterated and not visible.
To rectify this, I used a flat file to sand deeper straight panel lines, and then used the same drill bit I did on the upper hatch to drill the bolt circles. I used the soft detail that was already there as a guide for placement of the file and drill bit.
After hitting it with a final coat of primer, and then the dark grey paint (in this case Tamiya XF-50 Field Blue), the panels now look like what you see on the studio model instead of being hidden to soft detail. The reason I used Field Blue instead of a saturation-less neutral dark grey, is because the hull color of the TIE will also have a very slight blue tint. Field Blue looks 95% grey, but just a HINT of blue. I feel this helps unify the color language of the model. Just more pleasing to the eye.
I soaked the TIE solar panel wings in 91% alcohol overnight and then scraped the black paint off easily with a toothbrush. This will allow me to prime the bare plastic and repaint over the model.
A few updates ago, I drilled bolt holes into the upper hatch that were missing. I noticed after studying a studio model, that there are also bolt holes in the bottom hatch. I therefore added them.
Lastly, I finished almost all of the detailing of the TIE ball. I shaved off and sanded down the raised detail on the ball and replaced with scratch parts built from styrene strips to better match the studio model.