Home › McC › Best Of...
Greetings!
Welcome to Scifi-Meshes.com! Click one of these buttons to join in on the fun.
Badges


McC
About
- Username
- McC
- Joined
- Visits
- 46
- Last Active
- Roles
- Member
- Points
- 373
- Posts
- 704
- Blender
- Blender
- GIMP
- GIMP
- Inkscape
- Inkscape
- Krita
- Krita
- Badges
- 8
-
U.S.S. Coronado, Katana Class Starship
If you're just joining this thread, hi! Please read the first post for some background info. Many questions have come up over and over again that are answered there. Thanks!
Thanks, evil_genius_180 and Rekkert! Certainly been a long road since that first post at this point.
Today's post brought to you by adventures in rabbit holes.
Since October's renders, I did some more reading about the filmic lighting model and various aspects of trying to cultivate a more physically-based approach to surfacing and lighting generally. One of the big shifts is the use of correct, high-intensity lights where appropriate...such as when directly lit by the sun. I decided to remove the flat environment light that I'd been using (instead replacing it with an emissive value that more or less matched actual starlight) and cranked up the intensity on my main sunlamp to match the intensity of the sun on the surface of the Earth in broad daylight. The result was quite striking:


I had some obvious sampling noise that I was going to have to deal with at some point, but as a first experiment, I was pretty happy with the result.
Still, that shuttlebay wasn't going to model itself. To give myself some direction, I put together a collage of existing Trek inspirations I wanted to pull from to use as a point of reference. I drew from stills and unused concept art of the Sovereign-class, as well as stills from Voyager of the Intrepid-class and cooked up this:

I next kicked out a render from a camera inside the shuttlebay with a wide FOV, capturing everything from the edge of the bay doors to the midpoint of the control room window to use as a background plate to paintover and plan direct features.


Thus armed with some specific items to work on, I set to work.


In all of this, I also kept futzing with materials and rendering settings. That from-the-outside-in shot above took 40 minutes to render, but I noticed that several of the tiles in the center seemed to take much longer to render than the rest of the image, and I couldn't figure out why...until I pieced together that the CPU+GPU rendering mode of Cycles was on by default in my GPU Compute render settings, and the middle 7 tiles were being rendered by the CPU, not the GPU! Dialing down the tile size to something more CPU-appropriate like 32x32 brought the render time back down to ~6 minutes. Turning off the CPU and leaving the tile size at 256x256 was about the same, so I decided to keep things simple and leave the renders as GPU-only.
Having stumbled across that, I wondered what other rendering and lighting settings I could futz with. I kept on seeing a lot of sampling noise in the renders, which I didn't want to just throw more samples at. Brute force can be the answer, but it should at least be a last resort! I did a bunch of A/B testing by changing one render parameter multiple times and then flipping between results in GIMP to see the difference. I used this approach to settle on a number of bounces for each ray type that seemed to be right around where adding more bounces made little to no difference.
Even so, with the bay open, the full ship enabled, and the bright sun lamp blasting light into the scene, it was still noisy at 2000 samples (500-2000 is where I usually render these). I did a pass through all my materials, tweaking settings and making sure there weren't incorrect settings (There were some! Escape Pods definitely don't need Multiple Importance Sampling!), simplifying half-complete experimental shader networks down to simpler ones for the sake of simple WIP renders, and so on. Still noisy.
Frustrated, I decided to really stress-test things by picking a small-but-noisy section of the image and crank the sample count up and up and up to see how high I had to go. Even at 8000, I still had noise! In a huff, I cranked it up to 12000 samples and let it render for two hours.

Still noisy! Grr!
I shared some of these images on the SFM Discord and several folks immediately questioned why I wasn't using the built-in Denoiser. In point of fact, quite a few of the earlier images posted do use the Denoiser, but I had turned it off when debugging the CPU+GPU slow render speed issue and pressed on with it off in case using it was masking some other problem(s) (like bad light bounce settings, bad material settings, etc.).
I also wasn't wild about it because I like to render out each of the passes separately and use Blender's Compositor to assemble the image piecemeal, processing different layers to achieve different effects (e.g. bloom on bright surfaces, the glow on the emissive surfaces, the radial flares on the running lights, etc.) As far as I can tell, there isn't a way to get the Denoised passes from Blender, only the Denoised final image.
However, Daemoria pointed me toward an alternate plugin that I hadn't heard about that I'm planning to give a try next!


-
U.S.S. Coronado, Katana Class Starship
Thanks, @psCargile !
Texture work continues.
Because it's come up several times when soliciting feedback, I should stress that the only (deliberate) texture on most of these is the flat color texture. I've pulled out the roughness and bump passes that I had on here before, as well as extracted out the metal color texture that I had mixed into the mess, as well. That's why the surface tends to look so much more bland than it has in prior renders; it's not indicative of a final look, but rather a stripped-down version aimed specifically at hammering out one particular kind of texture component. Even in just the color channel, I'm still planning to mix in some micro-paneling detail (see below for some experiments with this!), some procedural edge weathering, a general light scuff pass, and selectively mix how intense the actual color pass comes through.
Finished vectorizing my sketched-in panel lines from last time (Nov 14):

Vectorized the sketched-in texture detailing on the "notch" (Nov 15):

Spent some time experimenting with different configurations for what I want the blue accenting on the engineering hull to look like, finally settling on the below for the dorsal side. Also vectorized the top-side pylon texture (Nov 21):

Same, but on the ventral side of the engineering hull. This also shows some stuff I've been messing with for mixing world-projected "decals" into the texture for signage. I had previously been using a UV Project modifier and multiple UV channels to do this. What you see here is entirely in-shader, no extra UV layers required. Instead, I just use a non-rendering square plane scaled (this is important) to the desired size, and then fed through the shader via Texture Coordinate > Object, fed into a Mapping node, and then alpha-mixed ontop of the base color. There about half a dozen of these in the shader now. The banner itself is its own 4K texture, albeit not 4K on the vertical dimension (also Nov 21):

That night, I started thinking about how I might work in some procedural micro-paneling into the hull. While aztec paneling is probably Trek's most famous hull paneling, conventional aztec was less of a thing on the filming model of Enterprise-E and was also absent on the physical and digital models of Voyager, both of which have been my aesthetic touchstones for surface detail on this ship. Instead, one particular image stuck in my mind as a fascinating inspiration: the shot of Picard, Worf, and Hawk walking across the Enterprise-E saucer in First Contact. I pulled a selection of the hull out of the image and perspective-corrected it into a rectangle and have had this setting in my reference folder for a while as something to return to.


I spent a good chunk of yesterday messing around with how to do this procedurally. It started with a Manhattan-style voronoi texture and a bullheaded certainty that I could figure out how to create an "edge extract" effect entirely within Blender's shader nodes. Turned out that yes, indeed, I could!

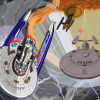
The shader node for that is pretty large, but it's also fairly straightforward. Posted here, with annotations, for anyone interested in using a similar effect:

I took a crack at a first-pass implementation on Coro herself, with promising (if in desperate need of tweaking) results. I tried letting the voronoi component of the network use the actual UVs, which in hindsight was a mistake given the varied scale of the UVs (which the main texture UDIMs account for, but generated object coordinates would not). I also need to back off how strong the color variance is, and let the roughness -- which s not hooked up to this at all yet -- do most of the heavy lifting there. But on the whole, I was very happy with the initialy results of what started as a though experiment.


-
U.S.S. Coronado, Katana Class Starship
If you're just joining this thread, hi! Please read the first post for some background info. Many questions have come up over and over again that are answered there. Thanks!
Thanks, Brandenberg and evil_genius_180!
Managed to knock out the modeling of the dorsal shuttlebay over the course of the day today. Hooray for largely-reusable elements!


Terrible denoising artifacts on that one, but meh.


Noticed some pretty nasty old topology in that last render there around the panels just below the launchways, so I next set to work rebuilding those panels from denser, more evenly distributed curves. Got through 3 of the 5 before realizing it was probably time for bed!
-
U.S.S. Coronado, a Seven Year Mission
In January 2014, I posted Coronado's first exploratory WIP images. At the time, I said I aimed to be render-complete by August of that year. I...may have missed that target by a little. Completing this model has been a labor of love spanning over seven years. Not seven continuous years of working away at it. There were lots of long gaps where I didn't work on it at all. But, at last, I'm calling her done. Lots of background details available in the WIP thread (which I still need to make a final update post in!) for anybody curious.


-
U.S.S. Coronado, Katana Class Starship
If you're just joining this thread, hi! Please read the first post for some background info. Many questions have come up over and over again that are answered there. Thanks!
Thanks, @evil_genius_180 !
Haven't been idle on this, just haven't taken the time to put together a post!
Continue to add ceiling detail and added big ol' status displays to the main columns. They're about 3 meters tall, so nobody'll miss w hat they have to say! For now, I just slapped the old MSD image that Jester made onto it, but the idea is that it'll display ship status, launch status, and Specter readiness level. That'll be a fun vector graphic to put together...

Next thing to do was the aft end of the bay, which I had been largely ignoring. The main issue is that the wall panel detailing I've been using for all the bays didn't quite coincide nicely with the deck layout for this bay in particular. After some hemming and hawing, I ended up putting a mid-deck observation/control room there, reasoning that people needing to walk up or down a half-deck of stairs was probably fine.

Originally, I had envisioned that the Specters would be retrieved similar to the way runabouts landed on DS9's landing platforms. Here's what a mockup of that looks like, with mostly-finished wall detailing:

However, the more I thought about it, the less I liked the idea of the Specters having to gently come in for a landing on a landing pad, and then be slowly lowered back down into the bay. Actuated, moving parts are neat and all, but does it even make sense here? After conferring with folks in the SFM Discord as well as some of the old Coronado players with a vested interest in this particular topic, I decided to ditch the platform and instead go with the idea that tractor emitters placed around the retrieval hatch, as well as in the floor, would be sufficient to pull the Specters back in.
Regardless, I still needed a hatch through which the Specters could return, which meant making one! Proof of concept, the timing of which almost certainly needs revisiting:
-
SDF-1 Macross
@ashleytinger Wins the prize! It is, indeed, the titular ship from Superdimensional Fortress Macross.
(I've now edited the following into the first post, with some more information about my overall plan for this project.)
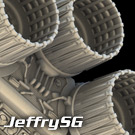
Specifically, I'm doing a direct replica of the 1:4000 Hasegawa model kit of the ship as seen in Do You Remember Love?. It's got some inaccuracies when compared with the movie (many of which aren't present on the 1:3000 toy, based on pictures I've amassed), but I'll worry about those after I finish capturing all of the parts.
I'm still working on the next part, piece J1 (and its mirror counterpart, J2). There's a large chunk still to do, which is the mount for one of the smaller forward cannons that'll go in that big empty space toward the back there.


-
U.S.S. Coronado, a Seven Year Mission
One @seanr requested on Discord (I'll see about doing some shaded area shots this evening!):

The bay interiors are unfinished right now, because I don't have any particular plans for them, but it shouldn't be too hard to finish them properly if I get the urge to do so. The black "tarmac" areas on both the Specter and upper bays are meant to extend into them, for reference; that jarring shift from dark to light is just a byproduct of the unfinished interior textures.
And @admiral horton's requested orthos:


-
U.S.S. Coronado, Katana Class Starship
I've spent the last several days making very little progress on textures and continuing to obsess over the hull shader. Discord quote of the year:
lewisniven wrote:2071, the grandchildren play with their hoverboards in the garden as grandpa McC further tweaks his hull shader
I keep finding things that are leftover -- or built in a way that's no longer valid based on my current approaches -- in my shader that are "corrupting" the look I expect to get out of it.
Since I had broadly homed in on the major material properties I wanted already, I finally felt comfortable following @Viper's suggested approach of dropping the ship into a color-corrected HDRI lighting environment, rather than space lighting, and adjusting material properties from there. The following images represent that shader exploration over the course of 1/29 to 2/1, with the last one having more-or-less finally achieved a look much closer to what I intended -- thanks in part to tweaking some settings based on this approach, but also thanks in large part to tearing the shader down to its constituent pieces and adding them all back together bit by bit, ensuring that everything was combining exactly as I intended and expected.


After that, I did a little rework on my textures themselves, mostly nudging colors around. In particular, I made the textured gridlines brighter than their underlying surface by a uniform amount across the whole ship, and I made the medium-gray armor panel lighter commensurate with the "off white" panel color's distance away from white, so the ratio between them is now the same. I finally shifted the escape pods away from their sandy color and to a more off-white/creamy color, as well.

I'm fairly happy with where this is now, though there are a handful of relatively small tweaks I already see that I need to make: reduce the bump depth on the panel lines and the panel line color on the dark "cape" (and possibly on the blue panels) is a little too dim to make out properly. Still, those are fairly small changes and I feel like I can finally move forward with further texturing work now.

-
U.S.S. Coronado, Katana Class Starship
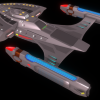
I next spent some time adding some much-neglected accent lighting around the ship, and retooling the way I had been handling my running lights. In particular, I was missing the white hotspot in the middle of the otherwise colored light, so I revised how my running light object was built in order to achieve that look. I also spent some time placing decals like the ship identifier and Starfleet pennants on the flanks of the stardrive and under the nacelles.


I moved on from there to finishing the last set of textured panel lines needed on the saucer wedges, which also prompted some rebalancing of my base metal "grunge" texture that feeds into the painted maps.

At last, it was time to tackle the nacelle textures.


About this time, I started to realize that my UV layout for the nacelles was garbage. Even with 4K maps, details painted into the texture were looking too low-res up close. The nacelle was also set at bit of an angle, which made all of the panel texture painting a giant pain. I set about completely re-UVing the main body of the nacelle, in the process switching it to use its own 4x2K texture instead of a 4K square texture that it shared with the Nebula-style sensor panels on the ventral saucer. With the nacelle now easier to work with, finishing it up happened fairly quickly.
Unfortunately, I ran into a hard limit in Blender/Cycles with my shader at this point -- it had grown too deep to render anymore, and was showing up all black. I decided at this point to "bake out" a large 4K image of my micropanels, rather than rely on them being entirely procedural (which required quite a few nodes). I'd still keep the procedural conversion between triplanar and polar coordinates, but there was no need to keep the four distinct Voronoi procedural texture networks that comprised the layers of micropanels at this point -- I hadn't tweaked those particular settings in quite some time. This also gave me a chance to simplify my math a little bit, which has had a very welcome impact on shader compilation time in the viewport, and even some impact on Cycles render time.


I next spent some time rebuilding the procedural shader on my warp nacelle grilles, aiming to get a better lighting result while still remaining fairly true to the Sovereign-style nacelles that are their inspiration. This involved a little bit of rethinking, switching from using stretched Checker textures to simply using some sine math on the UV map itself to determine the masked-out bands where the dark copper nacelle spacers would be and the gradual dark-to-light fade for the emission surface. I can also turn the emission of entirely, which results in a sort of flat, dull gray surface that matches what you might see of the ship when it's powered down.

Hull shader work, it seems, is never done. As I worked on finishing the panel lines on the flanks and spine of the ship, I continued fiddling with the color, roughness, and bump mix for the micropanels. One major "advance" here was better parameterizing my polar coordinate conversion node group so that I could independently control the latitudinal and longitudinal scaling of the texture; previously, they had been directly linked, which resulted in major stretching on the rim of the saucer. I further mixed in some slight perturbation in the IOR/Specular value informed by the micropanels, still centered on an IOR of 1.585, but fluctuating between 1.5 and 1.67 now.


The second image here can be directly compared with the similar image from two paragraphs back to see the changes in glossy reflections, color mix, and tiling.
I remain unsatisfied with total shader result, though; it continues to look "too CG" to me in most renders, which is frustrating.
-
U.S.S. Coronado, Katana Class Starship
If you're just joining this thread, hi! Please read the first post for some background info. Many questions have come up over and over again that are answered there. Thanks!
I have not been idle these lasts two weeks, but I sure have been frustrated!
My issues fighting sampling noise continued and occupied most of my Blender attention, leading to slow (but steady) progress on the actual detailing of the aft shuttlebay. I'll spare everyone the gory details; suffice it to say, I tried many, many denoising approaches, got a lot of great advice from the braintrust on SFM's Discord, manually compiled a few 3rd-party denoising plugins (the D-NOISE plugin linked above, Intel's OpenImage Denoiser) and tried those, until finally deciding to just dive into a brute-force analysis of the different permutations of settings for Blender's internal denoiser. I planned to try a full range of denoising radii from 2px to 16px, strength settings from 0 to 1, and feature strengths from 0 to 1, rendering out images for all combinations. It was a daunting number of snapshots to capture, but I was at wit's end! I started comparing the various initial results using strength and feature strength settings of 0.5 and noticed that one of them among the rest looked pretty good...
...oh, wouldn't you know it: the default denoiser settings!
Sigh.
Anyway!
Here's the bay interior finished (for now; I'm going to come back and add some floor guide lighting once I put some textures down to indicate landing areas):


Ready to move on, I headed up to add some tiny, low-poly furniture to the officer's lounge aft of the bridge. The layout and shape of this furniture follows a 2D plan view done by one of the Coronado players back when the game was still running.

Odds of any particular render actually showing this furniture is pretty small, but the room and its windows are large enough that I didn't think relying on the apparent parralax of a textured box alone would do the trick.
Next, onto the upper shuttlebay!


Additional credits
- Icons from Font-Awesome
- Additional icons by Mickael Bonfill
- Banner background from Toptal Subtle Patterns
© Scifi-Meshes.com 2001-2024