Home › McC › Best Of...
Greetings!
Welcome to Scifi-Meshes.com! Click one of these buttons to join in on the fun.
Badges


McC
About
- Username
- McC
- Joined
- Visits
- 46
- Last Active
- Roles
- Member
- Points
- 373
- Posts
- 704
- Blender
- Blender
- GIMP
- GIMP
- Inkscape
- Inkscape
- Krita
- Krita
- Badges
- 8
-
U.S.S. Coronado, Katana Class Starship
Happy with the results I was getting out of my polar coordinates and micro-paneling shader networks, I couldn't help but feel like I had to finally solve the overall shader problem: how do I make this hull look good? What does "look good" even mean? I received a great deal of advice and heard from a wide variety of perspectives, but the fundamental problem facing me is that I didn't have a strong sense about my "look target" for the hull.
In starting to explore that, though, another problem presented itself and demanded my attention first: the way I had done the saucer registry thus far -- and in previous renditions of the model, even -- just wasn't cutting it for me anymore. Squashing the name onto the same sort of plate as the registry made the name look cramped, and having them side-by-side like that bucked a pretty universally-consistent tradition throughout nearly every Starfleet ship of "big registry, smaller name above it". Even weird setups like the *First Contact* ships, with their strange placement for this text on the hull, were consistent about the rule. That signaled to me that I needed to put the registry front and center on the saucer, interfering surface detail be damned. Thus sparked a *whole* lot of fiddling with different font sizes, font kerning, placement, and so on, to finally settle on this:

In the course of figuring that out, I also noticed that my rooms had seemingly all gone dark...and with good reason! When I arranged all of the UVs of the various objects that make up the ship into a unified set for UDIM textures, I had moved the room UVs into "negative" UV space, since they weren't part of the UDIMs and were instead handled on their own. But! The shader I had been using expected them to exist in the 0-1 UV range. A few shader tweaks later to account for their new negative coordinates, and Coro's crew were no longer lost in darkness. I also finally added the beginnings of a room-by-room randomizer to the shader that selectively disables their emission based on their UV island index, meaning the crew wouldn't always be blasted with light, either.


With those issues settled, I returned my attention to the hull shader. Since Enterprise-E is probably Coro's closest relative in terms of hull patterning, I decided that that would be my "look target". I concluded that the only way I, personally, could really figure out how to translate "hull looks like Enterprise-E" into shader parameters in Blender was to choose a few screengrabs out of First Contact -- I wanted shots where the ship was depicted by the physical studio model, or else I'd just be chasing a CG target -- and try to achieve an approximate match in the way presumptive light interacted with my hull shader that aligned with the screenshot.
Brief aside about that. In my shader exploration, I had indeed studied a number of photos of the model itself, outside in broad daylight. Trying to match that, though, would not achieve the result I was going for, because what the actual mode looks like in actual sunlight is not what the depicted spaceship looks like in depicted sunlight. All manner of studio lighting fakery, multi-pass compositing, and so on factor into how Enterprise-E looks on film where it is supposed to be lit by "sunlight", vs. how the studio model looks in a parking lot under real sunlight. Fundamental to what I was after is asserting the premise that what we see on screen, after all the movie magic has been done to the studio model, is how the ship "really" looks.
Armed with that mission, I selected three shots: the opening reveal of Enterprise-E with the nebula behind it and two shots related to the deflector dish spacewalk. In all three, I also took as a given that the ship was being key lit by the sun (an admittedly questionable assertion for the nebula shot), allowing for some color variation -- again, I was after getting the hull to react to light as desired, not so much worried about color-matching. For the Earth-orbiting shots, this felt like a pretty solid assumption. Finally, I allowed myself to use either an environment image (specifically for the case of the nebula; I essentially took the screenshot itself and applied a sharp curve to it, then cranked up the intensity of the output to make it simulate an HDRI) or a wide-angle fill light, to account for the typical high-illumination way in which most physical model shots in *Trek* are typically lit, whether it makes physical sense in the scene or not.
I stripped all my textures off the hull so I was playing purely* with the parameters on Blender's Principled BSDF. Here were my initial results:


* This isn't strictly true; I actually applied a very fine noise to the color, roughness, and bump channels to give the surface the faintest bit of imperfection. I would end up retaining this noise as a foundational element of the new shader.
The biggest surprise for me was how dark I needed to make my base color: 28.9% gray. Baseline roughness sat around 38.5%, with a IOR of 1.585 (which works out to a Specular value, using the Principled specular formula of around 0.64).
The next hurdle was figuring out the right mix for my micro-paneling detail, which was at this point also serving the role that aztecing often does. I put together a few different options, being careful to ensure I stayed roughly in that ballpark roughness range I had identified, and polled a bunch of folks on what they thought looked best.

The end result of that feedback:

What followed (and continues) was a whole lot of adjusting color texture colors and how those mixed in, as well as rebalancing all my existing roughness and bump maps to mix properly to follow with the look I had now pretty firmly established for myself.


The middle two images there also include some experimenting with doing a better-looking "bloom" composite pass...still very WIP, though. The final image there was done by request, and revealed several things: my key light in that setup needs to be bluer, the registry light is too bright, and I forgot to turn the nacelle grille glow on!
On with 2021...


-
Ambassador Facelift: Meet Aurora
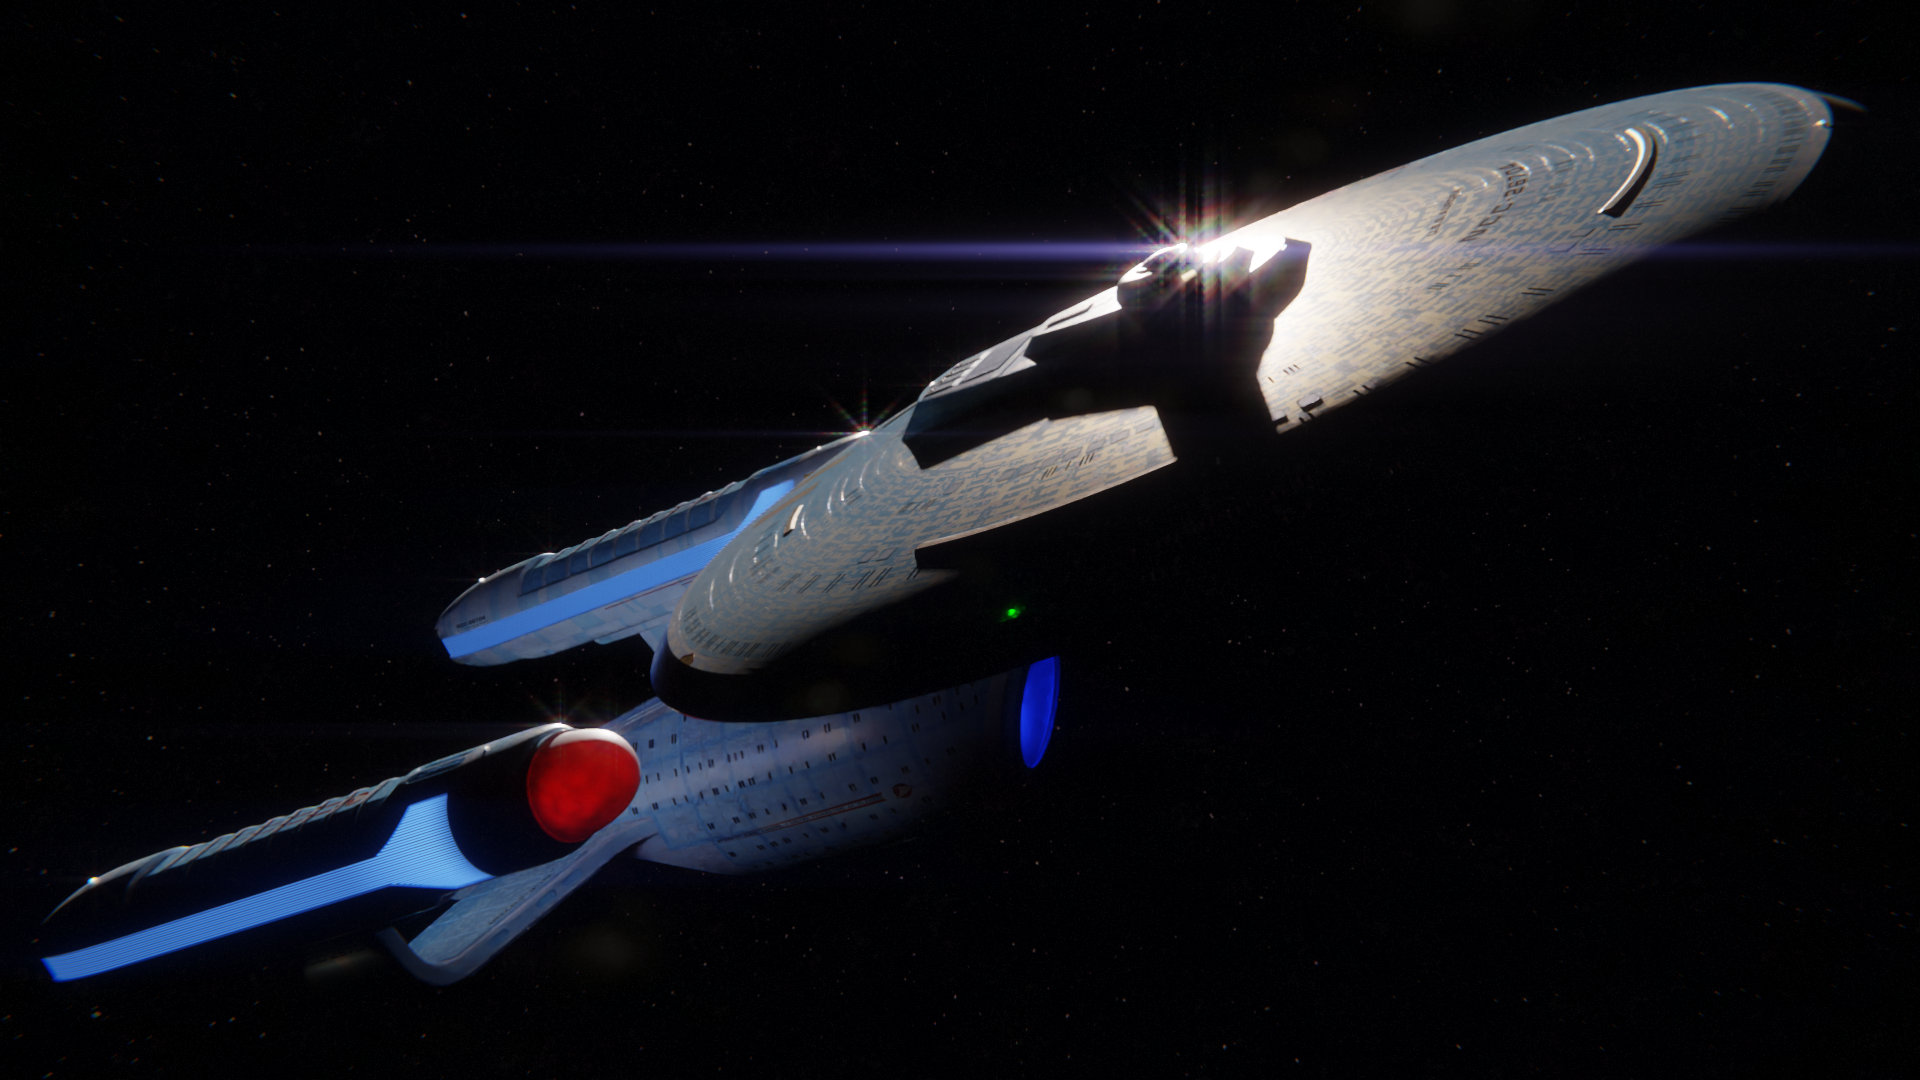
Eight years ago, I finished my Ambassador-class model, then-named USS Trafalgar. A few months ago (mid October or so), I went to see what I could salvage out of the remnants of the files I still had after the hard drive failure I mentioned here, and then proceeded to give the model a facelift. I didn't want to rebuild it entirely; instead, my goal was to fix mesh errors, correct (some) topology issues, update (or recreate, where they had been lost entirely) the textures, and overhaul the shaders based on all the stuff I had learned working on Coro.
I ended up doing far more than I originally planned, but I feel good about the end result. Meet USS Aurora.


Full list of updates:
- Modeling:
- Fix nonmanifold geometry throughout
- Add glass to window portals
- Add ribs to deflector glass
- Add a mount point for the belly strobe light
- Recreate hull and stardrive "shells" to use as DataTransfer sources to correct normals
- Create a new, conformal escape hatch based on the higher-detailed escape hatch used in Star Trek: Generations (previous version was loosely based on Voyager's hatches)
- Remove some of the existing stardrive windows and replace them with others more consistent with the rest of the ship
- Texturing:
- Fix UVs, especially on the saucer
- Switch textures to UDIMs
- Re-create all original texture masters in Krita (formerly, Photoshop), including layer comps
- Re-create all base color textures as vector files in Inkscape, sourcing colors from color-corrected photos of the studio model
- Re-create the nacelle texture from scratch
- Update the stardrive texture to remove some weird curves from the dark blue "grid" area
- Shaders:
- Revise every material the model uses
- Ditch the Principled shader in favor of a custom-built shader mix network that uses "real" Fresnel to blend between Diffuse and Glossy, and also correctly accounts for microsurface apparent roughness falloff based on angle. Planning to write Wrote up a little guide on this one.
- Update escape hatch material to use deliberate, rather than random, numbering, the way I did for Coro
- Update all interior rooms to better match real-world lighting values, and to color-shift based on different alert statuses
- Investigate (with major credit to @PixelMagic for doing real-world empirical research) how the interference paints on the refit Enterprise actually work and integrate those findings into the hull material. Planning to write up a little guide on this one, too.
- Create a random-scatter "visual interest" texture mix that places small markings all over the hull (inspired again by an idea from @PixelMagic ). Yep, planning to do a little guide for this one, as well!
- Miscellaneous:
- Modernize the running light setup, based on Coro's
- Pull "decals" out into their own hull-hugging objects so they don't contribute to hull shader complexity
- Add a bunch of signage/registry illumination that I didn't have before and that didn't exist on the studio model, either
- Revisit the compositor mix I developed for Coro and further refine it
If I revisit the Ambassador class again in the future, though, I am definitely starting from scratch!
Enjoy!


- Modeling:
-
U.S.S. Coronado, Katana Class Starship
Time to do an actual update now!
Even before the crash, I made several changes that I only ended up posting on Discord. First, as mentioned in the last post with updates, I backed off on the big dark area behind the upper shuttlebay and instead made it more of a U shape, with additional landing lines and such. This was from March 21:

Looking at that, it became clearer and clearer that my little "porthole" windows in the insets on the saucer just weren't working, so I replaced them with more Voyager-esque inset windows instead. This was from March 25:

I also started having serious misgivings about the "spine" and why such a huge dividing feature would run through the middle of an otherwise contiguous flight deck. After a lot of experimenting, I ended up with this more subdued piece. This was April 2:

Then the crash and such happened. When I finally got back into it, I decided that I still wasn't happy with the above solution and decided to throw the full-length spine out entirely, in favor of having it terminate with the other hull plates in that area. This was October 31:

That, of course, left a big gaping hole in between the two Specter doors, and someone suggested putting a flight observation room there, so I mocked one up just to see how I felt about it. I wasn't sure straight away, so I let it sit for a bit to think it over. This was also October 31:

A few days later, we (some of the old Coro RPG folks) got to discussing the flight procedures for the Specters and it turned out many of us had misunderstood how it was intended to work. The "top" doors were meant to be where they launched from and the aft doors were meant to be how they returned to the ship. I had been treating the aft doors as egress, including a little aircraft carrier-like catapult launch track for the Specters. The original intent had been for them to be raised on a variable gravity platform for launch, and then that platform would launch them in pretty much any direction, with huge initial velocity, that the situation called for. This called for a couple of changes to the area: ripping out the catapult "strips" on the deck (which I was all too happy to do!) and restoring the interior elevator platform. I also reduced the overall height of the aft doors, in part because they were playing merry hell with the sense of scale in that area. I ended up going with a revised two-piston platform, drawing inspiration from some of the model kits I've seen of the Constitution refit's shuttlebay and the shuttle lifting platform inside it used to elevate shuttles to the launch deck from storage. This was November 6:

I revised the shape of the exterior flight control station, which at this point I had settled on as a worthwhile feature to keep. I drew inspiration for the window shape from the flight control station on the Sovereign dorsal shuttlebay, which resulted in the following. This was from November 7 (and please ignore the UV wonk on the spine!):

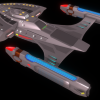
And, to sanity check how it looks in deep space:

At this point, having burned a lot of unexpected time on remodeling, I decided that the model is now geometry locked. I'm not going to make further structural changes, no matter how compelling. The only changes to geo henceforth'll be driven by render errors or UV issues and the like.
So, back to texturing!
Most of my texturing source files got corrupted, but most of the textures themselves were still around, so I can reverse-engineer a lot of that without too much trouble. My vector documents for making precise panel lines and things are also still intact. To that end, I decided to just start doing some direct on-model texture painting in Blender to sketch out what I wanted to do with more precision in the final texture comp. The following are the results of the initial work in that direction, all from November 10:


The stardrive/engineering hull in particular has only had a little bit done to it so far (top and underside of the pylons and the ventral "notch") -- the lateral/dorsal surfaces remain flat color at the moment, but I don't intend for them to remain so. The big dark patches on the underside of the saucer are meant to be similar to the big sensor pod on the Nebula class.
Obviously, a whole lot of shader work left to do, as well.


-
Quick Greebling in Blender
Here's a nifty trick I stumbled across and then fleshed out a bit more, which I think will be of use to a lot of the community. Props to YouTuber Ryan Devenney and this video for inspiration.

Greebles. If you're modeling a spaceship, chances are you're going to need some greebles at some point. While precise replication of an existing studio model may demand exacting modeling of each little cube, pipe, and hemisphere dotted across a ship's surface, most of the time that level of exacting replication isn't necessary. That's where this technique comes in handy.
First, a demonstration of the general principle.
I. General Purpose Tutorial
1. Base object
Create a cylinder. This is your hypothetical starship hull. It could be a cube or a plane just as well, but doing it with a cylinder proves this technique works in more than just easy cases!

2. Make greeble objects
Now, create some other objects. These will be your greebles. They can be whatever you want. Make some boxes, with varying scales. Make an icosphere. Make another cylinder. Anything you like. Don't spent more than 30 seconds on any of them. The point (for the moment) is not building a crazy greeble library (though this technique can be applied to one!). I moved the pivot points/origins on some of these objects to be on their "bottom" face. The only thing I strongly recommend is that you not make the "bottom" of each object coplanar with the others, relative to their origins. Vary them a bunch. We'll touch on why later.

3. Collect 'em all!
Add all of these objects to a Collection (Ctrl G, by default). Call it something memorable.

4. A hairy situation
Back on your cylinder, go to the Particle Settings tab of the Object Properties panel. Click [+] to add a particle system and change it from Emitter to Hair. Yes, Hair. We're going to adjust some Emission settings later, but you can leave them as-is for now. Do turn on Advanced and (then) ]Rotation, however.

In the particle settings, go down to Render and change Render As to Collection. Under the now-present Collection submenu, choose your Greeble collection. You'll immediately see some cool stuff, but make sure you turn on: Pick Random (so objects are chosen at random from the collection), Object Rotation (so you can rotate your greeble objects to reorient, if needed), and Object Scale (so that you can scale them and see that respected). Go back up to Rotation and set Orientation Axis to Normal, so that our greebles are oriented to our object's face. The rest of the settings can be left at default. Phase can be fun, as can Randomize Phase. Randomize itself is not as useful because it leads to chaotic greebles, but play around with it to your heart's content.
Having done that, you may also want to rotate some of your greebles at this juncture!

If you want to adjust the proportion of the objects, so that some appear more often than others, you can do that under the Use Count section after checking the checkbox. If you have one object you only want to appear once for every 100 objects, you can set it to 1 and then evenly divide 99 amongst the others available, for example. Maybe I want my icosphere and smokestack greebles to be relatively rare, so I'll set them to 1 and the rest to 5.

You may have noticed that we just have a band of greebles along our cylinder right now. That's governed both by our cylinder geometry and the Source settings under Emission. We could just subdivide our cylinder to get more greeble bands, but instead, let's change Distribution from Jittered to Random* and crank up Number to something like 2000 -- thisis why you keep your initial objects simple! You can also adjust Hair Length (which governs object scale) if needed. Segments can just be 2 (the minimum), since we're not actually trying to use the Hair system to do Hair here.
* (Sidebar: you can use Jittered and play around with Particles/Face and Jittering Amount to get nice-looking distributions, as well, and for some seed surfaces this may be the exact right thing to do. For this example, Random worked better.)

4. Make it real
Alright, now we've got this virtual greeble surface geometry. How do we make it real? Flip over to the Modifiers tab and you'll find a modifier for our ParticleSettings, with a handy [ Convert ] button on it. Push it! ...and then wait a while for the "hair" greebles to bake into a single object. Unfortunately, this appears to be a single-threaded process, so it can take some time. Eventually, you'll find yourself staring at a whole bunch of selected objects (2000, to be exact!). Cool!
Once you've done this, remove the particle system from the Cylinder object!

5. Mass-Booleans (Optional)
But wait...trying to mess around with 2000 objects sounds awful. Can we do anything about that? We can, and our saving grace here is the BoolTool addon that comes bundled with Blender. BoolTool is aimed at making boolean operations slicker. It's still the basic boolean modifier operations under the hood, but it's a nicer interface for certain operations...including mass-applying boolean operations to several objects at once!
How you approach this depends largely on your system. With a beefy enough system, you (probably) could select all 2K greeble objects and run BoolTool > AutoBoolean > Union, then walk away for a few hours while it churned through everything. For my part, even with 2K objects, I was inclined to pick smaller batches to do at a time, starting with just 10 and then working up until I found a number that felt like a decent balance of "Blender is just busy" and "...did Blender crash?" responsiveness. 50 took about 20 seconds; 100 about a minute. I settled somewhere between 100 and 200. The other potential issue here is that if one boolean operation starts causing nonmanifold geometry that propagates boolean errors forward, the entire operation will end up with a garbage result, so doing them in smaller batches lets you catch this earlier.
Note 1: you need to make sure one of the objects in your selection is the active object, or BoolTool will give you an error.
Note 2: Boolean operations hate overlapping faces (and objects with malformed/inconsistent/wrong-facing normals!), which is why I advised not making any of your greeble objects have coplanar faces relative to their respective origins! If you find your greeble objects are resulting in terrible boolean results, one trick you can try is using Object > Transform > Randomize Transform with all of your greeble objects selected, and restrict the randomization to location and/or scale, keeping the variations very small. This will jitter the faces enough per-object that the boolean operation should complete OK, without drastically affecting the placement of your greebles.
Note 3: It's not strictly necessary to boolean all of them together, and in some cases you may not want to, but the next step is made easier by doing so, and if you intend to apply a geometry bevel (as opposed to shader bevel) to your greebles, having them be a single object will make those beveled edges look nicer.
6. Detail applied
One benefit to combining everything into one object -- although, admittedly, BoolTool would allow you to do this without having to combine everything, too -- is that you can then further carve up your greebles to fit them to specific places on your geometry, which in turn also makes them take on additional unique shapes on top of what they've already got.

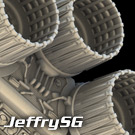
II. Practical Example
To put my money where my mouth is, here's an example of using this technique on a part of my Coronado model. The sensor wells were looking a little bare with just the big greeble objects in place; too plain. To fix that, I chose a small subset of the faces on which I wanted additional surface detail and duplicated + separated them out to their own object. I applied the method above, then created further boolean objects from the larger original surfaces in order to isolate the greebling detail to just locations where I wanted it.

Hope this is useful to you!


-
U.S.S. Coronado, Katana Class Starship
If you're just joining this thread, hi! Please read the first post for some background info. Many questions have come up over and over again that are answered there. No, this is not the Insignia class. Thanks!
Texture, texture, texture! Plus messing around with shaders and not being happy with any of my experiments. I've (at least for now!) resolved to leave the shader fairly simple for now and will circle back to roughness and bump maps after I get all the colors and such sorted out.
Most of the texture work is done in Inkscape (open source equivalent to Illustrator).
Mar 10:

Shader iteration over the course of Mar 10 through Mar 14. I have yet to shake the feeling that it looks too much like a plastic model or toy in the shots, which is super disheartening:


Phaser hazard markers from Mar 15:

Blocking in some more color areas and general markings, from this evening:

I'll probably back off of the big dark landing area aft of the shuttlebay. That was lifted from the aft bay of the Sovereign-class, where it's a much smaller accent. Might keep some of it, though -- maybe make it U- or V-shaped instead.
The grind goes on.

-
U.S.S. Coronado, Katana Class Starship
If you're just joining this thread, hi! Please read the first post for some background info. Many questions have come up over and over again that are answered there. No, this is not the Insignia class. Thanks!
Thanks, @Brandenberg! Life has change profoundly, but also remains the same in a lot of ways!
Been madly UVing since last post, finally getting everything to a point where I think I'm happy with it. With the UVs sorted, I plunged back into texturing in earnest. Right now, I've got a generic hull panel mixed into the shader that is just mapped with blended box mapping. I don't intend to leave it in that state; the hull panels will get properly incorporated into the textures once the other features are in. For now, it's there just to give me something to reflect light off of and see how the surface roughness is coming together.
UVing, from Feb 26, 27, and 29, using checkerboard textures to check scale across both islands as well as different UDIMs.


Texturing finally beginning anew (albeit with the previous texture work used as a reference), from Mar 1. Some pieces still have checkerboard scale textures on them, other places have islands with solid, bright color for quick identification.


More incremental texture work, from Mar 3 through this evening.


-
U.S.S. Coronado, Katana Class Starship
More texture and shader work across the ship. Entering the home stretch now.


-
Beyond Principled: Tackling some of the weaknesses of the Principled BSDF
Most Blender users are familiar with the Principled shader, and probably use it as the foundation of all of their materials. The Principled shader, based on a white paper put out by Disney enumerating their principles for creating a physically-based and artist-friendly shader, was a widely welcomed update to the convoluted node networks necessary to achieve similar results in Blender up to that point.
Over time, though, cracks have appeared in the Principled shader's gleaming armor.
For one, it is not an "energy conserving" shader; that is, it has the potential to reflect more light than it receives, in violation of what real-world materials do. While its energy gaining properties are relatively minor, it's easy to reproduce using a "white furnace" test: create a box with its normals facing inward and give it an white emission shader with a strength of 1, then place a sphere inside it with a white Principled material applied; the edges will be brighter than the rest of the sphere.
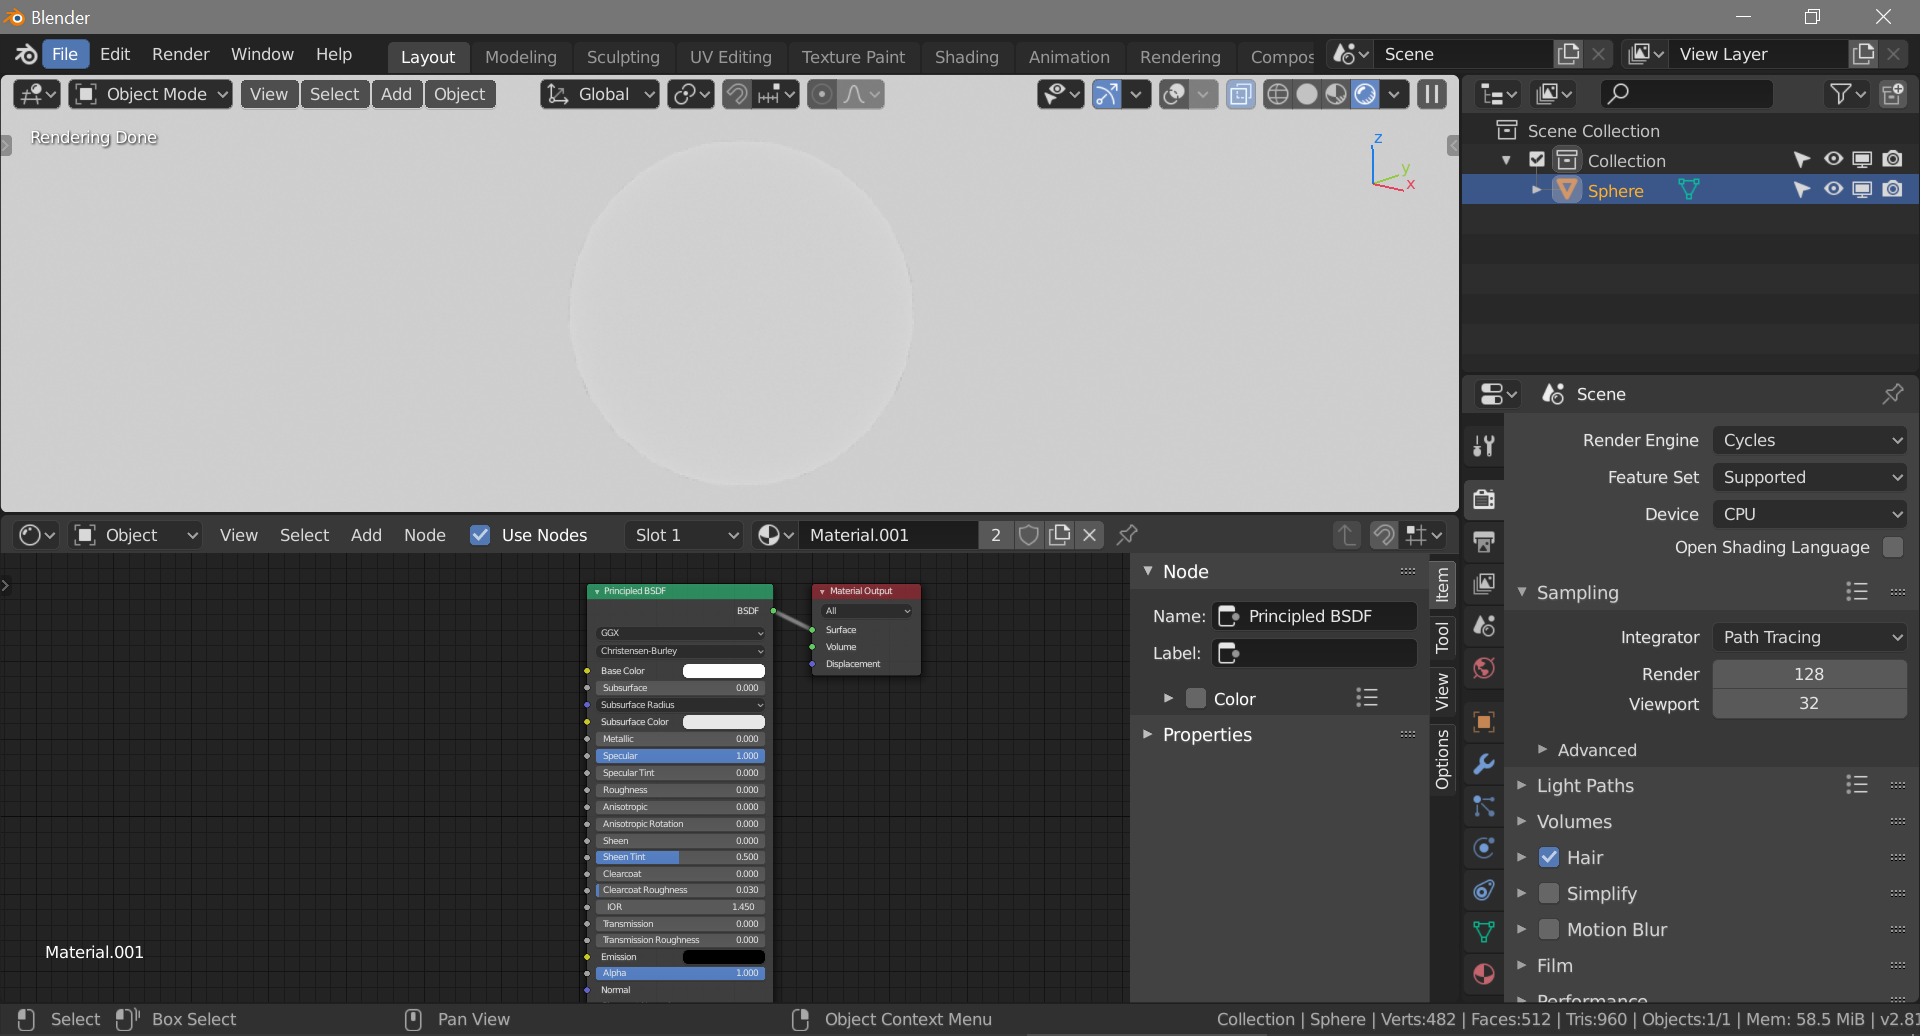
For another, although it correctly accounts for the Fresnel effect when blending between its albedo (diffuse) and reflective (specular, glossy) at various view angles, it does not properly account for the phenomenon of rough materials to seem much more smooth at glancing angles (c.f. a rough stone building exterior that, when viewed from an extreme glancing angle, takes on a mirror-like appearance). This effect is often referred to as micro-roughness. It can be forced by including a very fine noise texture in the Normals of a material, but this solution tends to be costly and artifact-prone. YouTuber Chocofur has a good video that describes a workaround for the problem, but in particular showscases some real-world surfaces that exhibit this property. The following images are extracted from the linked video, and I extracted the relevant 45 seconds into a bite- (megabyte-?) sized mp4 here


Finally (well, for the sake of what interested me, at least!), the Principled shader granted no artistic control over the reflection color. In the "old days" of Diffuse + Glossy mix shaders, the Glossy shader's color could be independently controlled. While most dielectric (i.e. non-metal) surfaces do not exhibit colored reflections, some more-complex materials (such as interference paints!) can only be correctly represented by manipulating the reflection color. The Principled shader only allows tinting of the dielectric specular reflection, based on the Base Color input, which just isn't enough.
These three things seemed sufficiently surmountable and important to producing more physically-correct materials that I set out to create a shader mix that properly accounted for both.
>>>>> You can download the current version here. <<<<<
This is meant as a more-or-less drop-in replacement for most basic materials using the Principled BSDF. It does not (currently) account for subsurface scattering, anisotropy, clearcoat, sheen, transmission, or emission! I may eventually add those as needs arise, but so far I have not needed them.
If you don't want to know how it works and just want to give it a spin, enjoy!
If you want to know more and the theory behind it, read on!
Fundamentally, this node group does the same thing the Principled shader does in its OSL code: it computes a base color Diffuse shader, then adds (yes, adds) a Glossy shader on top of it.
The first problem with the Principled shader, though, is that it doesn't correctly damp down the Diffuse contribution where the Glossy one kicks in. That leads to the Fresnel-influenced energy gain observed in white furnace tests of the Principled shader. It does this by calculating the "F0" value of the material, based on its Index of Refraction (IOR) and using it to compute how much of the Base Color to "add" to black, before passing that color into a Diffuse BSDF.
What it does with the Glossy shader is a lot more involved. Rather than using a plain Fresnel term driven only by surface Normals, a "perturbed" Fresnel component, driven by the surface Roughness, is used as the Normal input to a Fresnel node. It also feeds the derived view angle (arccos of the dot product of the surface normal dot and the incoming camera vector) into a pair of albedo response curves, based on data from the Disney white paper, mapping between them depending on whether the surface is smooth (roughness < 0.1) or rough (roughness > 0.1). The albedo response curve for roughness > 0.1 adjusts the roughness down starting at around 60 degrees off-normal, reaching a minimum value of around 40% of the input roughness. This models the micro-roughness effect.

And, because it's a Glossy BSDF, you have control over the reflection color the whole way.
Actually mixing in the reflection color isn't solely the purview of the adjusted Fresnel calculation, though. The supplied Glossy color is "normalized" against the Fresnel (by multiplying the Glossy color by 1/Fresnel), which in turn is fed into a node that governs dielectic vs. metallic reflectance value. The Specular slider on the Principled shader goes from 0 to 1; this actually maps to a surface reflectance of 0% to 8%, corresponding to dielectric IORs of 1 (air) to about 1.79. The same effect results. When the surface is metallic, this control does nothing.
The Fresnel component is then used as a factor that adds the computed Glossy color to black, which is at last fed into the Gossy BSDF.
With both the Diffuse and Glossy BSDF accounting for the F0 "weight" they should each contribute in addition to the usual Fresnel component, energy is conserved. With micro-roughness accounted for, rough surfaces appear much more reflective at glancing angles. With a controllable Glossy shader, reflection color can be manipulated for complex material effects. Thus, you get a more physically correct, more controllable material.
I'm always learning more and constantly striving to improve, so it's entirely possible that I'll revise how I have this shader assembled as time goes on. It's also possible that the needs it addresses will disappear as Blender continues to grow and evolve.
I hope this has been informative and useful!
-
U.S.S. Coronado, Katana Class Starship
If you're just joining this thread, hi! Please read the first post for some background info. Many questions have come up over and over again that are answered there. Thanks!
Thanks, @evil_genius_180 !
Was out of town for GenCon (my first time!), and the week prior to it was a whirlwind of in-person D&D sessions, so have only really been able to get any progress done in the last week or so.
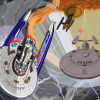
The next big item on the agenda was finalizing what to do with the actual launch doors. After some experimenting, I decided I liked horizontal staggered sliding panels. Unfortunately, in order to make them not overly huge and also reasonably thick (~30cm, my standard hull thickness), I had doors that didn't fit into the door frame I had made! Time to rebuild the entire outer shell of the Specter bay, I guess!

Pictured above is the "how am I going to patch this up?" screenshot of despair on top, with the end result (using a red carpaint matcap to look for mesh distortion) on the bottom. The Shrinkwrap modifier, using some freshly-built and very clean target meshes, made reworking the area a lot less painful than it would have otherwise been. That'd turn out to be foreshadowing for later tasks. Speaking foreshadowing, anyone remember this?
Shrink Wrap is a dirty, evil modifier that I try to avoid wherever possible.
Yeah...my opinion on that topic has changed over the years.
In any event, I ended up putting together a quick rig and cooked up a viewport render to see how it looked opening.
-
U.S.S. Coronado, Katana Class Starship
If you're just joining this thread, hi! Please read the first post for some background info. Many questions have come up over and over again that are answered there. Thanks!
Thanks, evil_genius_180 and Rekkert! Certainly been a long road since that first post at this point.
Today's post brought to you by adventures in rabbit holes.
Since October's renders, I did some more reading about the filmic lighting model and various aspects of trying to cultivate a more physically-based approach to surfacing and lighting generally. One of the big shifts is the use of correct, high-intensity lights where appropriate...such as when directly lit by the sun. I decided to remove the flat environment light that I'd been using (instead replacing it with an emissive value that more or less matched actual starlight) and cranked up the intensity on my main sunlamp to match the intensity of the sun on the surface of the Earth in broad daylight. The result was quite striking:


I had some obvious sampling noise that I was going to have to deal with at some point, but as a first experiment, I was pretty happy with the result.
Still, that shuttlebay wasn't going to model itself. To give myself some direction, I put together a collage of existing Trek inspirations I wanted to pull from to use as a point of reference. I drew from stills and unused concept art of the Sovereign-class, as well as stills from Voyager of the Intrepid-class and cooked up this:

I next kicked out a render from a camera inside the shuttlebay with a wide FOV, capturing everything from the edge of the bay doors to the midpoint of the control room window to use as a background plate to paintover and plan direct features.


Thus armed with some specific items to work on, I set to work.


In all of this, I also kept futzing with materials and rendering settings. That from-the-outside-in shot above took 40 minutes to render, but I noticed that several of the tiles in the center seemed to take much longer to render than the rest of the image, and I couldn't figure out why...until I pieced together that the CPU+GPU rendering mode of Cycles was on by default in my GPU Compute render settings, and the middle 7 tiles were being rendered by the CPU, not the GPU! Dialing down the tile size to something more CPU-appropriate like 32x32 brought the render time back down to ~6 minutes. Turning off the CPU and leaving the tile size at 256x256 was about the same, so I decided to keep things simple and leave the renders as GPU-only.
Having stumbled across that, I wondered what other rendering and lighting settings I could futz with. I kept on seeing a lot of sampling noise in the renders, which I didn't want to just throw more samples at. Brute force can be the answer, but it should at least be a last resort! I did a bunch of A/B testing by changing one render parameter multiple times and then flipping between results in GIMP to see the difference. I used this approach to settle on a number of bounces for each ray type that seemed to be right around where adding more bounces made little to no difference.
Even so, with the bay open, the full ship enabled, and the bright sun lamp blasting light into the scene, it was still noisy at 2000 samples (500-2000 is where I usually render these). I did a pass through all my materials, tweaking settings and making sure there weren't incorrect settings (There were some! Escape Pods definitely don't need Multiple Importance Sampling!), simplifying half-complete experimental shader networks down to simpler ones for the sake of simple WIP renders, and so on. Still noisy.
Frustrated, I decided to really stress-test things by picking a small-but-noisy section of the image and crank the sample count up and up and up to see how high I had to go. Even at 8000, I still had noise! In a huff, I cranked it up to 12000 samples and let it render for two hours.

Still noisy! Grr!
I shared some of these images on the SFM Discord and several folks immediately questioned why I wasn't using the built-in Denoiser. In point of fact, quite a few of the earlier images posted do use the Denoiser, but I had turned it off when debugging the CPU+GPU slow render speed issue and pressed on with it off in case using it was masking some other problem(s) (like bad light bounce settings, bad material settings, etc.).
I also wasn't wild about it because I like to render out each of the passes separately and use Blender's Compositor to assemble the image piecemeal, processing different layers to achieve different effects (e.g. bloom on bright surfaces, the glow on the emissive surfaces, the radial flares on the running lights, etc.) As far as I can tell, there isn't a way to get the Denoised passes from Blender, only the Denoised final image.
However, Daemoria pointed me toward an alternate plugin that I hadn't heard about that I'm planning to give a try next!


Additional credits
- Icons from Font-Awesome
- Additional icons by Mickael Bonfill
- Banner background from Toptal Subtle Patterns
© Scifi-Meshes.com 2001-2024