Greetings!
Welcome to Scifi-Meshes.com! Click one of these buttons to join in on the fun.
Quick Links
Local TutorialSpud's quick and easy nacelle detail basics
Part one...
Using poly modeling techniques it is fairly easy to model details for nacelles. This first part will simply show you how to create a basic nacelle shape. This isn't going to be an accurate representation, but more of an overview of some of the principles involved in modeling things from a basic primitive.
Later on we will investigate how to build more complex models and break up the details
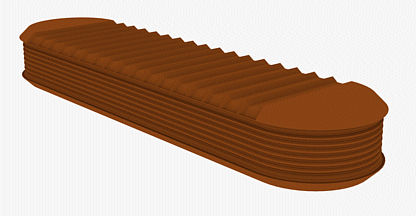
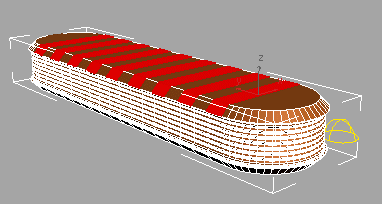
This is what we are aiming for:
Step 1.
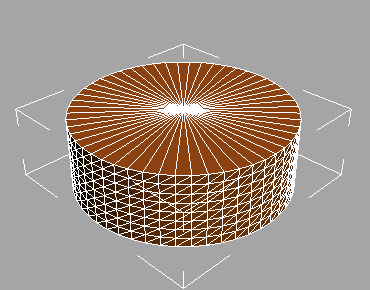
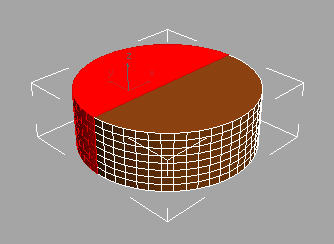
We're going to start with a pretty basic cylinder with a number of height segments which we will convert to an editable poly and then use a slice plane to cut it down the middle
Step 2.
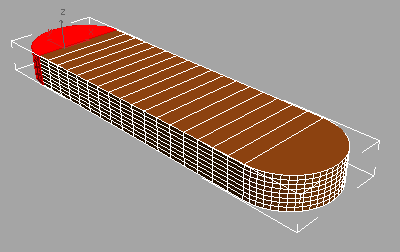
Next we are going to select one half of the cylinder and extrude it out by a number of steps from this
to this
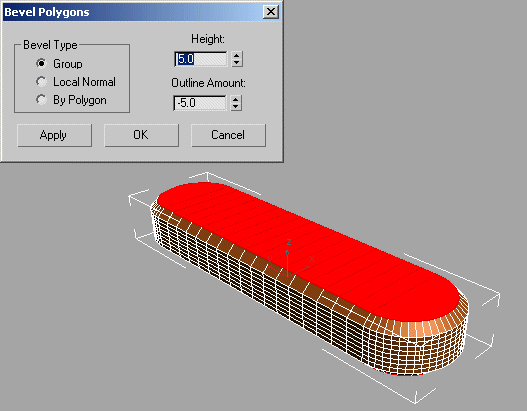
Step 3
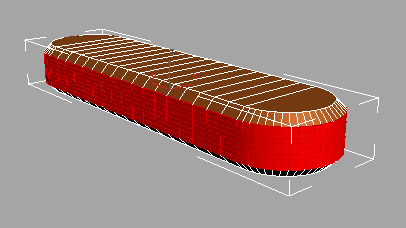
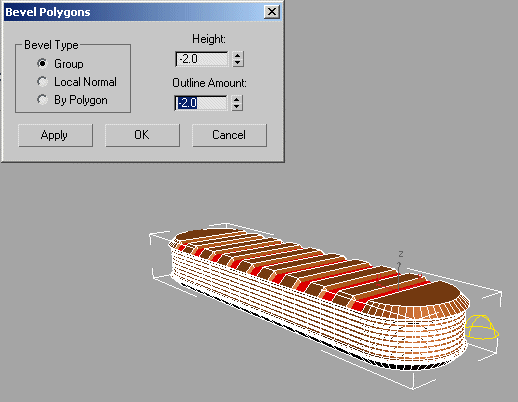
Now we select the top and bottom faces and, in this case I have simply used bevel to extrude and scale the faces. Obviously this is a really, really basic shape and more effort could be put into shaping this into a more curved outline. Part two will discuss alternative starting shapes to make this easier
Step 4
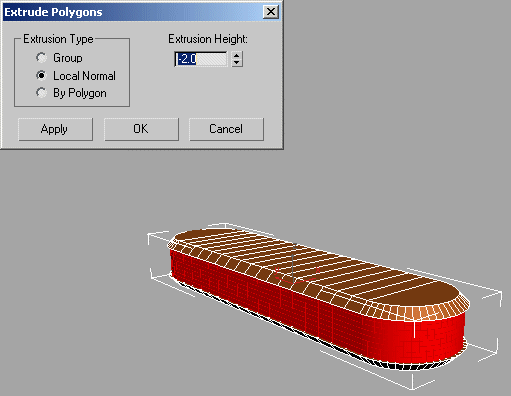
Select the faces in the middle of the object as follows
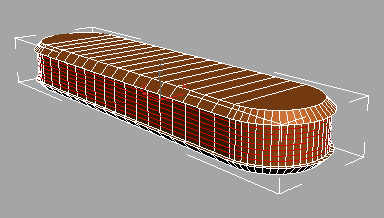
These faces are going to be our grills, so they could do with being indented a little, instead of being flush with the rest of the model. Use an extrude with a negative value, but select local instead of group and adjust the value until you are happy
Step 5
To make the grills, select the horizontal edges of the extruded part. The easiest way to do this is to select one edge segment for each horizontal line and selecting loop. You should have something like this
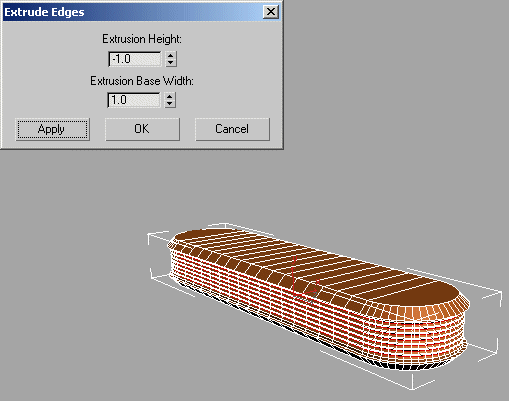
Step 6
To give the grills depth, we are going to extrude the edges. Adjust the height and base to give the desired look.
The edges are a little sharp at this point, so add a small chamfer to make them more rounded.
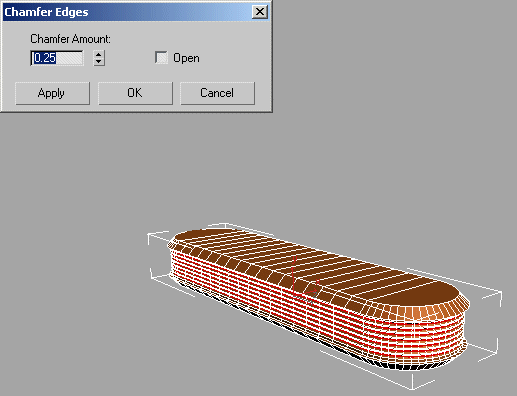
You can add more chamfers to smooth things out further. I also chamfered the outer edges to smooth things off a little more. Some better planning here may have avoided having to do this!
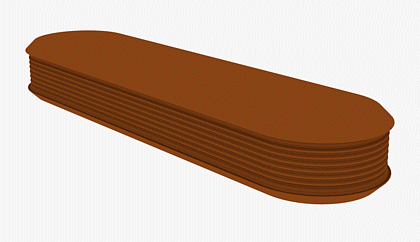
Here's a quick render of how it looks now
To add more detail you can use extrudes, bevels and chamfers. Try selecting alternating polys on the top as follows:
Applying an inner bevel to these polys will give you the following for example
Pretty basic so far.
In part two we will look at some other ways of creating nacelle shapes using poly modeling
Using poly modeling techniques it is fairly easy to model details for nacelles. This first part will simply show you how to create a basic nacelle shape. This isn't going to be an accurate representation, but more of an overview of some of the principles involved in modeling things from a basic primitive.
Later on we will investigate how to build more complex models and break up the details
This is what we are aiming for:
Step 1.
We're going to start with a pretty basic cylinder with a number of height segments which we will convert to an editable poly and then use a slice plane to cut it down the middle
Step 2.
Next we are going to select one half of the cylinder and extrude it out by a number of steps from this
to this
Step 3
Now we select the top and bottom faces and, in this case I have simply used bevel to extrude and scale the faces. Obviously this is a really, really basic shape and more effort could be put into shaping this into a more curved outline. Part two will discuss alternative starting shapes to make this easier
Step 4
Select the faces in the middle of the object as follows
These faces are going to be our grills, so they could do with being indented a little, instead of being flush with the rest of the model. Use an extrude with a negative value, but select local instead of group and adjust the value until you are happy
Step 5
To make the grills, select the horizontal edges of the extruded part. The easiest way to do this is to select one edge segment for each horizontal line and selecting loop. You should have something like this
Step 6
To give the grills depth, we are going to extrude the edges. Adjust the height and base to give the desired look.
The edges are a little sharp at this point, so add a small chamfer to make them more rounded.
You can add more chamfers to smooth things out further. I also chamfered the outer edges to smooth things off a little more. Some better planning here may have avoided having to do this!
Here's a quick render of how it looks now
To add more detail you can use extrudes, bevels and chamfers. Try selecting alternating polys on the top as follows:
Applying an inner bevel to these polys will give you the following for example
Pretty basic so far.
In part two we will look at some other ways of creating nacelle shapes using poly modeling
Post edited by spudmonkey on
Additional credits
- Icons from Font-Awesome
- Additional icons by Mickael Bonfill
- Banner background from Toptal Subtle Patterns
© Scifi-Meshes.com 2001-2024
Posts
Ok, so part 1 wasn't that exciting. Good news! Part 2 probably isn't that exciting either
When building the basic body of your nacelle there is always more than one way to do it. Here are a couple of poly modeling techniques that use different starting points
Method 1:
This is basically the same as part 1 of the tutorial. I mentioned using a different object to create a more rounded top than the rather basic bevel. In this case a chamfered cylinder primitive is the base object.
The same principles from part 1 apply for how to progress from this basic start
Method 2:
This is a slightly more involved method, but hopefully will show you a couple of new techniques.
Our starting point is this:
Yep, a rounded rectangle... Exciting! By default, shapes in Max are optimised. We want to switch that off so that we can retain a higher level of detail and consistent spacing between our grids. This is how we do it:
A single tick box... Easy! Now we can extrude the shape out by the required length and with the required number of segments.
I didn't use any segments for this example... Oops! Still, I can fix that using a slice plane in the middle and then chamfering the new edges a number of times to break up the large sides. Not that I did that here... Just saying
This is all well and good, but we need some nice rounded ends to our nacelle. There are other ways of doing this, but I thought I would use hinges. First we need to slice the object down the middle of its length
Next we select one of the faces on the end. We are going to use the hinge from edge modifier next
Click the smaller button and the dialogue is shown. We want to select the edge that is in the middle of the end face. I decided to do this in two steps, so a 90 degree angle was chosen with enough steps to get a nice smooth curve
When I do the other side, I will need to weld the two ends together, so delete the face you just hinged. Select the other face
and repeat the hinge and delete.
Next we weld the verts and now our object is nice and solid again. You can repeat this for the other end, or if you want to do something different for the back, bevel, chamfer and extrude until you are happy.
"Why didn't I just do this in a single step of 180 degrees and double the number of steps?" I hear you ask. I could have done it that way, but I prefer to be able to see the faces I need to delete. A 180 degree hinge would have left both faces inside the object and after deleting the first one I would have to have been more careful about selecting the second face. It's more of a personal preference really; experiment and see which way you prefer.
Method 3
This method is going to use a sphere. This is a good starting point for TNG style nacelles and will simply involve a couple of "Select half and extrude" steps.
So, here is our sphere. Select the top half and extrude it
Select the original bottom half and extrude that. Why both? It gives us a nice edge loop in the middle that we can chamfer a couple of times to create our grills
Now select the front or back half of the extruded sphere
Extrude away until you are happy with the size and number of segments. If you over do it or make it too short we can fix that later on.
What we have now is something that might look okay on an Olympic class with a bit of tweaking, but I promised you a TNG style nacelle and most people probably thought Galaxy when I said that, so we'll go in that direction. Apply an FFD (Free form deformation) modifier to the sausage... er... sphere... I used a 3x3 but use whatever you feel comfortable with for the style that you want
Our nacelle is a little tall, so select the control points sub level, select all of the control points and scale them down vertically
That's a little better. Now you can play with the control points to get the shape you want. I used a uniform scale to reduce the front of mine in all directions. Not that exciting, but the shape is about right
Part 3 will go into some more detailing options and perhaps some texturing
I'll try to work on part three soon. Had a couple of heavy nights out in the past couple of days so I'm taking a bit of R&R at the moment
Perhaps show me what's going on and I'll see if I can work out what you need to do
Man I'm having a big trouble creating the nacelle I love. And that's the TMP nacelle.
I know there is a tmp nacelle tutoiral but mine never ends up like that LOL.