Greetings!
Welcome to Scifi-Meshes.com! Click one of these buttons to join in on the fun.
Quick Links
3DTrek Nova Class (In Blender)


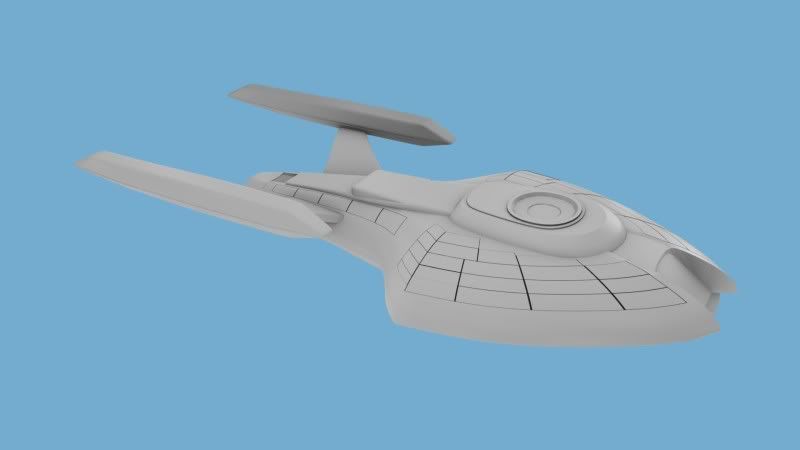
I've been chipping away at this mesh over the past few of weeks. I thought this would be a quick little build, but WOW was I wrong! This little guy is the hardest modeling study I have attempted yet. It took me several days just to decide on an approach to the basic shape. In the end, it seemed like I needed to create the saucer and the secondary hull as one unified sub surface, so that's what I did.
I think I have a pretty good handle on it, though there are one or two smoothing problems that may prove to defeat me... I may have to go back to the start on this one...
But here it is so far:
I think I have a pretty good handle on it, though there are one or two smoothing problems that may prove to defeat me... I may have to go back to the start on this one...
But here it is so far:
Post edited by Polaris 004 on
Tagged:
Additional credits
- Icons from Font-Awesome
- Additional icons by Mickael Bonfill
- Banner background from Toptal Subtle Patterns
© Scifi-Meshes.com 2001-2024
Posts
-Brian
I may get around to the Rhode Island, since it would be a cheap investment time wise, but it won't be right away. I've got a bunch of projects lined up.
I went back to square one on the deflector lines, did them completely over and made them narrower and shallower. They may still be a little too much...
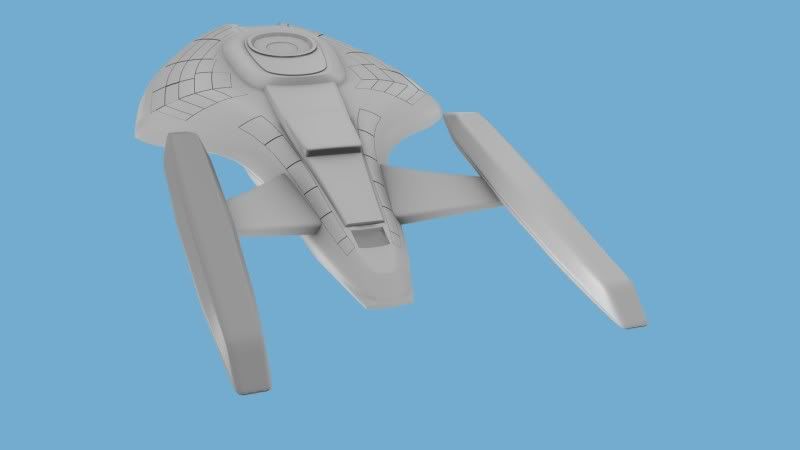
I find myself constantly backtracking on this model, the Def grid is only one example. But Hopefully I won't have to go back to the start with the body mesh. You can see the bottom has some problems under the saucer, especially at the nose, where smoothing issues popped up. I'm hoping I can fix them...
Sure. I created that niche by deleting 3 or 4 vertices when the saucer was still a subsurface. Then I just extruded the solid walls. I will go back into my construction records and post some pics for you.
And yes, I have yet to even think about textures...
Here's how I did it. I'm not saying this is the best way. In fact I'd be amazed if it were. But here's how I did it nonetheless:
Here's the basic saucer shape.
Deleted some Vertices to make the nook
Side view for clarity
Snagged the upper vertecies, duplicated them, extruded, set scale of z to 0, and brought them down, to make the solid side walls on the nook. I had to fill the curved areas manually, but it wasn't too bad.
Then I made this housing where the deflector dish will eventually be inset. It's the wrong shape; it's just a sort of place holder.
On the studio model, The top of the saucer sort of scrunches down where it meets the nook. It's actually kinda ugly, and I thought about not doing it. But for now I copied the look by grabbing the relevant faces, pulling them down slightly, making them a little wider, and rotating them on the y axis, so as to make a little ramp-like surface. I'm going to re-do this. I liked it better the way I had it before, in my original post. Accuracy be damned, I have to be able to enjoy looking at the mesh...
That's basically it. Feel free to ask further questions or generally comment. You can even tell me if I did something stupid. I know I am not the forum's greatest modeler. I'm just here for the beer and pretzels.
*Looks at your avatar pic* Oh, yeah, that's right! Hey, I'll take whatever material you want to send me... I'm always looking for more great reference materials, and that model looks really good, from what I can see of it.
and second...
IAâm not saying that I belong to the best modelers out here or you have done something stupid but i think this could be a problem in future work maybe in texturing...
Imho here is the way how it could be done too...
basic shape - subsurf on (realy basic just for an idea)
delete chosen vertexes
fill the hole
intermediate result
then thicken mesh by knife tool on edges you want to sharper
so this is it...
I hope you got my point. IAâm not sure whether you are using this technic on other parts the mesh, but seems to me you does. ( I just guess if i dont see wire) So why not use it even on the niche...
However iAâm sorry for little spam on your thread and iAâm looking forward for updates.
As far as your English goes, you do fine. Clearly you speak more than one language. Not everyone on this site has that excuse...
This might be of use to you:
http://darthmojo.files.wordpress.com/2008/05/wire-equinox.png
Yes it's the real one, and no thats the only shot
I look forward to the results, I'll be keeping a close eye on this!
Yup. That certainly is useful, thanks. It's also just cool to see.
The ship is looking pretty good so far, good luck with the rest of it :thumb:
Could you give me some tips on that one thing you mentioned: Thickening with the knife tool to make edges sharper? I think that would help me a lot with what I do or try to do I should say. Mostly I use edge split to make edges sharper, but it has it's limits and drawbacks.
And I hate to ask, but while I can make some shapes in blender by distorting primitives and such like spheres and cylinders, i can't imagine how to make a semi abstract shape like the ship's main hull except maybe by tracing. Any tips on that?
IAâm not realy sure that I understand question, but i think the best way how to do something in blender is by extruding the rough shape and then eventually by distorting it, and then extruding and distorting again and again until you have you want... ;D
Thanks Bory, I get exactly what you mean now, and it has been a tremendous boost. That must seem like an obvious technique to you, but I had not had it. The video made it super clear to me. I had been stuck on this model, and not wanting to go back, but with that video I think I will go back and start in again tomorrow.
I think I know exactly where you are, Judge. My skills as a modeler took their biggest leap right as I began to understand subsurfacing, and the manipulation of more primitive shapes into more complex ones. I tried to do a lot of stuff by "tracing" verts along paths and connecting them with edges, building up complex shapes. The results were never good. When you do that, there are always too many flaws, too many asymmetrical placements and weird edges. With Blender, I think, to get a smooth hull you have to start with something smooth and work it into the shape you want.
The trick is figuring out what sort of shape to start with, and how to manipulate it. This was really hard for me at first, but became much easier as I got used to "breaking down" fluid, complex forms into basic spheres and cubes and cylinders. It got so everywhere I went, every picture I looked at, I started "seeing" blender primitives and imagining how they were manipulated to make their end shape.
With this model, I started with the saucer, made the basic shape. Then I pulled the back of that saucer to make the upper half of the secondary hull. Then I pulled the bottom of that extension in different ways to make the bottom half of the secondary hull, including the deflector housing. IT was 12 or 13 different experiments to settle on that approach, but it was the only way I could fiigure out to make no seam between the upper and lower half of the secondary hull.
Also, if I had to model that Nova's front, I might go about it like this:
Wow Melak! I was expecting quite a few more vertices when I saw your top picture...so sleek and smooth, I can't believe it's really that "simplified" in terms of amount of vertices...Looks like you started with a circle and distorted it a bit by dragging your vertices, then beveled/knifed a few areas?
BTW, in a lot of cases where I have a curved section and need a sharp edge/flat surface, I use the edge split modifier. I know it creates extra verts, but is there any other reason not to use it? I've used it successfully on some models like my free trader.
Polaris, I'm trying to subsurf things and have limited success. I've found you really have to have the object well defined and subdivided a lot, maybe ween with beveled edges, to keep the subsurf effect from just smushing it into a ball.
So, like, if you want a rounded box you can't just subsurf a basic box or it turns semi spherical. You have to subdivide it few times, then probably bevel the edges to get a smooth, dice like cube instead of a semi spherical mess you didn't want.
The best example of successful subsurfing I ever saw was a woman's head made in high detail but still obviously made of little faces, then a subsurf was added and it didn't change shape, it just smoothed out into a very lifelike look.
If I try adding a subsurf to someting where I've cut windows I get the windoes going from sharp to rounded and with gaps in them.
So I'm wondering, when to subsurf? Should you subsurf furst, then start molding the object or should you make a mesh into a rough approximation of the intended form then sursurf? Should you add details like windows, hull panels, doors after subsurfing, anbd WTF does that 'crease subsurf" thing that I can't get to do anything supposedly do?
If it's not a bother, could you show some beforer and after subsurfing models of this ship, assuming you made a basic shape then subsurfed? That might help.
Hah. That post is like an exact echo of my thoughts a two years ago. I know exactly what you are talking about. You have it figured out already though. It's all in your post if you look for it; you almost have it put together.
The subsurface is the early stages of modeling. Use it to get your basic shape. You can cut windows into a subsurface, but I don't think you want to, usually. When you are sure you have the shape of the hull you want, then you apply the modification to the mesh and "harden" it into a full mesh. The cutting and the detailing is done to the final mesh. (I always save a copy of the original subsurface. In a separate layer or a separate file. You never know when it will come in handy, maybe to backtrack to and start over from a previous step, or maybe for a future kit bash. In fact, I always save EVERY MAJOR CHANGE I make to a mesh, from the first shapes to the final details, just in case I want to go back later.)
You can make a basic shape, and then add the subsurface modifier to it. But this can often lead to smoothing problems. I find it is usually better to start with a primitive shape, a cube, a sphere, a cylinder, even a plane, and add the subsurface modifier right away. Mold that shape into the basic shape you want. It's not as hard as it seems, but it it does seem hard at first. But this has the added benefit that you can watch the sursurface change shape as you manipulate the primitive shape. It gives you a better sense of how the subsurface mod works.
By the way, I generally work with the sub surface levels set at 2, and the render levels at 3. Catmul-Clark in the algorhythim box. It's just what I found seems to work the best for me.
You do have to subsurface an object 2 or 3 times to get a well defined shape. That's kinda the point. But if you sub divide like 4 or five times you are probably over doing it, creating a zillion more verts than needed. The verts pile up quickly. (Exponentially, I suppose.) I advise you to study the help I got in this post. The video Bory provided is brilliant, as it shows us how to very precisely define our shapes by just adding a loop or two to a mesh. Once you understand the power of that, you will never overbuild your mesh. Notice how he uses the "Control R" shortcut. I had forgotten that one, and I desperately needed to know it. Saves a BUNCH of time and work.
The crease mod can fold or crease the angle of an edge to make that edge sharper. It an alternative to adding more loops, like in Bory's video. But it can be tricky to use. You have to highlight the edge(s) you want creased, add the modifier, then drag the curser away from the edge to increase the strength of the crease. The angle of the edge has to be a certain amount for the mod to work.
I will try to have an update next week.
Well, if I had been more clever about my "save points" I could have just patched a re-worked section in. But no matter what I tried I couldn't fix it, so I just bit the bullet and reworked the whole mesh. I'm now up a little past the point where I had to start over.
I actually had to try several more times to get the mesh this close. This little ship has proven to be every bit the match for my skill. It has taken every trick I know to get it this close to the studio model, and it's by no means an exact match. :rolleyes:
I think most of the smoothing problems are fixable. I might actually be on track to finish this little gal. Please let me know what you think.