
Greetings!
Welcome to Scifi-Meshes.com! Click one of these buttons to join in on the fun.
Badges


NemVia
About
- Username
- NemVia
- Joined
- Visits
- 27
- Last Active
- Roles
- Member
- Points
- 192
- Posts
- 71
- Homepage
- http://www.NemVia.org
- Badges
- 5
-
My 1/8 Scale BTTF Delorean (WIP)
MAY UPDATES -2019 (part ll)
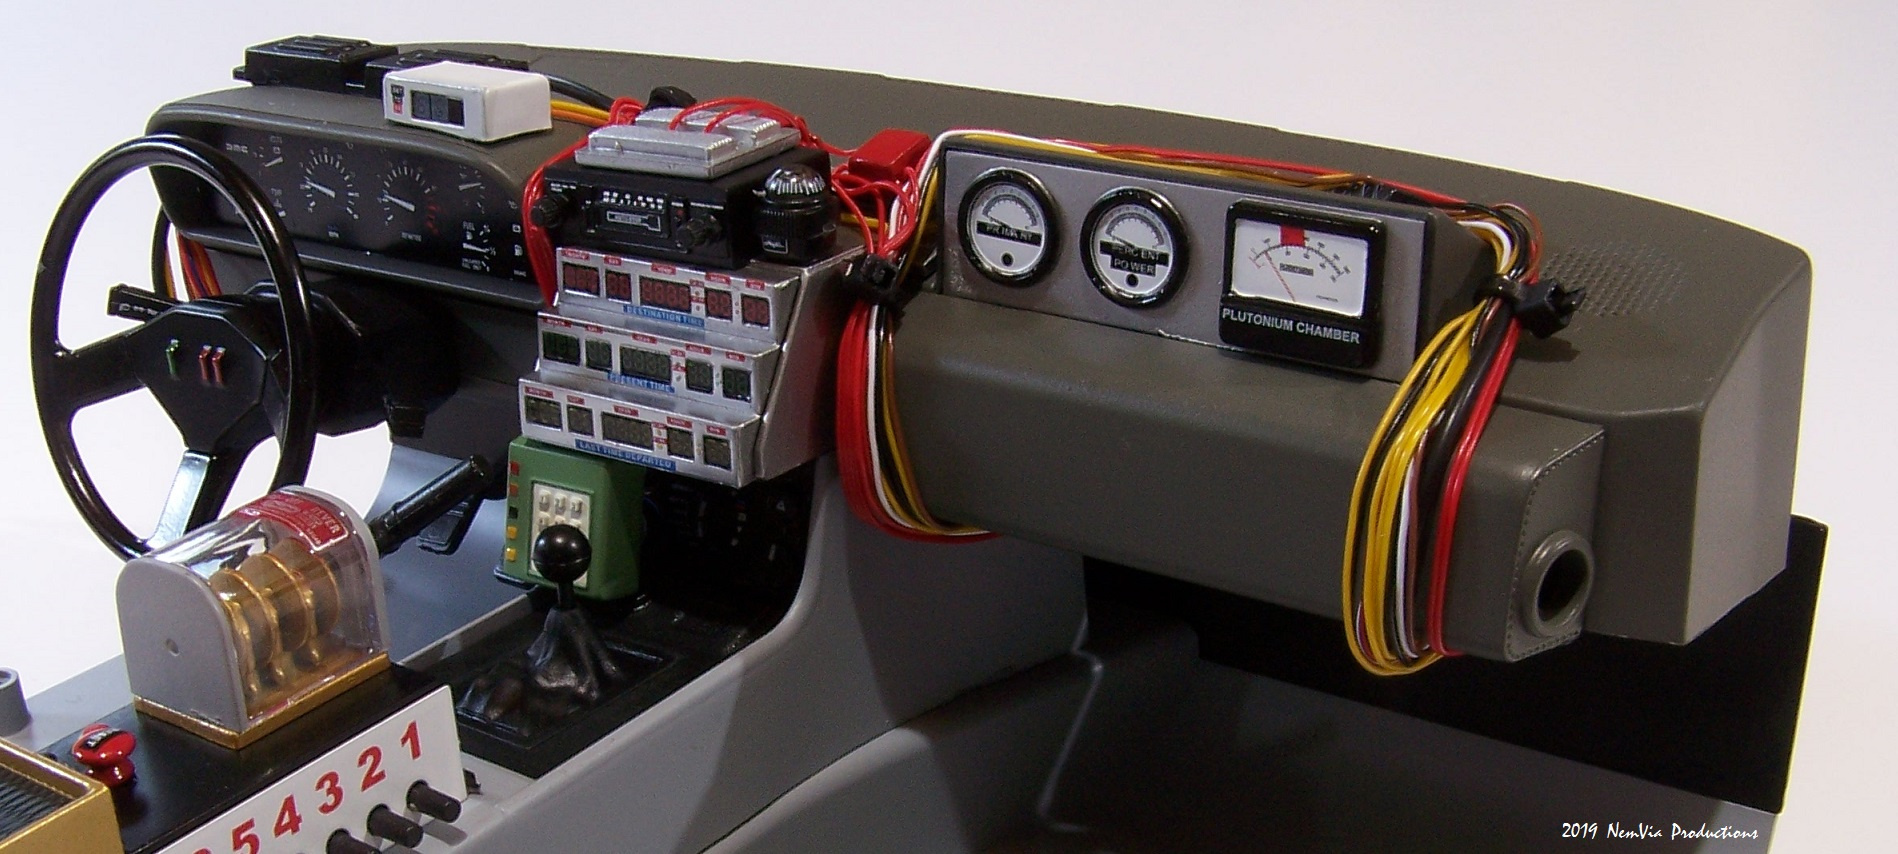
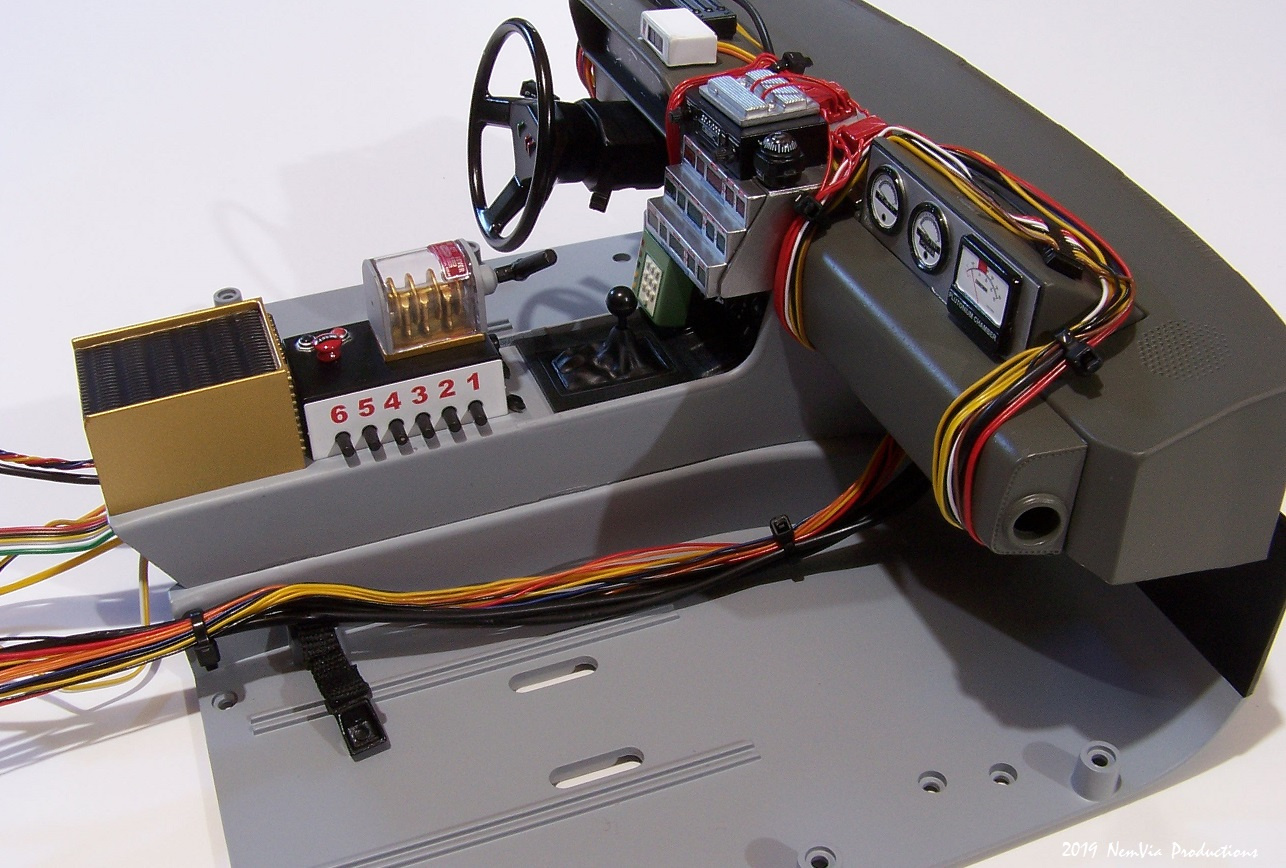
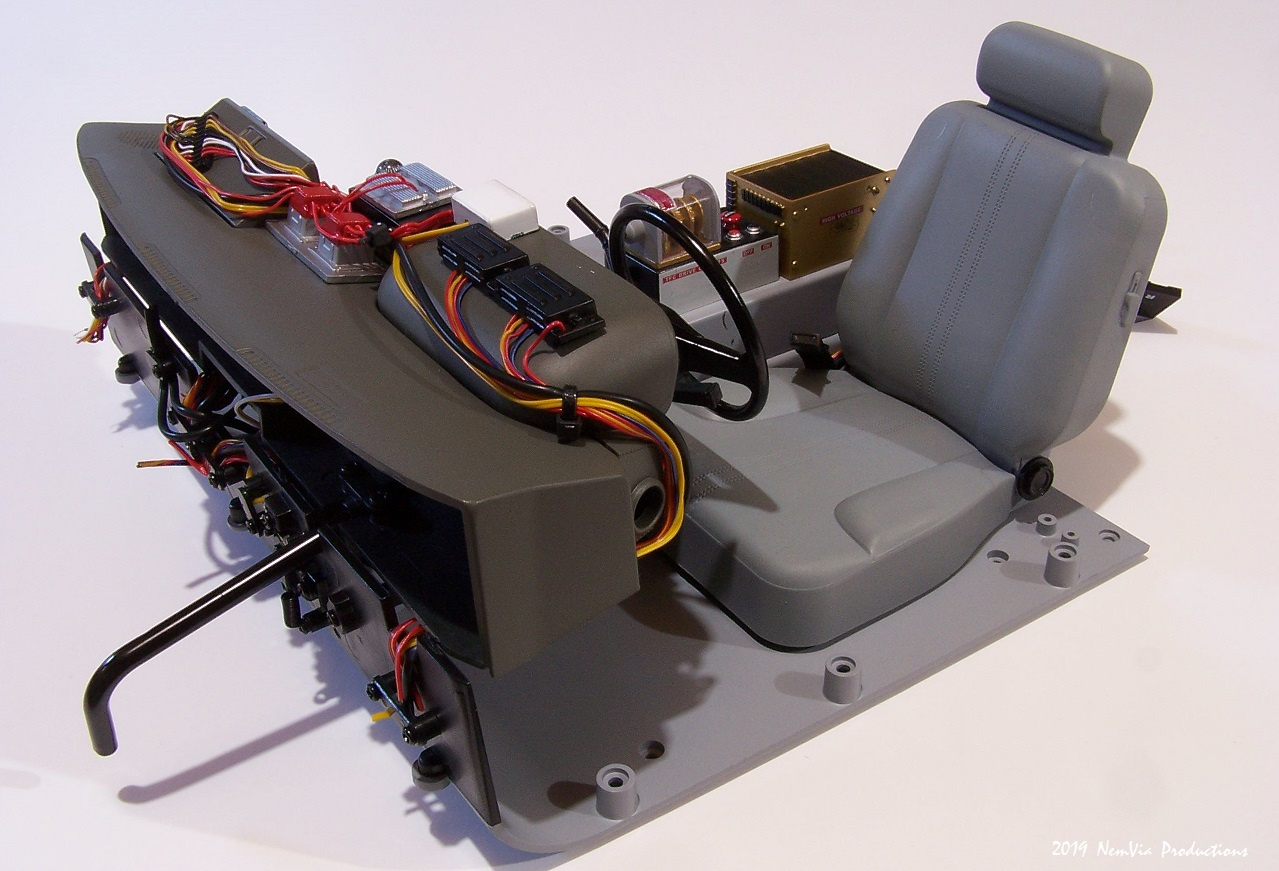
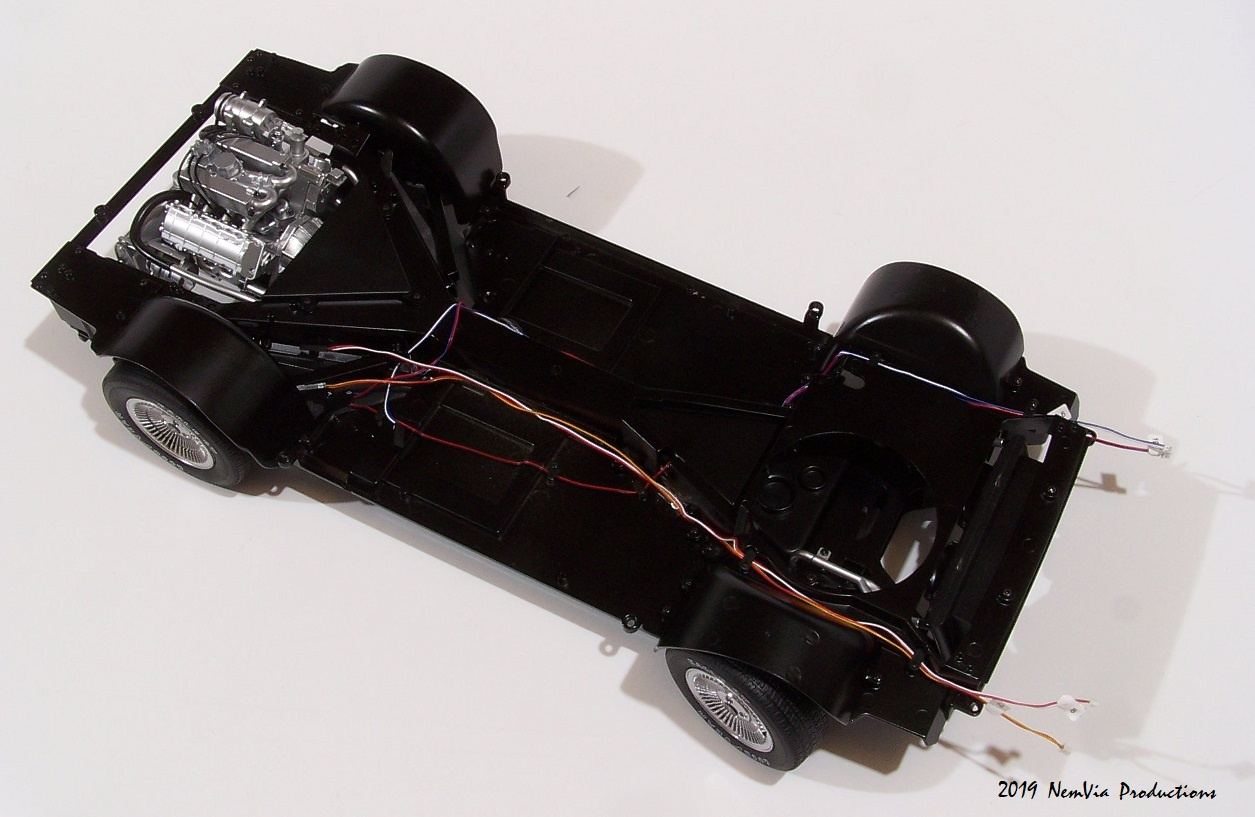
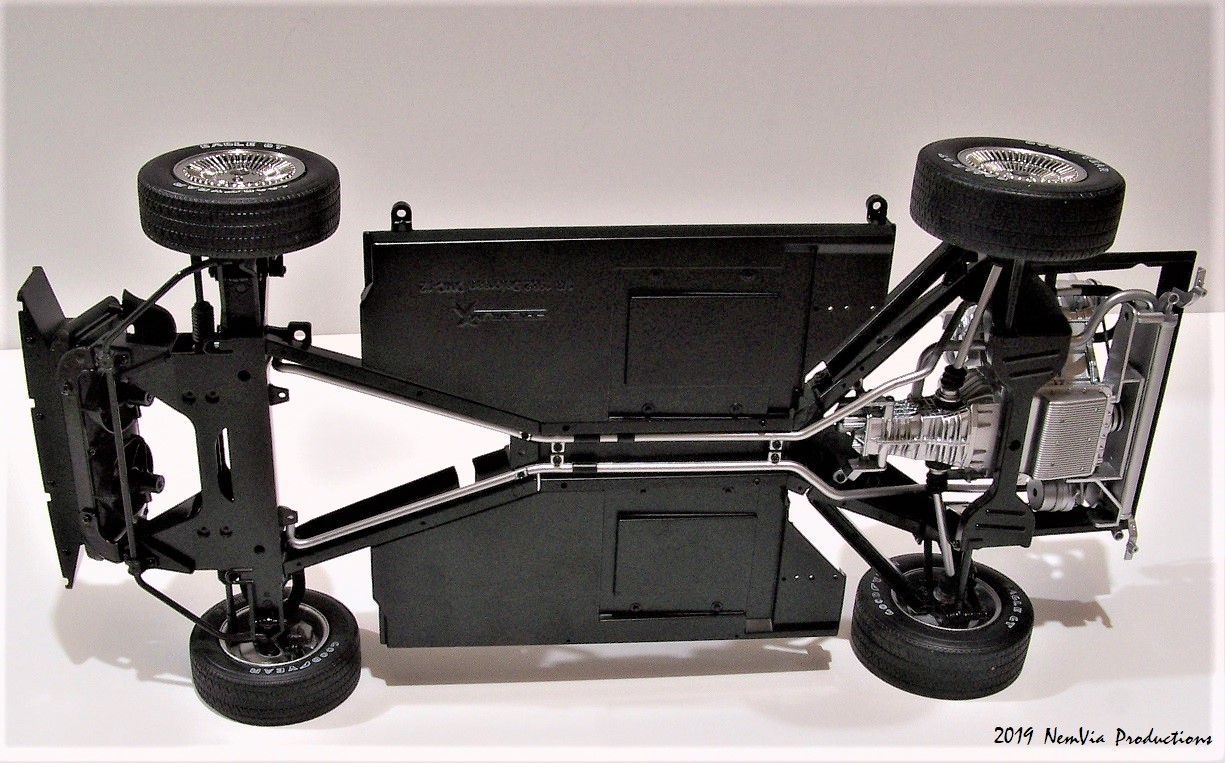
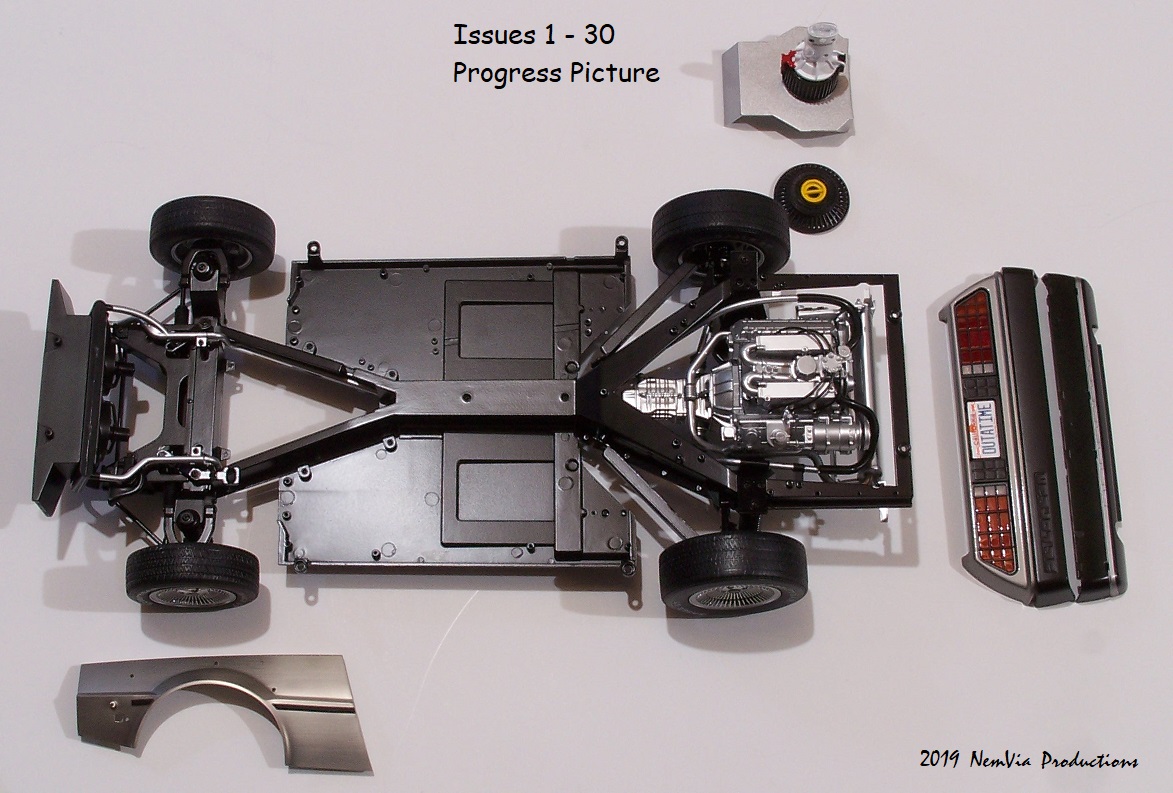
I know this is a rare occasion, but I was able to receive my next 4 issues of the DeLorean build within' the same month. I really liked these issues, especially Issue 48. Issue 48 had a little bit more work to do on it and it dealt mainly with the dashboard component wiring. All of these cables are of the GNDN variety and used for aesthetics purposes only. But, to adjust them and get them into their proper places was what took up most of the time. (well, that and I misread the instructions for the wire separator piece and threaded them through it upside down.....DOH) Oh, we'll anyway it was fun doing this part of the build. All of the cables needed to be threaded through the bottom of the dash into the trunk space area only to be secured there permanently later on. I've actually found a couple things that I do not like with this part of the build, though. One is that the cable ties or zip ties are way out of scale with the care. I do however plan to replace them with some smaller ones that are used for stereo electronics which are much smaller and a little more accurate. Also, I was very disappointed in the function of the steering wheel and steering column. I had hoped they would turn the front wheels a little farther than they do. Now I understand why they give you the mounting blocks for the display stand so that the wheels will turn a bit more with less effort. But, I don't think it's going to be too big of an issue since the car will mostly be displayed in a case. Anyway, I was also able to build one of the cars seats, driver's side to be exact. I like how the material feels, almost like real leather, and they give you foam to place underneath the seat cushions to make the seat covers feel soft just like you could sit on them for real. I think I will be weathering the seats a bit. Just looking at how much stuff was added to the car by "Doc Brown" would suggest a lot of wear on just about everything on the inside of the car. That's why I'm leaving any scuffs and scratches that I might make on the car for that lived in feel. So far I've built issues 1 - 50 for this kit and the car now weighs in at 7.5 lbs (3.4 kg) I didn't know it was going to be this heavy. I can't imagine what it will weigh when finished. So, there's 31 New pics to check out. Check out the link below, that will get you to the first pic. Well, that's it for now. Keep checking for the next update.
Thanks, Mark
https://www.nemvia.org/apps/photos/photo?photoid=205718895


-
My 1/8 Scale BTTF Delorean (WIP)
MARCH UPDATES - 2019
Greetings Fellow Modelers.
Just got back from 2 weeks vacation in a place that was nice and warm. Had to take a break from this awful cold weather in the Midwest. So, now after some recharging of the batteries from a good rest, I can deal with life again for a little while.
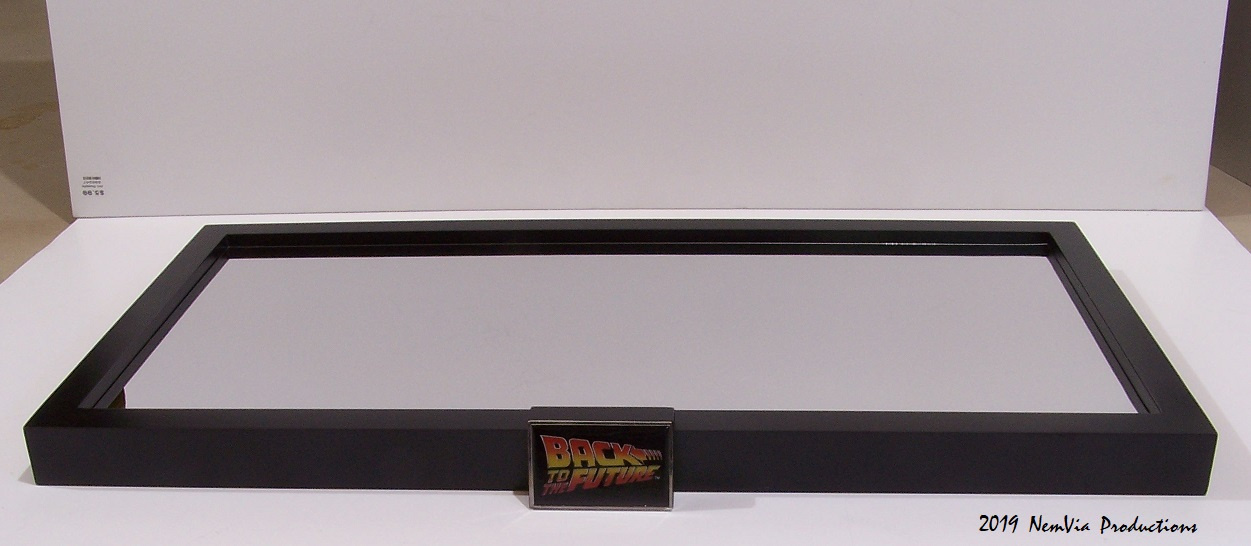
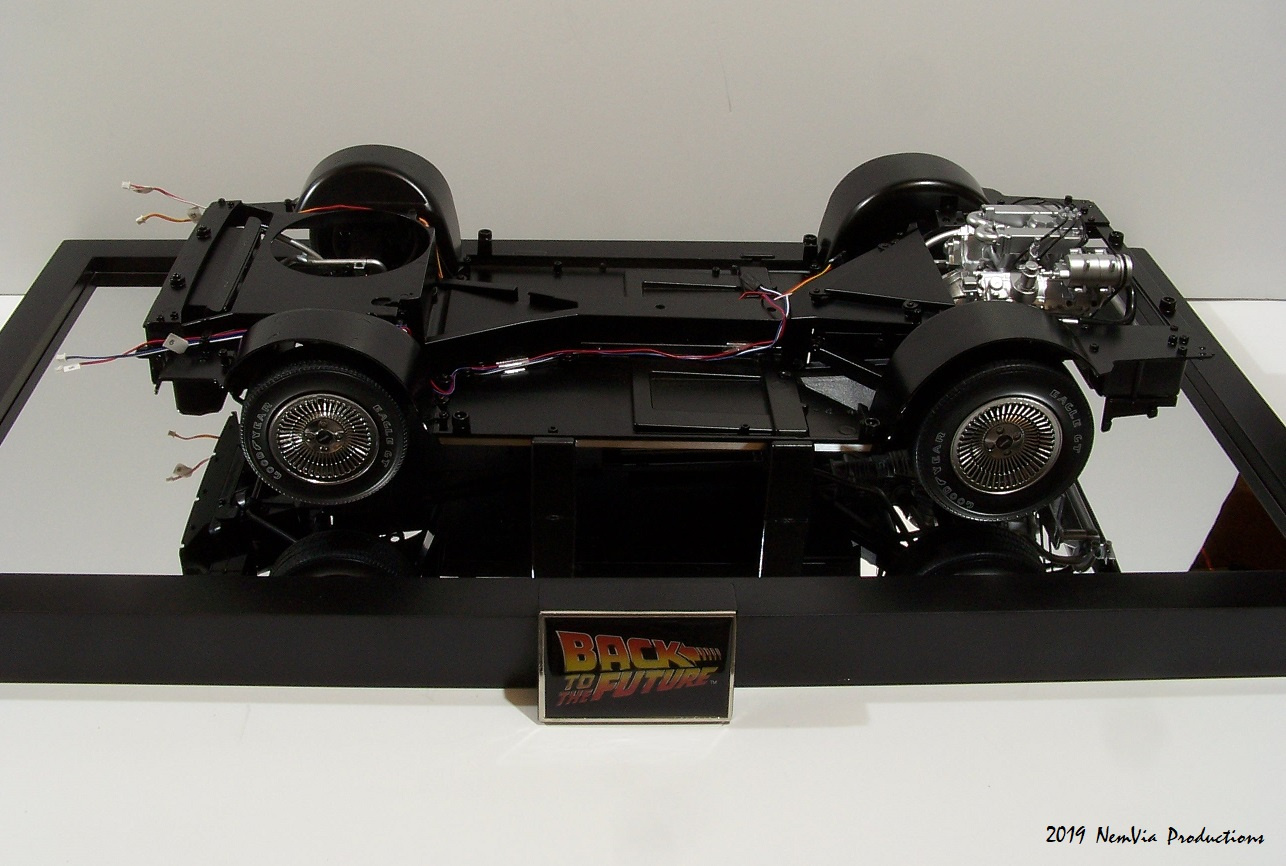
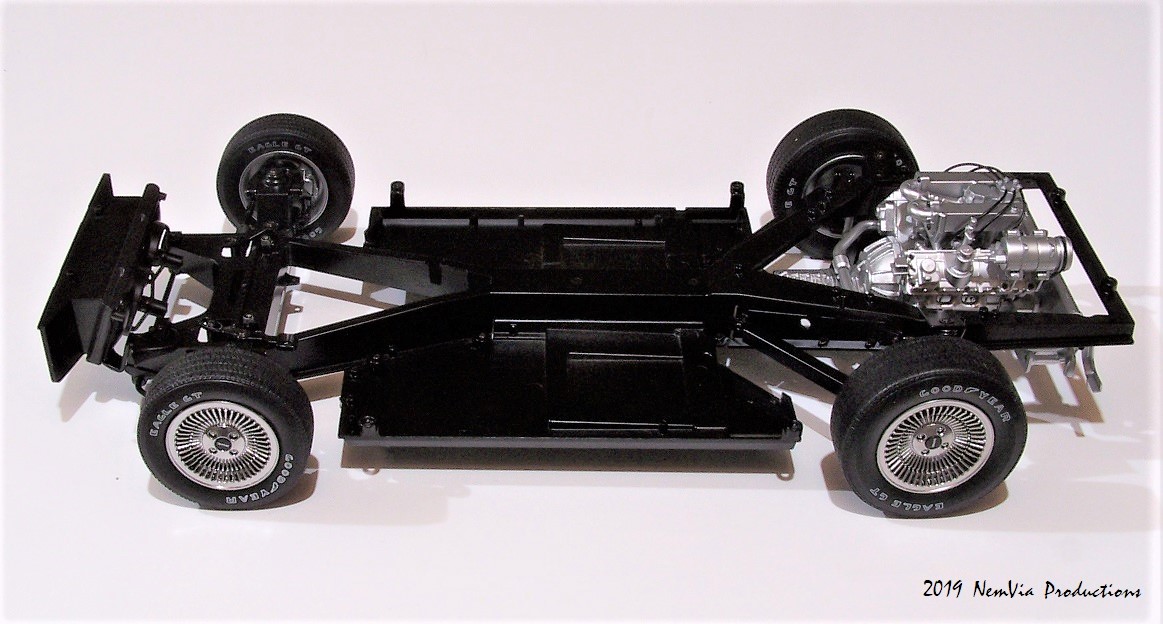
This month's update is a bonus update. Before I went on VACA, I received Issues 31 - 34 and assembled them, photographed them and then all I needed to do was edit them when I came back from our trip. At the beginning of the month, or on March 6th, I received Issues 35 - 38. So you can see the updates for 8 of the Issues this month. Also, the box I received for my shipment was unusually large this time and I couldn't really figure out why at first. But, then I checked my billing manifest and found that the 3rd and final "FREE" gift was included with this delivery which I forgot about. Eaglemoss sent me the Display Base for the DeLorean. It looks pretty sharp. Measures 27" x 14" x 1.5" and has a mirrored surface to display the underneath of the car and a BACK TO THE FUTURE display plate on the front. Issue 38 came with 4 mounting brackets for the car to sit on, but they don't hold the car high enough for hover mode. Maybe they're will be 4 more coming in the future that are a little higher up. Whish I had a Flux Capacitor so I could find out..... Hah... Anyway, I was also surprised that the front and rear wheel wells were metal pieces instead of plastic. The only Issue I had with these concerned the rear wheel wells. I found that in order to get them screwed in place I needed to first screw in the front part of the wells to the Chassis, then put the 2nd and 3rd screws in until they were flush with the Chassis. The "suspension" parts kind of hold the wheel wheels up and away from the frame. IF you try to put the screws in from back to front it's a little more difficult. Just letting anyone whose building this kit know how to get these parts in place. With these 8 Issues, some of the wiring has arrived along with the Battery Box and lid which are cleverly and appropriately hidden in the "fuel" tank. It looks like in the next Issue (39) some more wiring items will be arriving. I'm looking forward to it. There are 43 "New" pics in the "1/8 Scale BTTF DeLorean" page, starting on page 3 and slide number 158. For a view of the Display base, go to the bottom of page 3. As always, comments are welcome. See you next Month.
Mark
http://www.NemVia.org
-
My 1/8 Scale BTTF Delorean (WIP)
FEBRUARY UPDATES - 2019
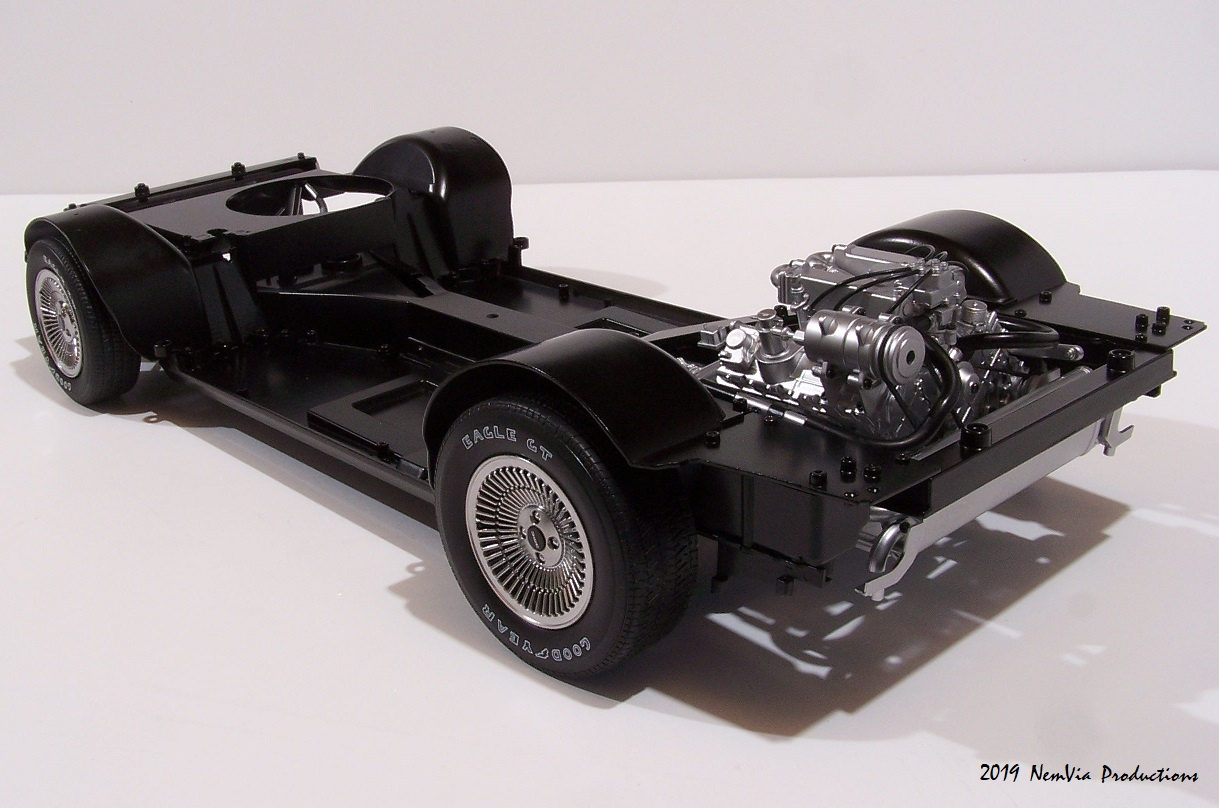
Hi everyone, this is the DeLorean Build update for February. I've received issues 27 - 30 and they are incredibly simple to assemble, just minimum work to do. The main focus was on the Chassis plate and the radiator and water pipe assemblies. Adding the plate to the car has really increased the total weight of the model, as the plate is made from metal. It now weighs in at 5.3lbs or 2392g. I could almost do some body building with this kit. Anyway, everything is fitting together nicely. I did have to make an adjustment to the two water pipes or hoses that connect to the engine. They are black radiator hoses the are made from a very stiff plastic, so there was very little give in them to make then fit properly. I wound up sanding down the side of the hose that faces the engine. When I did get it to fit you don't even notice it was filed down. I don't have pics yet of the weathering of the engine parts because I wanted to wait until all of this was assembled before I did anything. Hopefully, this will add a touch of the "used" look to the overall time machine. There are 20 new progress pics on the "1/8 scale BTTF DeLorean" starting on page 3 of the photo album, pics 137 - 157. Let me know what you think! The next 4 Issues are already being processed, so I'm looking forward to that as well. See you next month, happy modeling.
Mark
In other update news I've just became a GRANDFATHER for the 9th time. So happy days for that! Take care and we'll talk with you soon!
http://www.NemVia.net
Attachment not found.Attachment not found.Attachment not found.
-
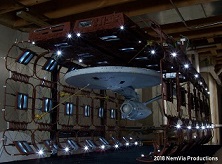
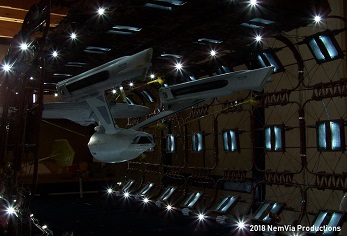
Re: ST:TMP Drydock (WIP)
Sorry these were resized for another posting on another forum. I didn't realize the size carried through. If you go to my website, then go to the member's photo gallery page and look for the Drydock build updates, you can see the pics in a larger format.
Mark
http://www.NemVia.net
-
Re: ST:TMP Drydock (WIP)
Thanks Rekkert. I appreciate your comments. This is my current update even though my work is causing another stalled out period until after January 1:The Enterprise is looking great in there.
Sorry to hear about your mother, it's understandable that you took time off the project because of that, no need to apologize.")
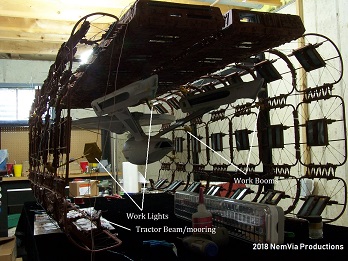
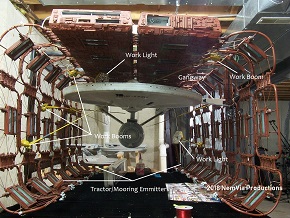
AUGUST UPDATES - 2018 Wiring, Wiring, WIRING! Yes, that's pretty much all that I've been doing this last month. Wiring and double checking the circuits to make sure they're working. I've had to do this because there were so many loose wired from both the Enterprise and the Dock that I needed to start getting these out of the way so I can do more wiring and lighting. Really there are only a few more effects that need to be added and then I can start working on the display stand switches and trim work. Besides the wiring I've sealed the open hanger on the aft end of the dock. The ceiling is now permenetly cemented to the structure. I will be adding a mirror to the back end of the hanger to give the appearance that the Hanger goes much farther back into the modules than it actually does. She's coming together. Please hang in there. See you next month. Mark
http://www.NemVia.net
Attached Thumbnails
Attachment not found.Attachment not found.Attachment not found.Attachment not found.
Additional credits
- Icons from Font-Awesome
- Additional icons by Mickael Bonfill
- Banner background from Toptal Subtle Patterns
© Scifi-Meshes.com 2001-2024