Home › NemVia › Best Of...

Greetings!
Welcome to Scifi-Meshes.com! Click one of these buttons to join in on the fun.
Badges


NemVia
About
- Username
- NemVia
- Joined
- Visits
- 27
- Last Active
- Roles
- Member
- Points
- 192
- Posts
- 71
- Homepage
- http://www.NemVia.org
- Badges
- 5
-
ST:TTMP Drydock Model (Physical Model)
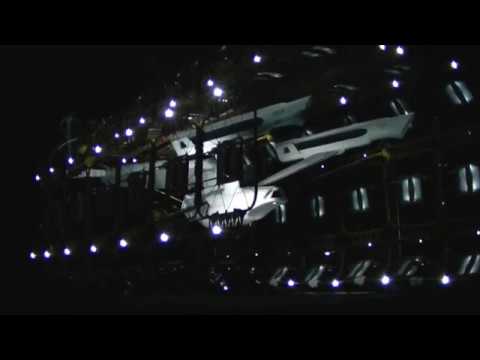
I've finally put together a video of my Enterprise in Drydock. It took several tries and several reshoots of certain scenes, but it's all together now. This is my version of the flyby scene in ST:TMP minus the dialog and intercuts with the travel pod. I had to extend some of the shots to fill in those gaps. I could insert the scenes to combine my footage with the movie, but the video is primarily about the Drydock model. Also because of the size of my video shooting equipment I added a different of the shot by filming it from a different angle. I also had to match the scenes to specific parts of the musical score.
This is my personal homage to one of the greatest filming miniatures ever made for the big screen: The Star Trek: The Motion Picture Drydock and of coarse the DeBoers Refit Enterprise model. To make this video, I tried to match as many of the same camera angles that were the movie as possible. There's no dialog except for a little treat at the end to finish the video clip off with.
The flyby video was filmed using a JVS Everio HD camcorder and was mounted on a Andoer camera dolly track system. The video was edited together using Wondershare Filmora9 editing system. Some of the shots where accomplished by mounting a selfie-stick to the camera dolly to get into the more cramped areas of the dock. Most everything was shot against a black velvet background, except for the long shots. I just didn't have enough velvet material to do this. I just had to hide the source lighting out of camera view and film with the room totally dark, except for the models own lighting. The long shots didn't come out as clear as I wanted, but as we zoom into the model for the closer shots, the details become very clear. I would have loved to add all of the work bees, travel pods and space walkers into the shots, but that will have to wait for some time in the future when I have the ability and time to do all of that. This was never meant to be the high quality Cinemamatic version of this now famous scene in the movie, but rather a way to show off the model. I hope you enjoy the video. Sorry about the long intro, but I needed something to fill in the beginning. Jerry Goldsmith's theme just has to be played in it's entirety. Also ear-buds or headphones are recomended for an awesome viewing experience. (click the youtube link below)
Likes and comments are welcome.
Mark
http://www.NemVia.org


-
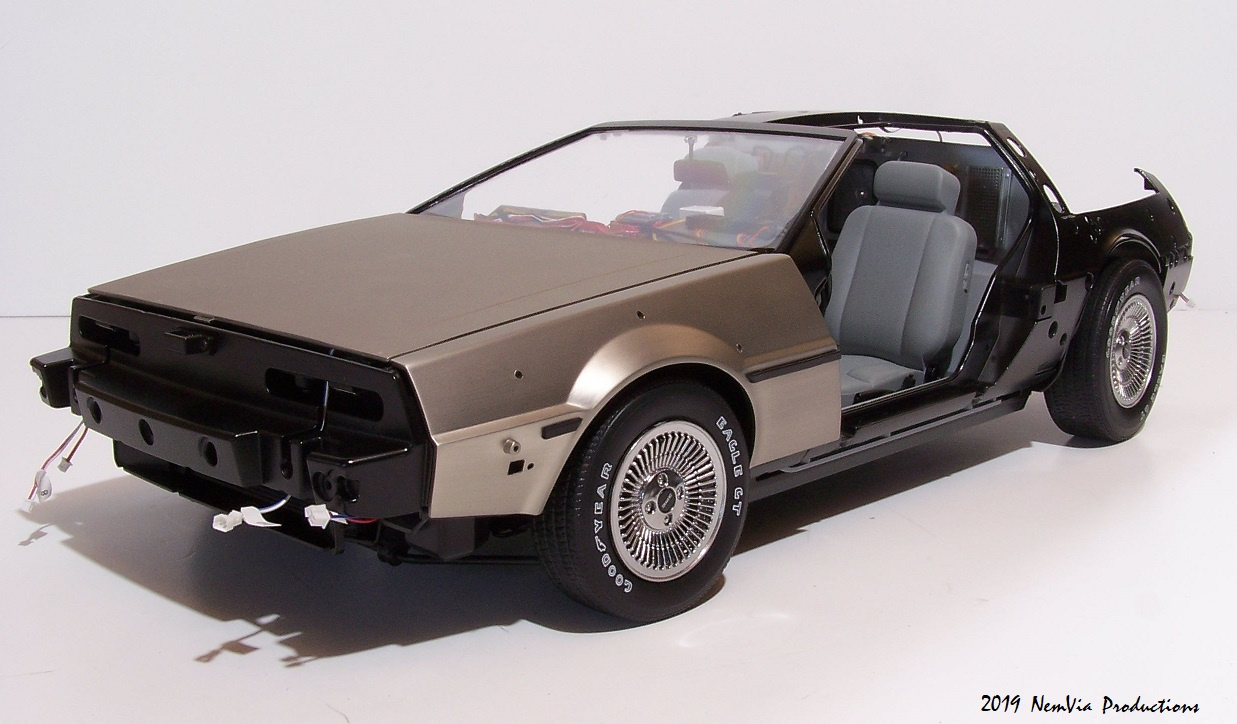
My 1/8 Scale BTTF Delorean (WIP)
They have a lot of highly detailed kits from many different genres.
Here is their link
https://shop.eaglemoss.com
OCTOBER UPDATES - 2019
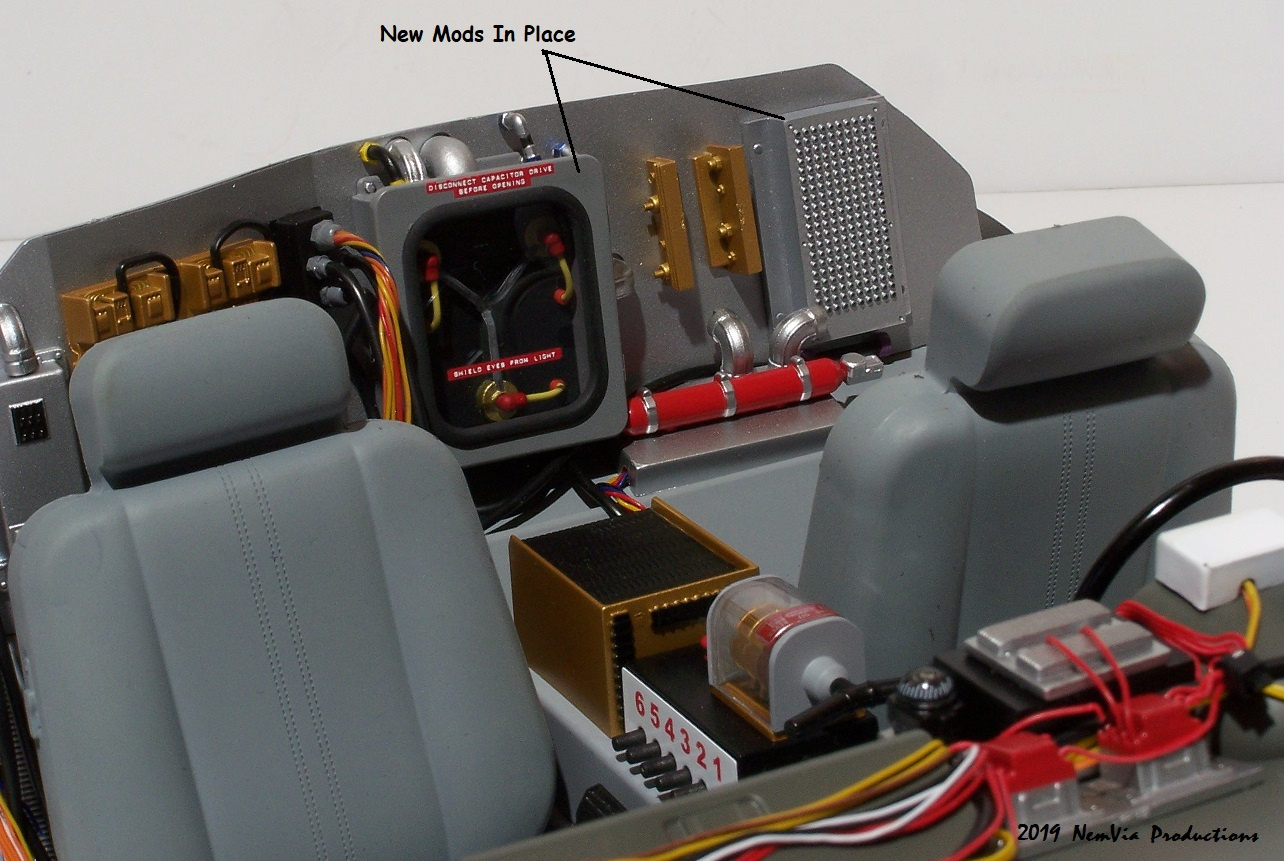
Okay, back to work again, with a bit of disappointment included with this group of issued. Although I was forewarned that this was going to happen, it still is a bit irksome. Eaglemoss sent me a message a few days after I posted the September supplemental update saying that their suppliers had run out of one or more of the next upcoming issues. I wasn't totally sure what to expect, but I was under the impression that I wouldn't receive anything from them for a month or two, but the following week I saw that I was billed for my next 4 Issues. I didn't look too closely at the issue numbers on the billing invoice, but I thought that the issue with the out of stock issues was remedied. I received my box and opened it up as usual to photograph the Assembly instruction booklets and I saw that I received Issues 71, 72, 73, and 78. A little distraught I re-checked the email invoice and it matched what I received. A little bummed about what I got, I proceeded with the assembly up to 73. I can't do anything with issue 78 until I receive Issue 75, 76, and 77, so 78 will have to be put aside until Eaglemoss catches up with their distributers. I think I would rather have waited for the proper issues came in the correct order, but here we are. So, what I was able to do this month was assemble just the door parts and the door for the passenger side, but Issue 74 didn't come which contains the hinge assembly parts to connect the door to the car frame, so I will not post an overall progress pic for this update. However, since I received some of the MODs that I wanted I was able to add those into the car for this update. The MODs include the car floor mats, a new Xmas tree component and a more detailed version of the Flux Capacitor. Both of these contain much better lighting effects that are closer to the screen version of the car. Hopefully by the next Issue cycle, everything will be caught up and I can give you a better progress update. But, I do have 26 new pics added to the 1/8 scale BTTF DeLorean page, so check them out and let me know what you think! More to come, keep checking for the November Updates
Mark
The top link will take you to the latest pictures, the bottom link will take you to the homepage.
https://www.nemvia.org/apps/photos/photo?photoid=205952494
http://www.NemVia.com
-
Re: ST:TMP Drydock (WIP)
Attachment not found.Although I've been working on this model for about 3 years now, It's still a WIP. I'm getting closer to it's completion now. This Drydock is scaled to the Deboers 1/260 scale Enterprise model and is one of 2 docks that I will be building.For now I'm* in the November update for 2016 and I should have a new update in a couple of weeks. Enjoy.
November Updates - 2016
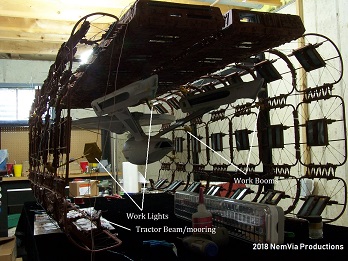
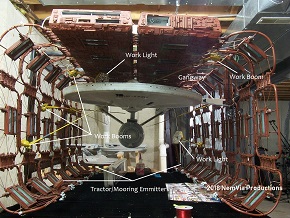
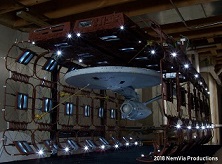
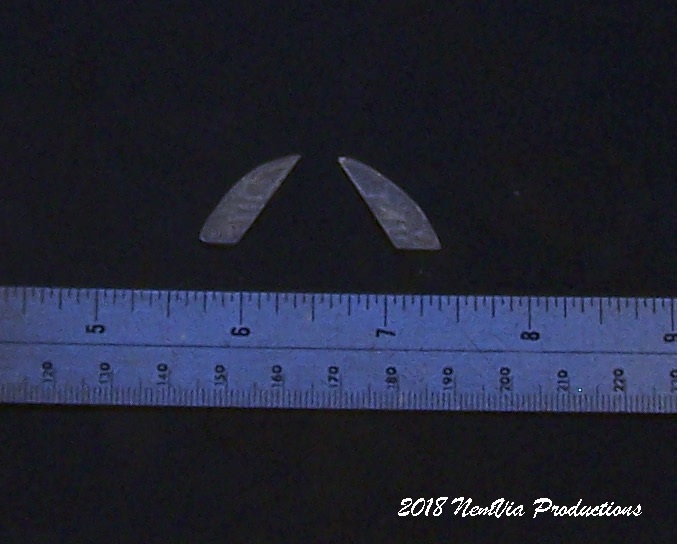
For this month's update I've finished wiring all of the turrets with their lighting effects. I've fed the wires through the bottom section of the turret and through a styrene tube at the back of the base of the turret. This makes it look more the filming miniature versions. After getting this all set up and adding the fiber optic strands to each of the work booms*I've also been working on the painting of the Work booms as well as the booms for the Work Light Array. There are 3-4 different colors used on these pieces. The main color was and off Yellow which somewhat resembles the color of our modern day work cranes. There are also gray and rust color stripes added as well as some military green. They were sprayed in layers, masked and then the next color was added. The final color was the yellow. They will need some touch ups to cover up some small pot holes created by the resin-molding process.
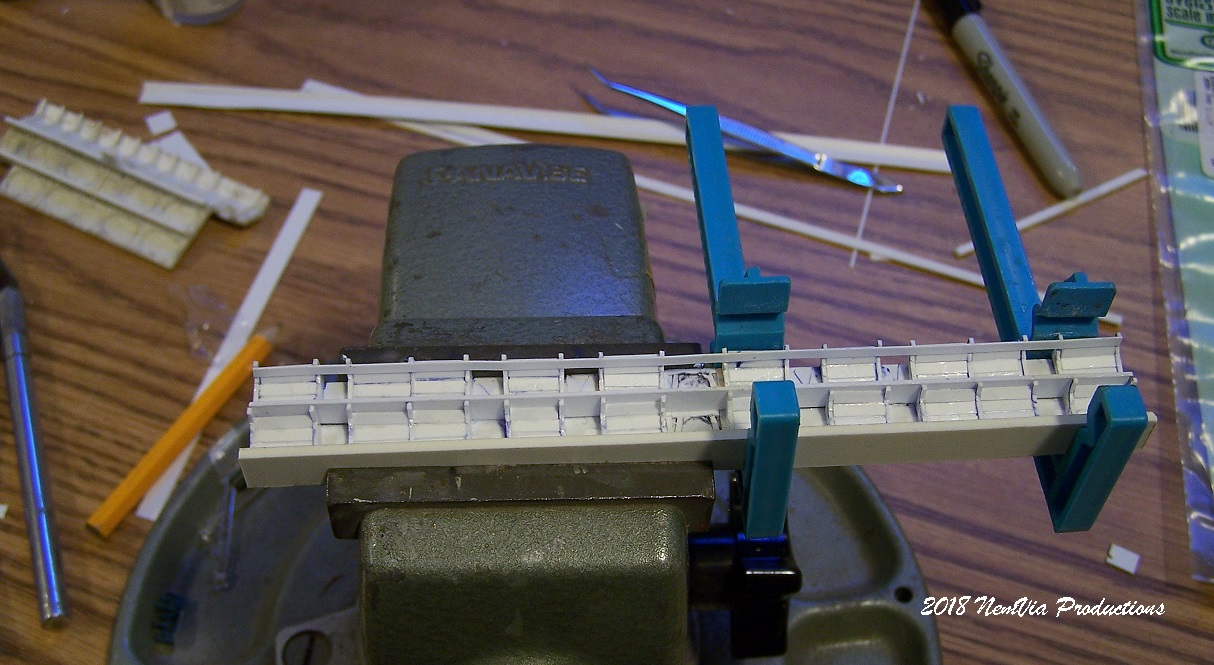
On the 1/350 scale dock I was not sure how I would mount these turrets to the dock because at that time there were no good pictures of the dock available. What you saw on the screen was all I could go by. But having seen the filming miniature in person I now know what to do to mount these pieces to the 1/260 scale dock.
There are some specialized mounting brackets that hold the turrets into place, so I'm trying to replicate them as best as I can using styrene. So far they are turning out okay and they look like they'll be able to support the weight of the turrets, especially the light arrays.*I should have them all painted up by the next updates. There are 20 new pics under the November Updates - 2016 page. Enjoy and feel free to comment. Thanks everyone. See you next update!
Mark


-
My 1/8 Scale BTTF Delorean (WIP)
MAY UPDATES -2019 (part ll)
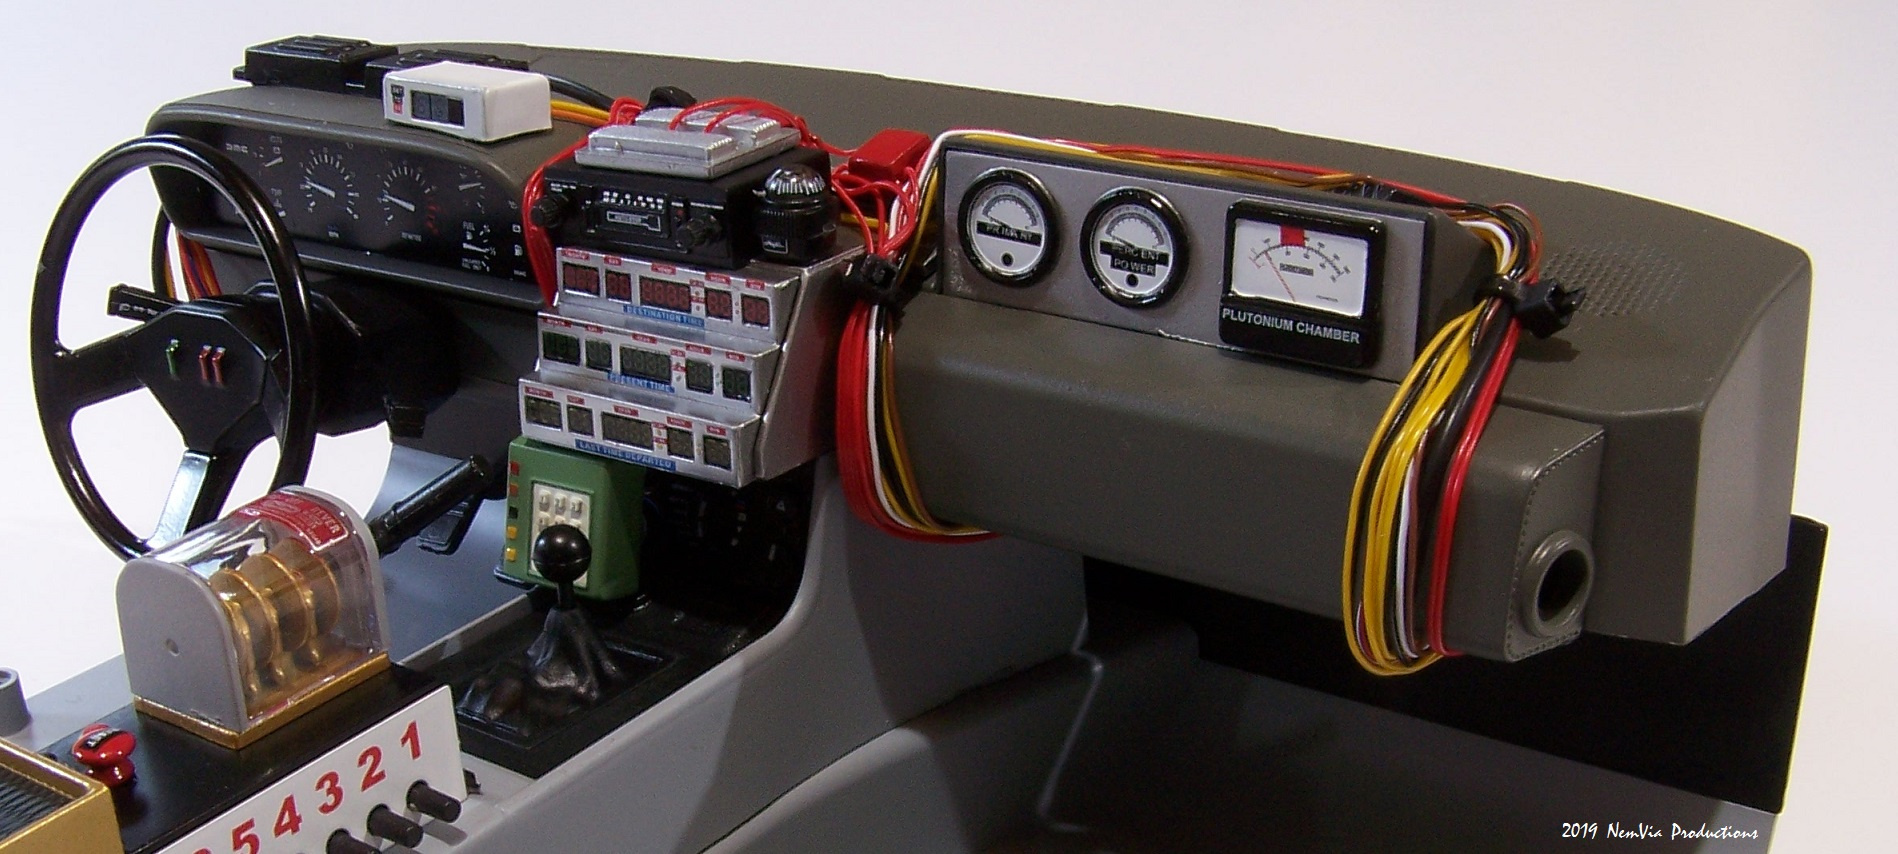
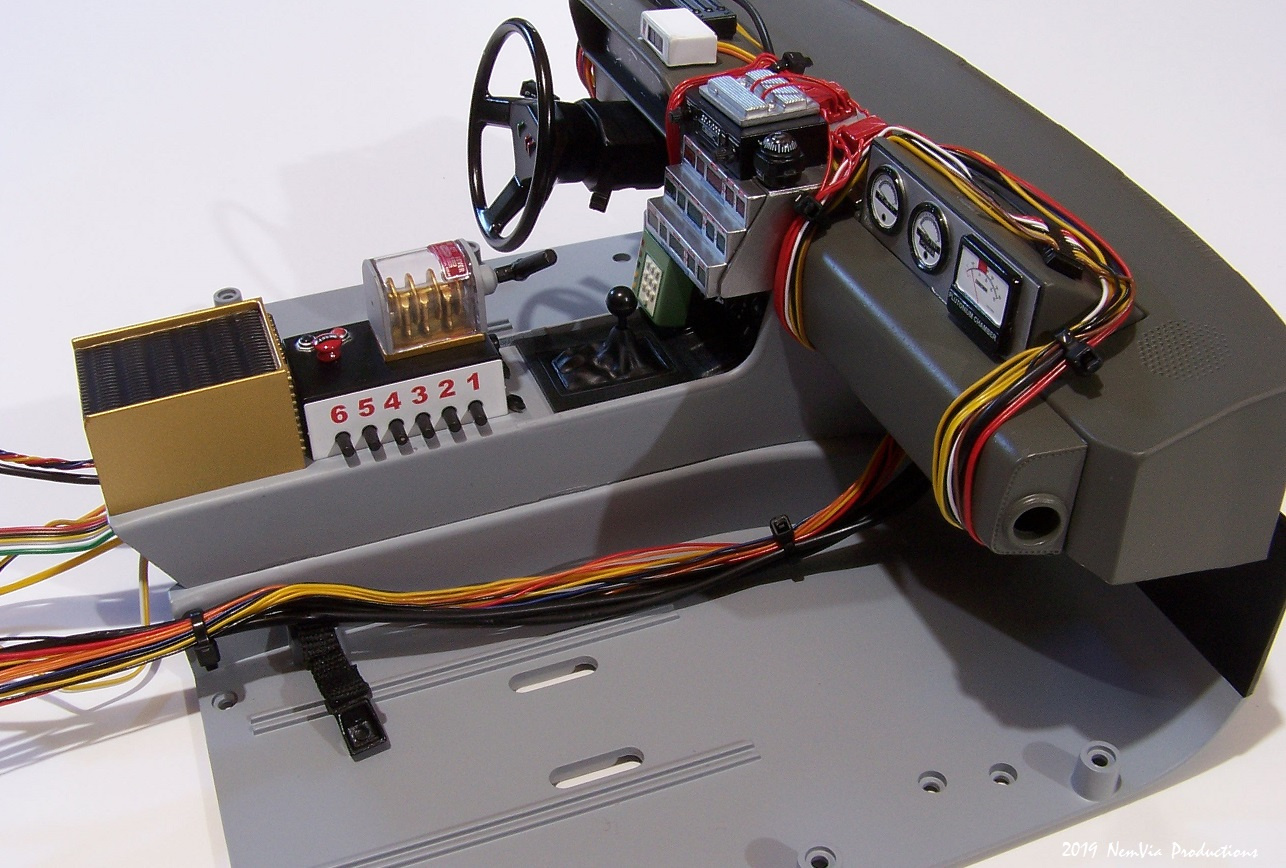
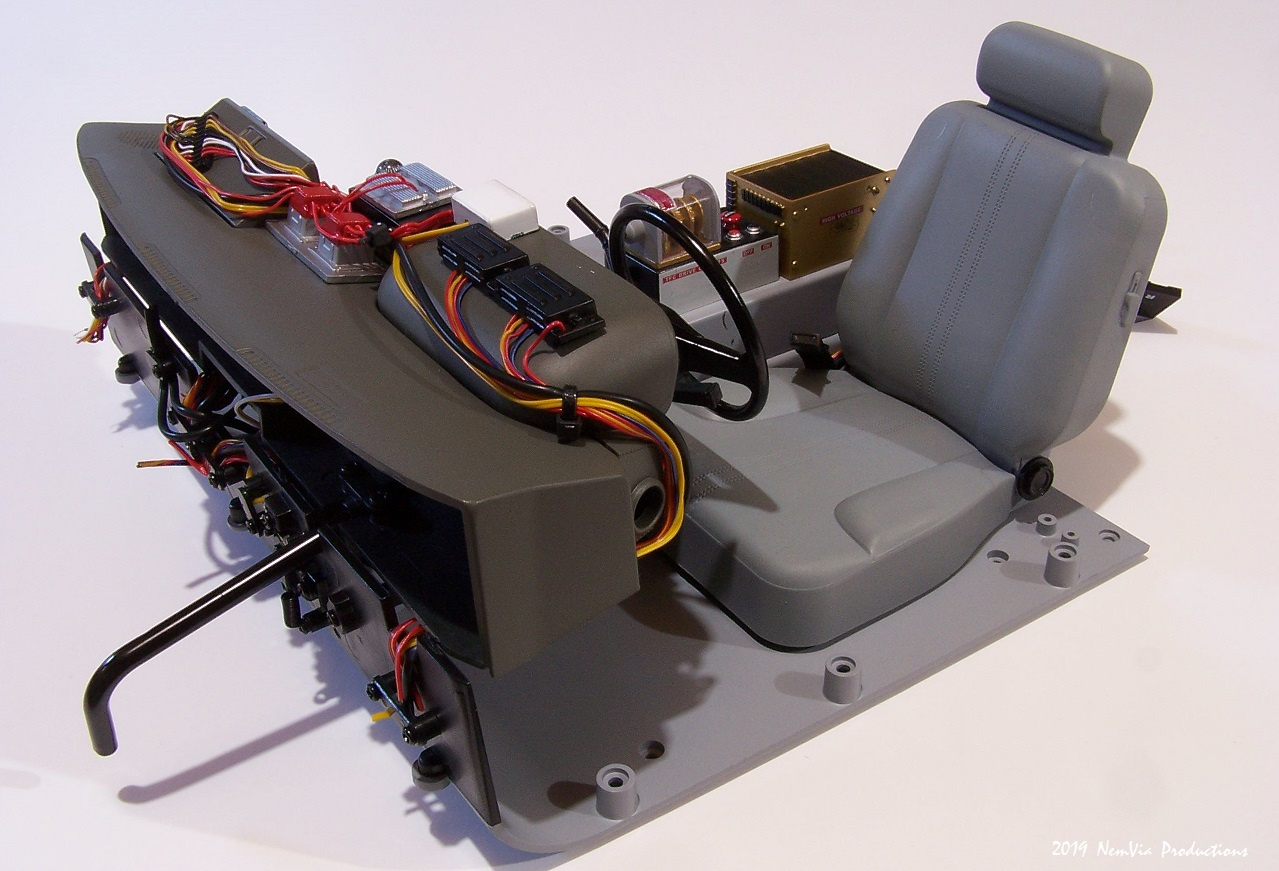
I know this is a rare occasion, but I was able to receive my next 4 issues of the DeLorean build within' the same month. I really liked these issues, especially Issue 48. Issue 48 had a little bit more work to do on it and it dealt mainly with the dashboard component wiring. All of these cables are of the GNDN variety and used for aesthetics purposes only. But, to adjust them and get them into their proper places was what took up most of the time. (well, that and I misread the instructions for the wire separator piece and threaded them through it upside down.....DOH) Oh, we'll anyway it was fun doing this part of the build. All of the cables needed to be threaded through the bottom of the dash into the trunk space area only to be secured there permanently later on. I've actually found a couple things that I do not like with this part of the build, though. One is that the cable ties or zip ties are way out of scale with the care. I do however plan to replace them with some smaller ones that are used for stereo electronics which are much smaller and a little more accurate. Also, I was very disappointed in the function of the steering wheel and steering column. I had hoped they would turn the front wheels a little farther than they do. Now I understand why they give you the mounting blocks for the display stand so that the wheels will turn a bit more with less effort. But, I don't think it's going to be too big of an issue since the car will mostly be displayed in a case. Anyway, I was also able to build one of the cars seats, driver's side to be exact. I like how the material feels, almost like real leather, and they give you foam to place underneath the seat cushions to make the seat covers feel soft just like you could sit on them for real. I think I will be weathering the seats a bit. Just looking at how much stuff was added to the car by "Doc Brown" would suggest a lot of wear on just about everything on the inside of the car. That's why I'm leaving any scuffs and scratches that I might make on the car for that lived in feel. So far I've built issues 1 - 50 for this kit and the car now weighs in at 7.5 lbs (3.4 kg) I didn't know it was going to be this heavy. I can't imagine what it will weigh when finished. So, there's 31 New pics to check out. Check out the link below, that will get you to the first pic. Well, that's it for now. Keep checking for the next update.
Thanks, Mark
https://www.nemvia.org/apps/photos/photo?photoid=205718895
-
My 1/8 Scale BTTF Delorean (WIP)
JANUARY UPDATES - 2020
Well, it's now 2020 and so far, this year has not started off well in the DeLorean build department. I received Issues 88 through 91 in December, but found out that there were two things that needed to be taken care of before I could move forward on the build. 1) and most importantly, I discovered that while trying to add the assembly Issue 91 to the engine which, by the way is the engine air filter assembly, I found that I had put the left and right air intakes, on the manifolds, facing the wrong direction. A major OOOPS! I decided to put off working on this project until after my peak season at work, otherwise I was going to hurl the car at the basement wall and be done with it. This was a bit frustrating, too because I still have not received Issues 75, 76, and 77, and it's now going on four months, with a new complaint letter sent in every month I don't get these Issues. And in order to move forward on the build, I need the parts from those Issues. Issue 74 is still in it's parts bag because I have nowhere to put these pieces. Anyway, when things calmed down at work I decided to fix the manifold problem. This gave me something to do while waiting for the next Issues. I had to reverse engineer how to get the manifolds off and turned around to the correct position. I did have to remove the engine to get to the manifold, but I finally got it into it's proper position, and now the air filter and other system pipes fit very nicely. But that's not all... You're not gonna believe this one.... I get my usual notice that my Issues would be mailed out, but I didn't pay attention to which ones I would get until they were delivered. so now, I'm not only missing 75, 76 and 77, but now I didn't get 86, 87 and 92 and 93. What I received are Issues 94 - 97 but I don't have the other Issues to assemble these parts together. (I guess you could say I have Issues with my Issues) So I'm not going to even open the parts bags for these until I get the other parts. Man! what a disappointment. And still no word from Eaglemoss on this problem But!!!! I still have posted some interesting pics of what I was able to get done despite not having what I need. I've assembled what I could starting from Issues 82 - 85, then 88 - 91. Some of the interior parts were added, such as the seatbelt harness pieces and of course the air filter assembly. The engine cover is made from metal and the detailing on the grates is quite awesome. But this is about all I was able to do for the last two months. So there are 49 new pics in the 1/8 scale BTTF DeLorean page. I hope you can at least enjoy those. That's all for now, keep checking my site to see if those missing Issues will ever get here!
Take care, Mark
https://www.nemvia.org/apps/photos/p...toid=206058226
http://www.NemVia.org
-
My 1/8 Scale BTTF Delorean (WIP)
SEPTEMBER UPDATES - 2019
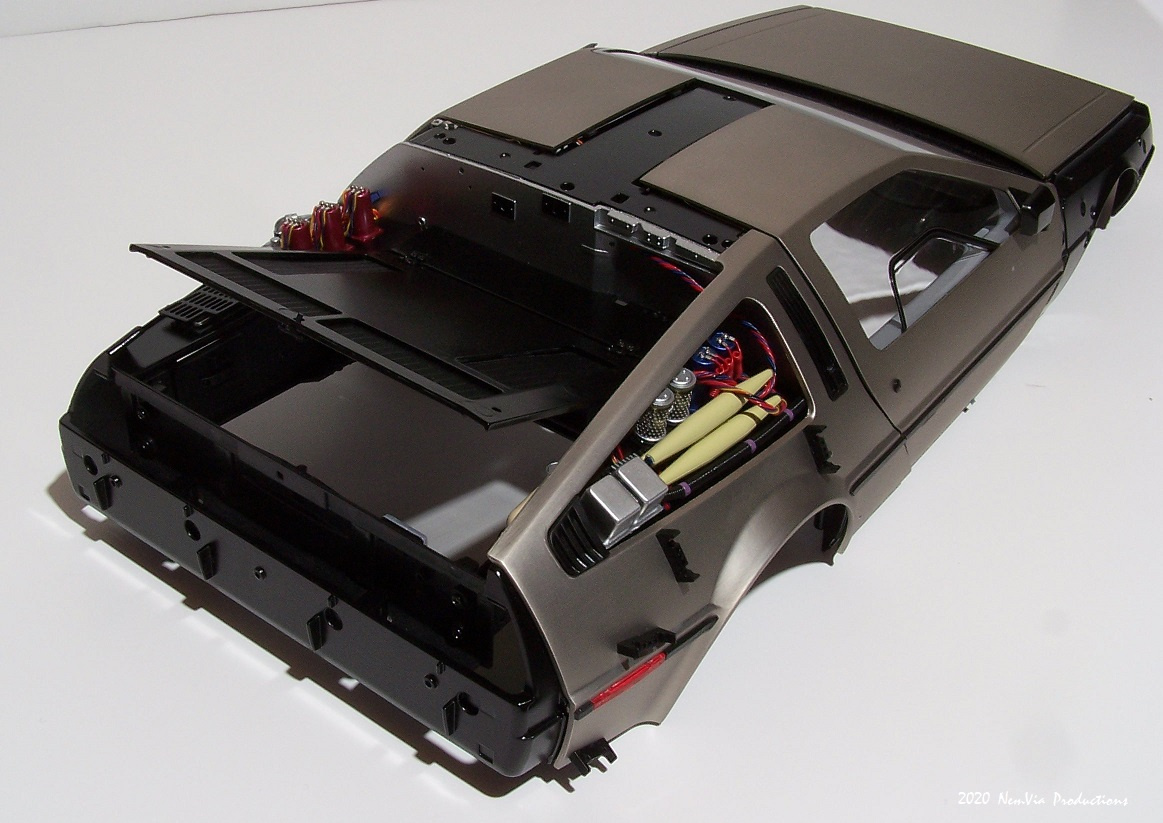
New exterior car body pieces arriving, finally! It's nice to work on some of the small details for this build, but every now and then it's great to see the larger parts arrive in the mail as well. This month I received Issues 63 - 66 and these included the Hood and framework for the trunk, the trunk interior and some more switches to operate the dome light when the doors are opened. All 4 of these issues are relatively quick to put together. The hood is made from metal as well as the air-pistons that are used to hold the trunk open. The pistons did have an issue, though. When opening the hood the mounting bracket pieces that are in the pistons would pull out from the metal tubes. I used some Maxi-cure to re-cement them into the tubes. This seems to work. But the reason they probably pulled out in the first place is that the piston tubes are very hard to pull open and slide closed. So I opened the hood as far as it would go, got some WD-40 and sprayed it on a tissue, then rubbed it onto the smaller part of the piston that slides into the larger tube. After a few open and closings, the pistons operated a lot smoother and I don't have to worry about the brackets being pulled out again. (I hope) For some of the smaller details in ISSUE 66 there are some more springs and door catches to assemble as well as the door locks which contains some micro switches, these also had some tiny springs to add in. Not very fond of those. I did have one fly away from me in an earlier issue, but fortunately I found it. Sometimes you need to work on these tine parts with over a white floor just in case something like this happens. (Wish I had a white floor) So, with these Issues, the piece-count for the build so far is about 1,079 pieces, including screws and wiring, etc. I haven't done this in a while, but the car now weighs in at 13.1 lbs (5.94kg). As a young Marty would say: "That's heavy, Doc". The weight includes the front left fender and the bumper assembly. I'll have to use a different scale next time because the one I'm using is for small measuring, up to 13 lbs. (5.89 kg)
Anyway, there are 23 new pics on the "1/8 scale BTTF DeLorean" page, so check 'em out and let me know what you think!
In the next issue (67) I will be receiving the driver's side door assembly. I'm really looking forward to that. Thanks for checking the sight! More to come next month!
https://www.nemvia.org/apps/photos/p...toid=205880178
http://www.NemVia.org
Attached Thumbnails
-
Re: ST:TMP Drydock (WIP)
Thanks Rekkert. I appreciate your comments. This is my current update even though my work is causing another stalled out period until after January 1:The Enterprise is looking great in there.
Sorry to hear about your mother, it's understandable that you took time off the project because of that, no need to apologize.")
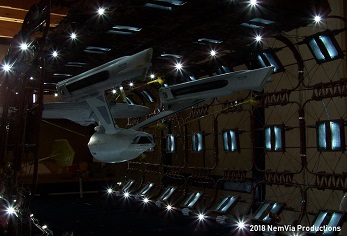
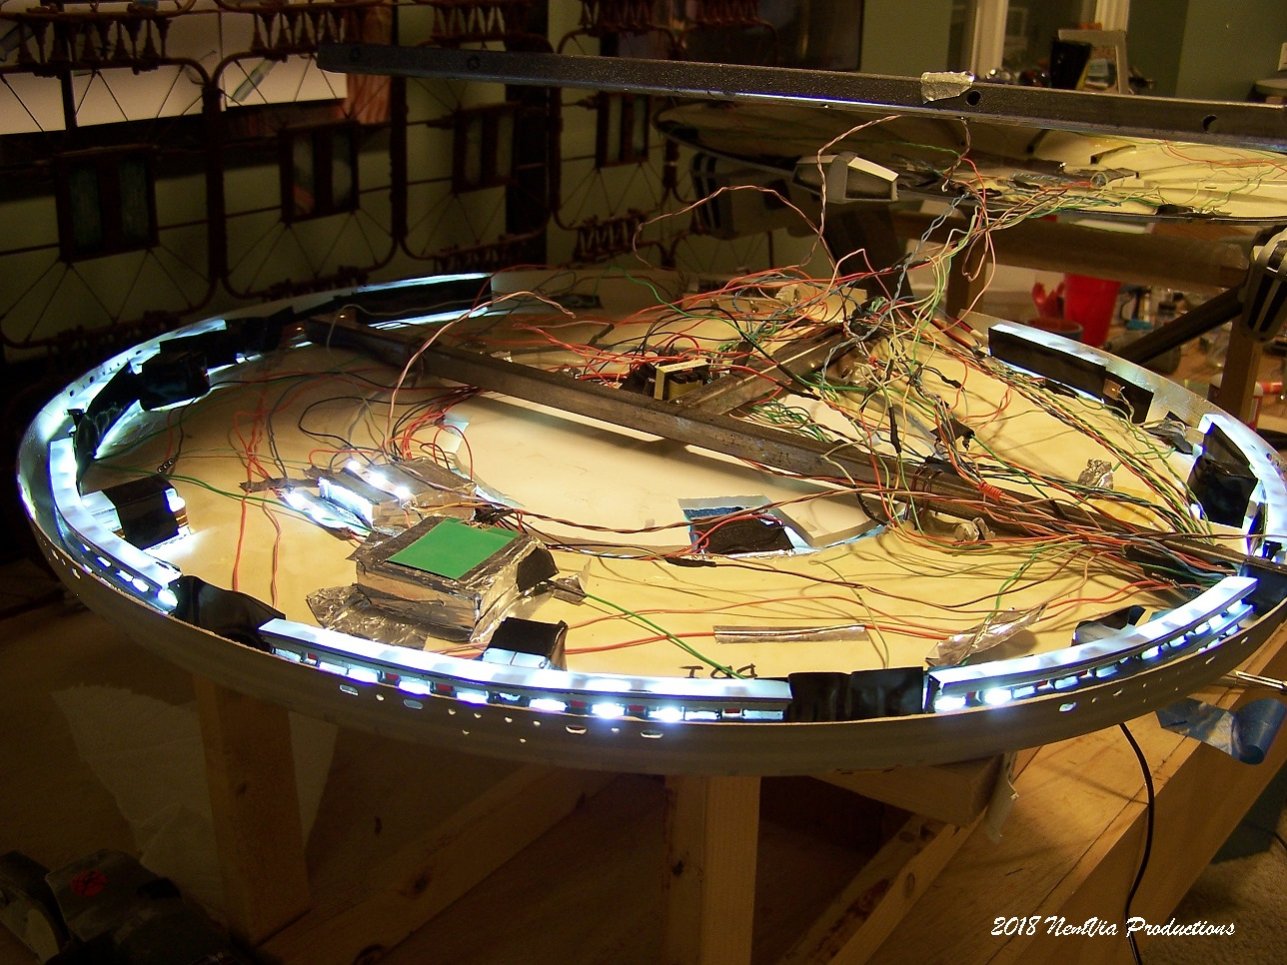
AUGUST UPDATES - 2018 Wiring, Wiring, WIRING! Yes, that's pretty much all that I've been doing this last month. Wiring and double checking the circuits to make sure they're working. I've had to do this because there were so many loose wired from both the Enterprise and the Dock that I needed to start getting these out of the way so I can do more wiring and lighting. Really there are only a few more effects that need to be added and then I can start working on the display stand switches and trim work. Besides the wiring I've sealed the open hanger on the aft end of the dock. The ceiling is now permenetly cemented to the structure. I will be adding a mirror to the back end of the hanger to give the appearance that the Hanger goes much farther back into the modules than it actually does. She's coming together. Please hang in there. See you next month. Mark
http://www.NemVia.net
Attached Thumbnails
Attachment not found.Attachment not found.Attachment not found.Attachment not found.
-
My 1/8 Scale BTTF Delorean (WIP)
deadmaster wrote: »wow nice model.
Thanks Deadmaster… here's another update.....
NOVEMBER UPDATES - 2019
Hey everyone! Well, still no word on when I'll receive my missing issues which are now Issues 75, 76 and 77. I really don't know what Eaglemoss will be sending me until I get my next automated order. They did send me Issue 74 which is the issue that has the hinge panel for the passenger side gull wing door, so I was able to get that into place, and I also received Issues 79, 80 and 81. 79 & 80 are the passenger side rear panel and trim assemblies, which are very easy to assemble. Issue 80 also has similar parts to Issue 78 which are the trim pieces for the rear panels as well as the mounting brackets for some of the lighting effects. Issue 81 has a part called the "engine surround" which will eventually be filled up with wiring and more greeblies. I have 17 new pics added to the 1/8 scale BTTF DeLorean page which includes the pics and parts for Issue 74 which is now in sequential order. Now, depending on when my next shipment will get here will determine if there will be an update for December. My busy season begins next month so I might not have too much time or energy to get anything done. If not, there will be a big update on January of 2020. Who knows. Well, that's it for this update. Keep checking the website and we'll see you next update!
Mark
https://www.nemvia.org/apps/photos/photo...=205996566
http://www.NemVia.org
-
Re: ST:TMP Drydock (WIP)
January Updates - 2018
Hello everyone! My apologies for the delays. I really have been working on my build, but Life just keeps getting in the way of my progress. Hopefully things will be a little better now that my peak season at work has calmed down.
For my project updates I have cast resin pieces for the outside details of the hanger bay lighting effects. I had to make the pieces transparent so you can see the actual lighting effects. I'm in the process of opaqueing the castings to prevent light leaks.
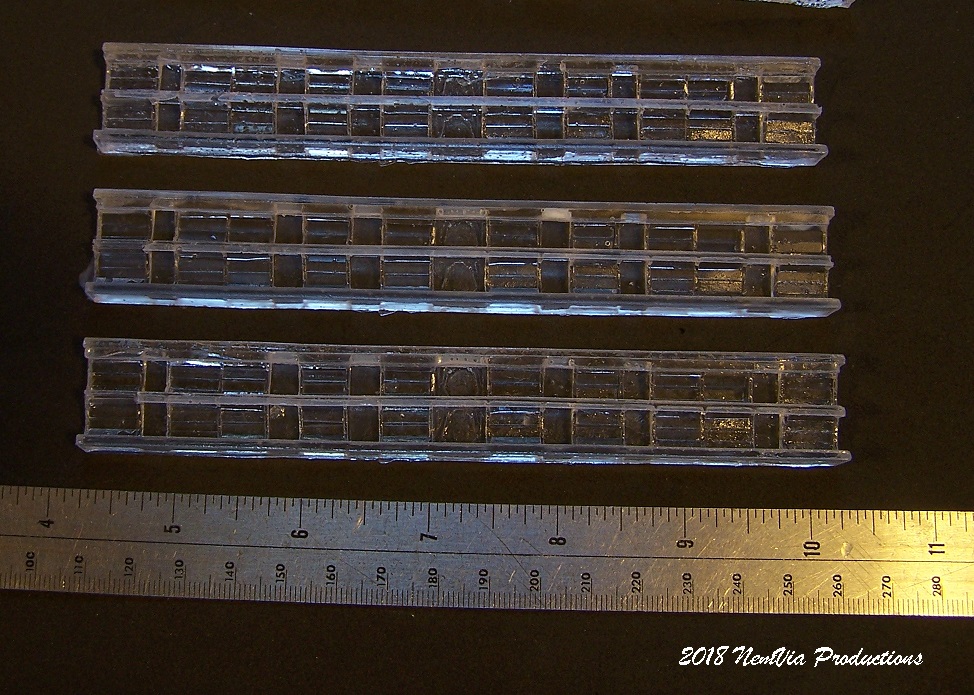
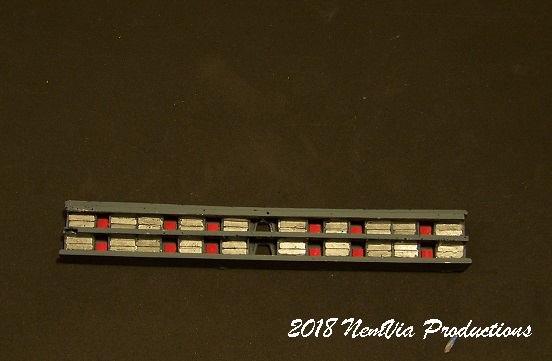
I was asked by my client to put some different lighting into the saucer section of the ship. So, I pulled all of the fluorescent lighting and ballasts out and I replaced them with LED lighting strips. This was a very good idea because the lighting will have a longer lifetime in the model. I also put some white styrene strips into the saucer sections behind the viewports to reflect the lighting better. I was originally going to insert some pictures of the corridors onto the strips but there was not enough depth to the pictures. So, I decided to do what I was originally going to do with the corridors and that was to build 3D versions of them. I built one master of the corridor section and made molds so that I could cast as many replicas as needed. I cast them in clear resin so that I could have the lower panels of the corridors lit as seen in the movies. After I cast all of the pieces I masked off all of the light panels. I then sprayed the first color which was FLAT WHITE. This would help reflect some of the lighting to make it appear more even. I then sprayed them FLAT BLACK to hide any light leaks. Next I sprayed them a medium BLUE/GRAY for the tops and bottoms of the corridors. Finally I hand panted the rest of the panels ALUMINUM, for the monochromatic look. After this I sprayed some flat pieces of styrene FLAT RED and then cut several pieces of them, all the same length, to use as the doors to the crews quarters. After all of this was done I then placed all of the finished corridors into an oven at 170F for ten minutes. This allowed the styrene to be pliable and I could then bend them into the shape of the outer rim of the saucer., Next I had to use a belt sander to sand down the tops and bottoms of the corridors to get rid of both the burrs from the casting process and to make them fit into the saucer. I aligned the corridors so they could be seen through the viewports.
Since the back sides of the castings were not painted, I added the LED strips to the backs of each of the corridor strips. Then I put electrical tape over the backs of the strips to prevent too much light from shining back into the model and ruining other lighting effects in the saucer. It was a lot of work, but worth the effort to give the corridors a little more 3D depth to them when looking through the viewports. To further help with the light leaks I found these foam rubber sheets at a hobby store and cut them into long strips and cemented them all along the perimeter of the upper saucer piece. This should help block light from showing through the seams of the upper and lower saucer pieces.
I have 16 New pics which can be viewed in the Members Gallery page under the January updates Aâ 2018 album.
I can now finally seal up the saucer and get ready to permanently add the Enterprise into itAâs new home in the Dock. Again, thanks for your patience with this build and I apologize for the long wait for this update. Hopefully I can now get this build finished. See you next update.
http://www.NemVia.net
-
My 1/8 Scale BTTF Delorean (WIP)
MARCH UPDATES - 2019
Greetings Fellow Modelers.
Just got back from 2 weeks vacation in a place that was nice and warm. Had to take a break from this awful cold weather in the Midwest. So, now after some recharging of the batteries from a good rest, I can deal with life again for a little while.
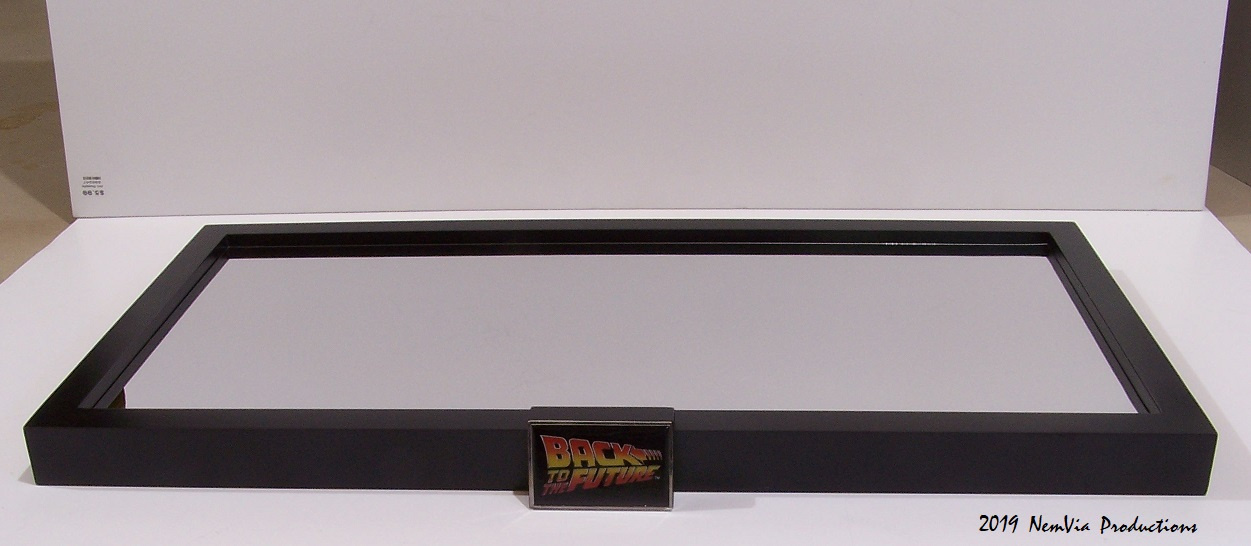
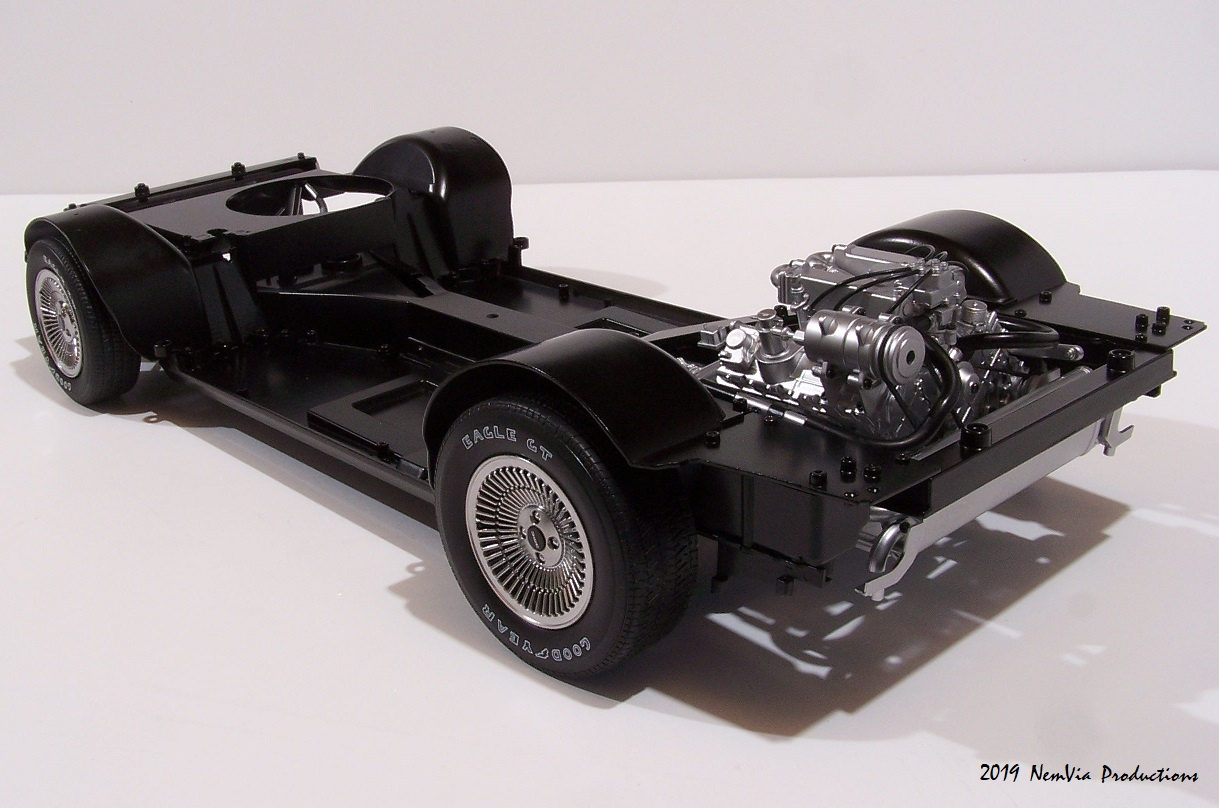
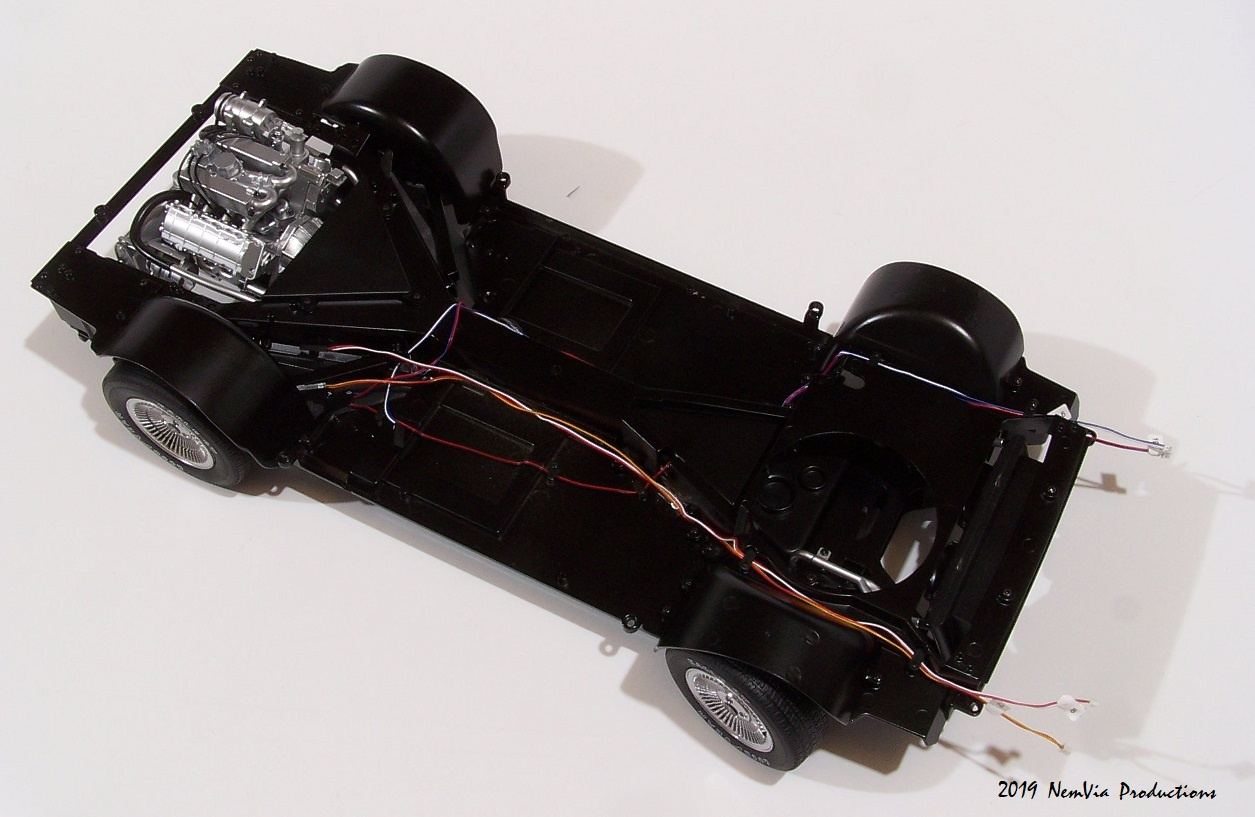
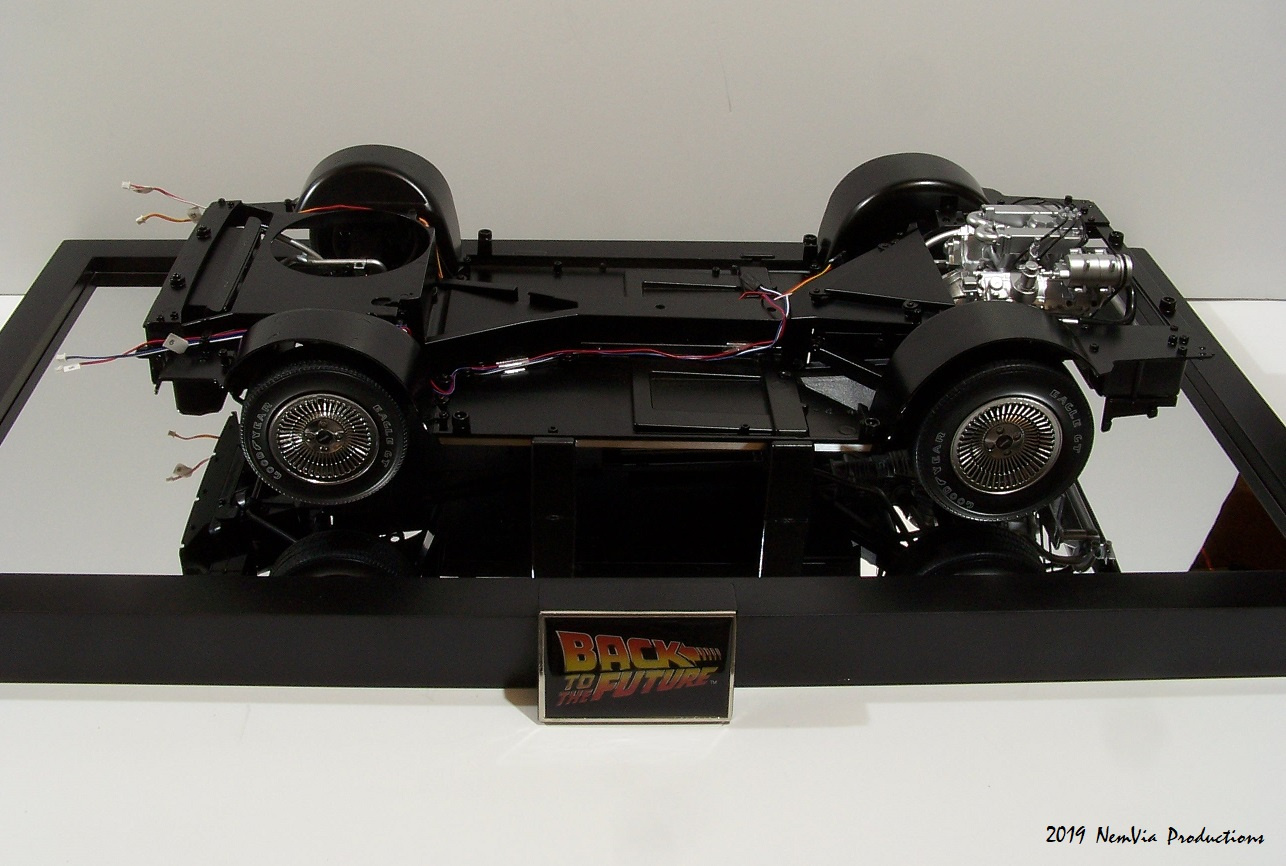
This month's update is a bonus update. Before I went on VACA, I received Issues 31 - 34 and assembled them, photographed them and then all I needed to do was edit them when I came back from our trip. At the beginning of the month, or on March 6th, I received Issues 35 - 38. So you can see the updates for 8 of the Issues this month. Also, the box I received for my shipment was unusually large this time and I couldn't really figure out why at first. But, then I checked my billing manifest and found that the 3rd and final "FREE" gift was included with this delivery which I forgot about. Eaglemoss sent me the Display Base for the DeLorean. It looks pretty sharp. Measures 27" x 14" x 1.5" and has a mirrored surface to display the underneath of the car and a BACK TO THE FUTURE display plate on the front. Issue 38 came with 4 mounting brackets for the car to sit on, but they don't hold the car high enough for hover mode. Maybe they're will be 4 more coming in the future that are a little higher up. Whish I had a Flux Capacitor so I could find out..... Hah... Anyway, I was also surprised that the front and rear wheel wells were metal pieces instead of plastic. The only Issue I had with these concerned the rear wheel wells. I found that in order to get them screwed in place I needed to first screw in the front part of the wells to the Chassis, then put the 2nd and 3rd screws in until they were flush with the Chassis. The "suspension" parts kind of hold the wheel wheels up and away from the frame. IF you try to put the screws in from back to front it's a little more difficult. Just letting anyone whose building this kit know how to get these parts in place. With these 8 Issues, some of the wiring has arrived along with the Battery Box and lid which are cleverly and appropriately hidden in the "fuel" tank. It looks like in the next Issue (39) some more wiring items will be arriving. I'm looking forward to it. There are 43 "New" pics in the "1/8 Scale BTTF DeLorean" page, starting on page 3 and slide number 158. For a view of the Display base, go to the bottom of page 3. As always, comments are welcome. See you next Month.
Mark
http://www.NemVia.org
Additional credits
- Icons from Font-Awesome
- Additional icons by Mickael Bonfill
- Banner background from Toptal Subtle Patterns
© Scifi-Meshes.com 2001-2024