Greetings!
Welcome to Scifi-Meshes.com! Click one of these buttons to join in on the fun.
Quick Links
PracticalBuilding Serenity
 JohnThunder0
Posts: 0Member
JohnThunder0
Posts: 0Member
Getting a touch of cabin fever during the winter monsoon, so I decided to start a new model of Serenity. Materials are mostly cardboard, card stock, and paper, with the odd bit of junk thrown in on the details. I start with the paper model by Jorge Garcia Serrato and modify according to materials available and pix from the movie and TV series.
First step for me is to print out the pattern pieces on plain paper and glue them on to cardboard. In this case the cardboard is the rigid back from an artistA’s drawing tablet a little over 1/16" thick. There are a couple issues with the thicker cardboards. When folding pieces it is necessary to score the fold lines else youA’ll get a really crummy fold. I use the back of a utility knife blade for this. Also, thicker cardboards change the dimensions of pattern pieces, so you have to figure that in as you go.
This brings me to the next step: mudding. I like using Plastic Wood, which is sawdust mixed with glue. If you want to make your own mud, talcum powder and ElmerA’s glue works pretty well. Just mix it in small batches as required. Mudding helps to straighten lines and planes as the cardboard distorts from glueing and other manipulations.
Once the mud has dried you can sand it back to get the contours you want or need. I made a sanding stick from an old emery board (large) with strips of various grit sandpaper super-glued on. When it clogs up from the mud itA’s fairly easy to replace the sandpaper.
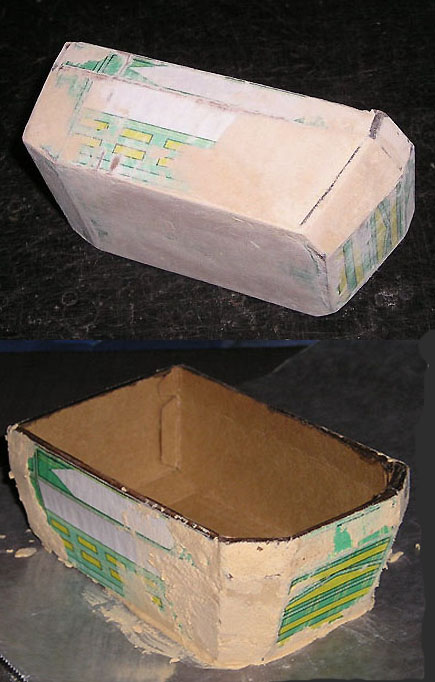
Pictured is SerenityA’s cargo bay, mudded, then sanded, re-mudded and sanded, and ready for the attaching of the landing gear pods. I should note here that I prefer super glue for main construction since it sets up way quicker than ElmerA’s or other wood glues. I do use ElmerA’s for adding paper details as I go.
First step for me is to print out the pattern pieces on plain paper and glue them on to cardboard. In this case the cardboard is the rigid back from an artistA’s drawing tablet a little over 1/16" thick. There are a couple issues with the thicker cardboards. When folding pieces it is necessary to score the fold lines else youA’ll get a really crummy fold. I use the back of a utility knife blade for this. Also, thicker cardboards change the dimensions of pattern pieces, so you have to figure that in as you go.
This brings me to the next step: mudding. I like using Plastic Wood, which is sawdust mixed with glue. If you want to make your own mud, talcum powder and ElmerA’s glue works pretty well. Just mix it in small batches as required. Mudding helps to straighten lines and planes as the cardboard distorts from glueing and other manipulations.
Once the mud has dried you can sand it back to get the contours you want or need. I made a sanding stick from an old emery board (large) with strips of various grit sandpaper super-glued on. When it clogs up from the mud itA’s fairly easy to replace the sandpaper.
Pictured is SerenityA’s cargo bay, mudded, then sanded, re-mudded and sanded, and ready for the attaching of the landing gear pods. I should note here that I prefer super glue for main construction since it sets up way quicker than ElmerA’s or other wood glues. I do use ElmerA’s for adding paper details as I go.
Post edited by JohnThunder on
Tagged:
Additional credits
- Icons from Font-Awesome
- Additional icons by Mickael Bonfill
- Banner background from Toptal Subtle Patterns
© Scifi-Meshes.com 2001-2024
Posts
btw, that green alien thingy means it's a thread in which you've posted.
After attaching the landing gear pods I discovered that the cargo bay wasnAât quite squared up. OOPS. Had to add a shim to the left rear corner and re-mud to get it square so the tail section will be straight. Same for the right front corner so the neck will fall in line. Turns out I need a little more mud on the bottom too so sheAâll sit level.
The wings are always a hassle. Too thin of material and theyAâll droop over time due to the weight of the engines. Too thick and getting them folded up becomes a chore. The 1/16th stuff IAâm using was borderline too thick, but IAâm making it work.
IAâve found that adding a wing spar through the cargo bay helps both with accurate location of the wings and rigidity. It looks short, but I have to leave room inside the wings for the engine pivot pins. Inside the wings are additional bit of cardboard for structural strength, and the mud in the engine pivot cutouts helps as well.
I should note here that IAâm only adding gross detailing at this point, like the cowls and reinforcing struts on the pods. Fine detailing on this section wonAât come until the head/neck assembly and galley dome are installed.
Don't mind the circus stripes on the pattern pieces, my printer is just about toast.
And as far as cabin fever goes, this isn't nearly the craziest thing to build a Serenity model out of. There's this...
With the neck angle wrong the dome was way too high. To fix that I cut the top out of the dome, filled the cavity with paper toweling, and slopped several heavy coats of mud on it. After much Aâmud on, mud offAâ and cutting/sanding itAâs pretty close.
Next up was adding the remaining structural details, such as the wing root extensions and the tubular structures that bracket the back of the neck. At the rear of the cargo bay IAâve added a mating structure out of mud for the tail assembly. On the paper model the grav rotor base (infirmary/rec deck area) sticks up past the bay and just looks like an unfinished area. Thanks to QMXAâs Serenity Blueprints and multitudinous pics of their artisanAâs replica I figured out how that should join to the domeAâs rear and itAâll look much better.
A few more slight adjustments here & there and I can begin the fine detailing.
I need to go all over it, fix what flaws I can, re-prime those spots if needed, then add the solar panels, windscreen, and probe mounts on either side of the chin.
Take a CD or DVD and cut about 3/8" out of the rim with a knife. This causes the two layers to delaminate, giving you a clear layer (tinted purple) and a layer with shiny aluminum after you pop them apart.
The layers can be cut with scissors, but are kinda floppy in large sections so they need to be mounted flat or backed up with cardboard. Also, cyanoacrylate glue (superglue) eats the purple coating and can screw up the shiny aluminum. I should have checked to see what other glues might work without screwing up the pretty.
This is another section that can drive you nuts with detailing. All those little feed pipes for the reactor took me most of a day to bend and fit.
Embossing did work pretty well on the reactor vent covers (the swing out doors). I scored along the lines, then used a spoon type modeling tool from my leather-working gear to push the cardboard down. Those have always given me trouble at this scale because the difference in height between the panels and frame is only about 1/32 inch. Wish IAâd thought to use that technique on the wing inserts instead of cutting them out and gluing in a backing plate. Live & learn.
Now IAâm ready to mud. That finalizes the shape and adds additional rigidity to the skids.
Are you eyeballing this or are you working from blueprints?
I've been searching for some Serenity blueprints to build the model in 3D.
Thanks...
Al
http://www.fireflyshipworks.com/category/development/ will take you to QMX's site. Poke around on there and you should be able to find their Serenity Blueprints Reference Pack. Best $35 I ever spent.
Under the Development category is an article re their Artisan's Replica of Serenity. Lots & lots & LOTS of pictures of the various bits they made for the replica which should also help you out.
As a for instance, the cargo bay on the Jorge/original version is 1/2" longer (at 1.5X scale) than the QMX/movie version. I'm also finding other bits of extra length here & there as I go. Once I figured that out it explained why my models never quite matched up with the drawings in the Reference Pack. I see lots of time using Photoshop in my future.
BTW- You're a Pratchett fan? GOOD MAN!