Greetings!
Welcome to Scifi-Meshes.com! Click one of these buttons to join in on the fun.
Quick Links
3DAries 1B from 2001: A Space Odyssey


 2957
SeattlePosts: 1,399Member
2957
SeattlePosts: 1,399Member


Taking a little break from my Enterprise-B to work on something a bit "easier." I've always liked 2001 and the design of it's spacecraft so today I decided to start working on the Aries 1B. I've thrown together a little test rig to make sure I understood how the landing legs worked.
Also a screenshot of where I'm at, sorta just roughing it all in now.

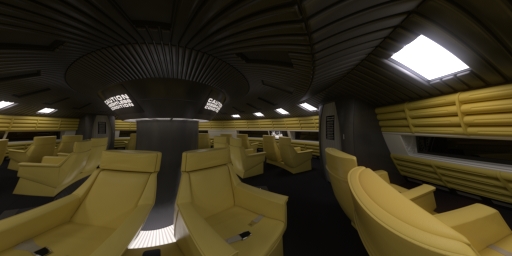
Also a screenshot of where I'm at, sorta just roughing it all in now.
Post edited by japetus on
Tagged:
Additional credits
- Icons from Font-Awesome
- Additional icons by Mickael Bonfill
- Banner background from Toptal Subtle Patterns
© Scifi-Meshes.com 2001-2024
Posts
Looking forward to seeing more of this project.
Al
You will find that you may have to add additional action to the upper leg struts, as they are a pair of hydraulic pistons on the filming model. This action allows the bottom of the legs to pull in tight to the body. If you watch the landing sequence you will see this. There is also a piston attached to the foot pad to tilt them in towards the body as well. I just finished the master pattern for AJ Models' Aries model kit. I had to bread-board the legs to duplicate their action.
Looking forward to seeing the finish!:thumb:
Scott
Not to sound like a know-it-all, but the thrusters are not centered under the windows or the panels in between the windows. If you look closely at various shots of the filming model, not design drawings, you will see that they are off center in relation to the windows. It is actually the window placement that is not on the 90* mark. It is subtle, but noticeable once you get up to your neck in researching the model. I was, so that is how I discovered that positioning. They windows and leg openings are at 90* degrees in relation to each other and the hull.
You are really going to have fun when it comes time to add the paneling to the top of the hull, around the windows.
Looking forward to more!:thumb:
Regards,
Scott
Anarion
Tho this one is a very close second.
There is a band that divides the cylindrical engine bases in half around the circumference that has holes through it. These holes allow the various pipes that run from top to bottom to pass through. Also, check the window height on the cockpit windows, they look a little too tall. ( as you would look at them from the top)
Looking forward to seeing more progress.
Scott
Scott
I liked your documentation in your "filming models" section of your website. It was really neat to see all those crazy parts come together to form a cohesive design! It's definitely a gift to be able to put all those parts together to form an idea, nice job
Progress looking good, glad you revived this thread also!
You are correct, the cockpit does not fit in to the top of the ship. I mastered the passenger and cockpit interiors for AJA Models. The cockpit was for-shortened and forced perspective is the result of the finished cockpit, just about what you have indicated in your render. The galley does not fit at all. The passenger section fits perfectly into the model.
As a matter of fact, the top of the elevator, the large beveled section, did not fit either. That was left out to accommodate the cockpit.
The arms that extend to open the clam shell doors are pistons. They attach to the same surface as the main engines. There is one for the left and right side of the clamshells and they sit up on cylinders. I know because I have seen the images of the filming model that contain that area of deatialing. If you follow the link to my site below, you can look through the images and see those cylinders with the tubes mounted perpendicular on them. Those tubes hold the pistons that attach to the clamshells.
http://spicerstudiosinc.com/spicer-studios-gallery/thumbnails.php?album=107
Regards,
Scott