Greetings!
Welcome to Scifi-Meshes.com! Click one of these buttons to join in on the fun.
Quick Links
3DPost Tutorial made by you!!!
 nahin0
Posts: 0Member
nahin0
Posts: 0Member
3D Text Effect into Water
Open the Photoshop software and create a new document. Which size has to set 2000 x 1500 pixels, with the high resolution of 300 and in RGB mode. Set it background color black and foreground color white by pressing Ctrl+D. Then go from A“filterA†to A“renderA†to A“cloudsAâ€. Here apply a gradient overlay layer style by following these (blend mode A“ScreenAâ€, opacity to A“90Aâ€, gradient A“black, white, reverse->checkedAâ€, style A“ReflectedAâ€, angle A“90Aâ€, and scale A“125Aâ€).
Now write something on this document. You can write anything. I wrote Color Experts. Font of Bauhaus 93 and size is 130 pt and strong.
22.jpg
Now change its Drop shadow layer as Blend mode at normal, color to #646464, opacity 75%, Distance at 0, Spread to 30%, and Size of 60px. Again change the Inner Shadow Layer Style as Blend Mode at Multiply, Color at Black, Opacity to 100%, Distance at 0, Choke to 0, and Size of 95px.
31.jpg
Now select text layer and cloud layer. Then merge by press Ctrl+E. Rename it as storm. Press Ctrl+J to duplicate it and named it water. For this time duplicate this layer.
Now press x to set the foreground color at white, background color to black. Select storm layer and go from filter to filter gallery. Select from filter then texture and set cell Size at 11, Border Thickness at 4 and Light Intensity at 0. Again select Photocopy filter from Sketch and set Detail at 14, Darkness at 2. Select Craquelure from the Texture and set Crack Spacing to 23, Crack Depth to 1 and Crack Brightness to 0 and press OK to save it. Visible the water layer and go to texture from filter then stained glass set Cell Size at 11, Border Thickness at 4 and Light Intensity at 0.
41.jpg
Then press Ctrl+L and set the Shadow Input Level at 145, Highlight Input Level at 215. In this step go from Fİlter to blur and then Gaussian Blur. Set Radius to 25 pixels. Again press Ctrl+L, drag Shadow Input Level Slider at starting point in the histogram.
7.jpg
5.jpg
Press Ctrl+A and Ctrl+C then go to chanel option beside the layer panel and create a new channel and paste by Ctrl+v. Kepp the mouse on Alpha 1 channel and press Ctrl+Click on the Alpha 1 channel.
Now go to the layer panel and create a new layer on top. Named this layer of A“W MaskAâ€. Fill up the selected space as #124477 color and change it opacity at 70%. And again hide the water layer.
81.jpg
You can change this as the following picture. For it choose the ass color and click on the selected area.
9.jpg
Now again create a layer named it water. Press Ctrl+D. Make sure foreground color at white and baclgroun color at black. Here you will see the foreground color at blue. Obviously make sure you change this color to white. Then set Filter -> Render- > Clouds. Again set Filter -> Render -> Difference Clouds. And again Filter -> Sketch -> Chrome. Set Detail at 8 and Smoothness at 10 and apply.
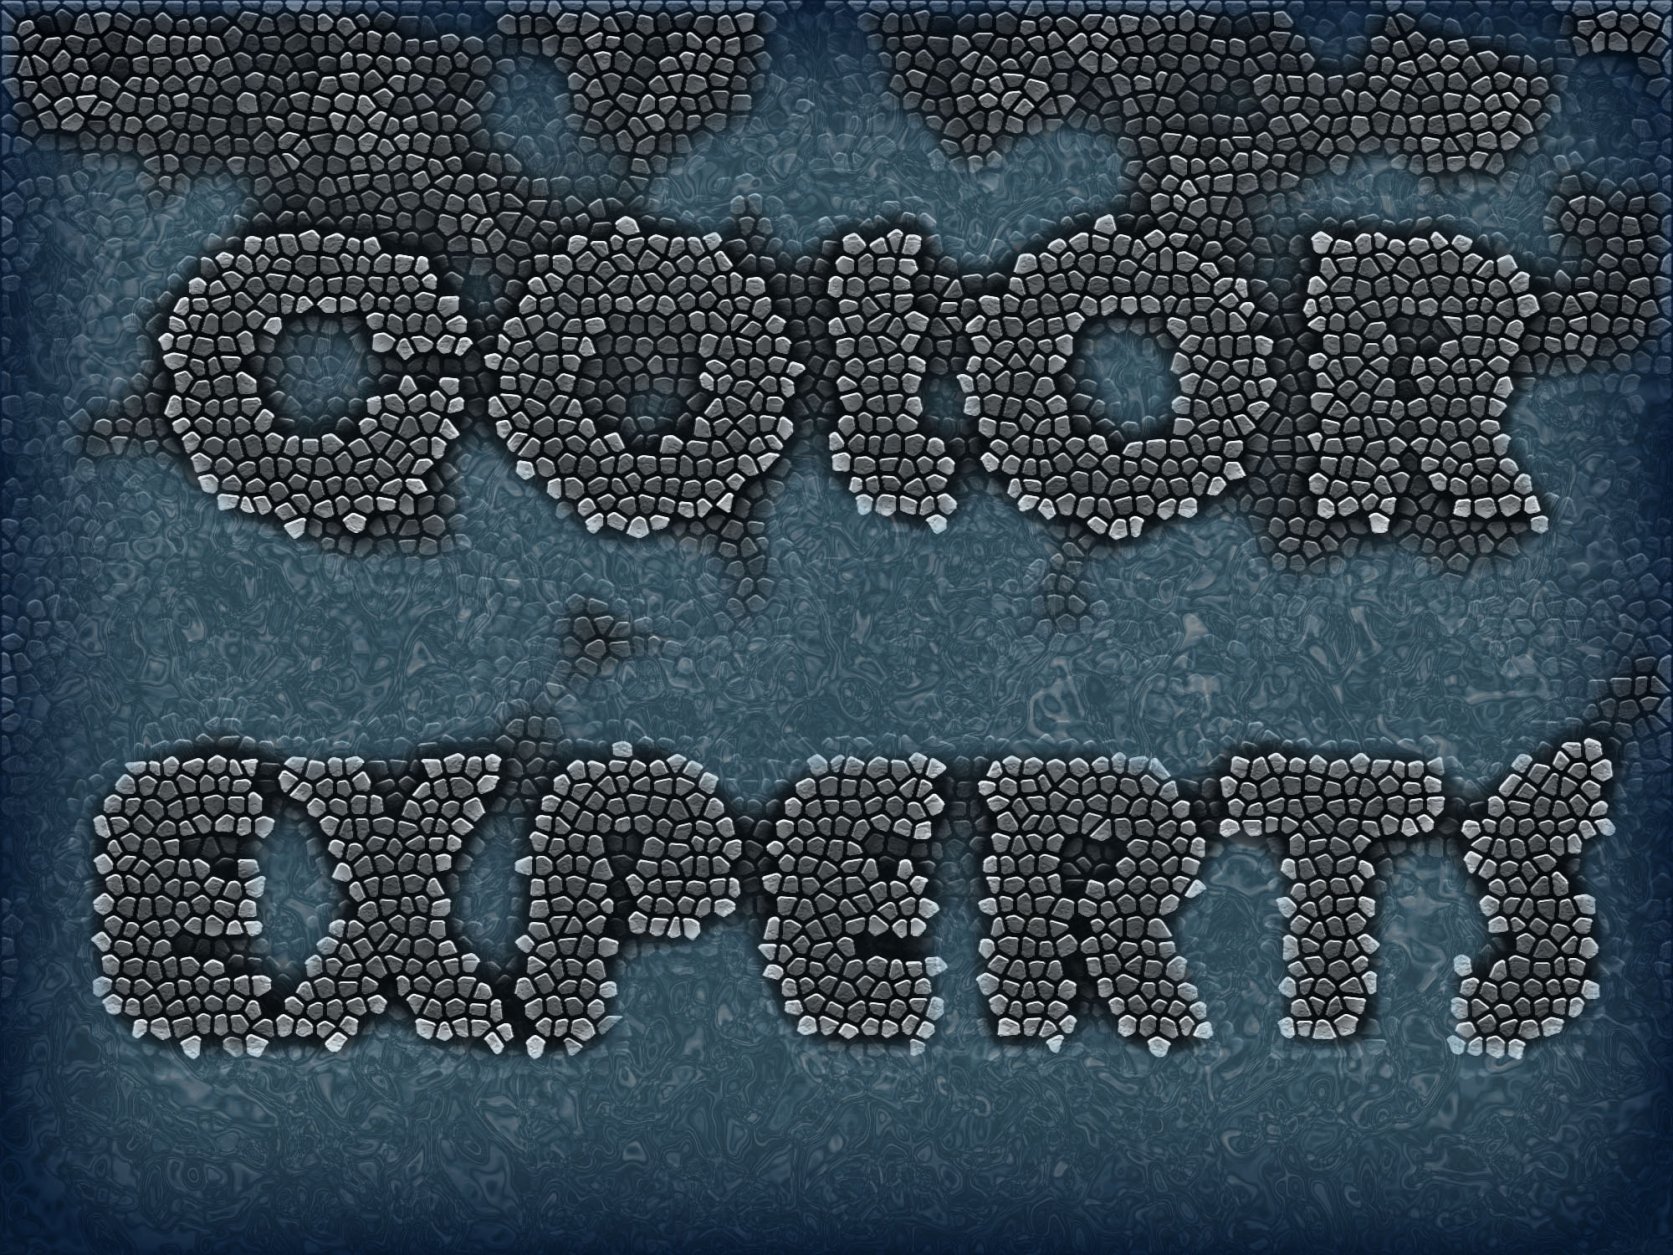
Press Ctrl+U and set color. Make sure Colorize, Set Hue at 200, and Saturation at 30 and Lightness at 40. Alt+click in the line both of A“WaterA†and A“W MaskA†layers to mask the water. Now go to Inner Glow Layer Style of select A“WaterA†layer and set Blend Mode at Multiply, Opacity at 90%, Color at #124477, Size at 250. The final Image is look like below.
13.jpg
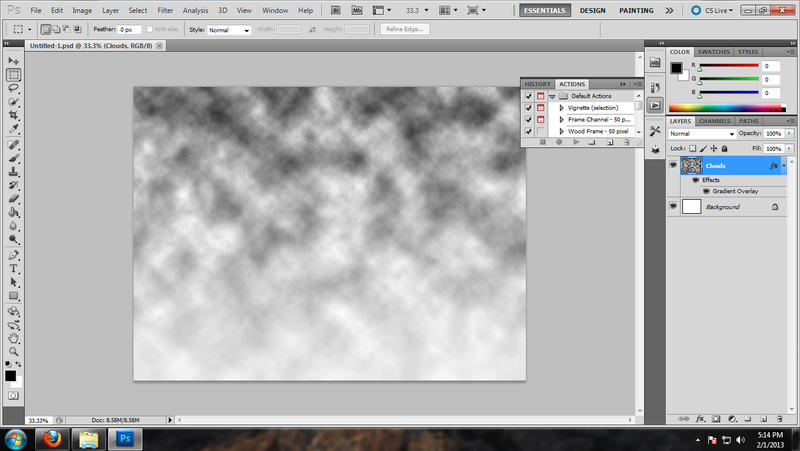


Open the Photoshop software and create a new document. Which size has to set 2000 x 1500 pixels, with the high resolution of 300 and in RGB mode. Set it background color black and foreground color white by pressing Ctrl+D. Then go from A“filterA†to A“renderA†to A“cloudsAâ€. Here apply a gradient overlay layer style by following these (blend mode A“ScreenAâ€, opacity to A“90Aâ€, gradient A“black, white, reverse->checkedAâ€, style A“ReflectedAâ€, angle A“90Aâ€, and scale A“125Aâ€).
Now write something on this document. You can write anything. I wrote Color Experts. Font of Bauhaus 93 and size is 130 pt and strong.
22.jpg
Now change its Drop shadow layer as Blend mode at normal, color to #646464, opacity 75%, Distance at 0, Spread to 30%, and Size of 60px. Again change the Inner Shadow Layer Style as Blend Mode at Multiply, Color at Black, Opacity to 100%, Distance at 0, Choke to 0, and Size of 95px.
31.jpg
Now select text layer and cloud layer. Then merge by press Ctrl+E. Rename it as storm. Press Ctrl+J to duplicate it and named it water. For this time duplicate this layer.
Now press x to set the foreground color at white, background color to black. Select storm layer and go from filter to filter gallery. Select from filter then texture and set cell Size at 11, Border Thickness at 4 and Light Intensity at 0. Again select Photocopy filter from Sketch and set Detail at 14, Darkness at 2. Select Craquelure from the Texture and set Crack Spacing to 23, Crack Depth to 1 and Crack Brightness to 0 and press OK to save it. Visible the water layer and go to texture from filter then stained glass set Cell Size at 11, Border Thickness at 4 and Light Intensity at 0.
41.jpg
Then press Ctrl+L and set the Shadow Input Level at 145, Highlight Input Level at 215. In this step go from Fİlter to blur and then Gaussian Blur. Set Radius to 25 pixels. Again press Ctrl+L, drag Shadow Input Level Slider at starting point in the histogram.
7.jpg
5.jpg
Press Ctrl+A and Ctrl+C then go to chanel option beside the layer panel and create a new channel and paste by Ctrl+v. Kepp the mouse on Alpha 1 channel and press Ctrl+Click on the Alpha 1 channel.
Now go to the layer panel and create a new layer on top. Named this layer of A“W MaskAâ€. Fill up the selected space as #124477 color and change it opacity at 70%. And again hide the water layer.
81.jpg
You can change this as the following picture. For it choose the ass color and click on the selected area.
9.jpg
Now again create a layer named it water. Press Ctrl+D. Make sure foreground color at white and baclgroun color at black. Here you will see the foreground color at blue. Obviously make sure you change this color to white. Then set Filter -> Render- > Clouds. Again set Filter -> Render -> Difference Clouds. And again Filter -> Sketch -> Chrome. Set Detail at 8 and Smoothness at 10 and apply.
Press Ctrl+U and set color. Make sure Colorize, Set Hue at 200, and Saturation at 30 and Lightness at 40. Alt+click in the line both of A“WaterA†and A“W MaskA†layers to mask the water. Now go to Inner Glow Layer Style of select A“WaterA†layer and set Blend Mode at Multiply, Opacity at 90%, Color at #124477, Size at 250. The final Image is look like below.
13.jpg
Additional credits
- Icons from Font-Awesome
- Additional icons by Mickael Bonfill
- Banner background from Toptal Subtle Patterns
© Scifi-Meshes.com 2001-2024