Greetings!
Welcome to Scifi-Meshes.com! Click one of these buttons to join in on the fun.
Quick Links
PracticalDurandal Mk 3
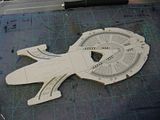
You may have seen my previous build of my fan design, the Durandal class. Well soon after I built it, I noticed small problems that have been bugging me this whole time, and finally decided to fix them and rebuild her. This time however, I've been documenting my progress, in case anyone on these forums is interested in delving into the field of paper modeling, but would like to know more about it first.
Before I start though, a quick list of the things I've changed on my baby:
- Phaser banks used to be too narrow, were widened
- Old version had no transporter emitters, whoops!
- Moved dorsal pulse phaser turrets into a more forward position.
- Added docking airlocks and sensor strips on the previously empty saucer rim
- Minor changes to the shape of the primary and secondary shuttle bays, and added secondary shuttle bay landing pad
- Made main deflector slightly concave instead of flat
- Made secondary deflector deeper inset in front of saucer
- Lengthened exterior troughs for aft dorsal torpedo tubes
- Straightened secondary hull "strakes"
- Added some darker panels on the bottom of the secondary hull
- Moved RCS thrusters on nacelles to the outsides of the nacelles, where they make more sense
- Enlarged forward and aft torpedo launchers
- Changed design of the primary impulse engines
In addition to those changes to the actual kit, I'm also putting a lot more detail into the build of this one, insetting escape pods, docking ports and other surface details. I even found several tiny flathead screwdrivers that match the sizes of the windows on Durandal when printed out, and before cutting out the parts, used the screwdrivers to press the windows in for added texture. Oh, and I'm raising all of the phaser strips too.
Anyway, on to the pictures:
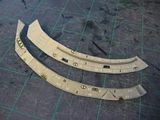
First, I cut out the bottom profile of the ship, which happens to work perfectly as a support, because the saucer and nacelle berths are level. I glued it to cardboard that happens to be about a deck thick at this scale, and will add a lot of durability to the model.
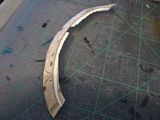
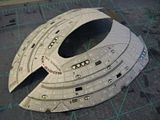
Next comes the upper saucer, which has to be cut out in semi rings to achieve the convex shape.
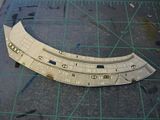
To keep the surface of the saucer smooth, I glue a strip of paper beneath the one that includes surface detail. This way, when I add the second piece, the edges fit flush together.
Here you can see the result.
And then just repeat for the rest of the pieces.
Here is the captain's yacht, still just the Aeroshuttle that Voyager had, I figured Starfleet might as well have some standard captain's Yachts instead of designing brand new ones for each starship class.
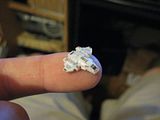
And of course the berth for the yacht is on the bottom.
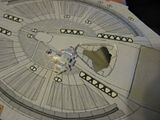
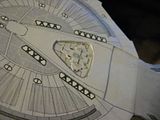
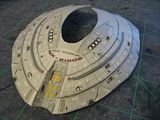
Here you can see the majority of the upper saucer is done, including a lot of recessed escape pods, windows, and some raised phasers.

Before I start though, a quick list of the things I've changed on my baby:
- Phaser banks used to be too narrow, were widened
- Old version had no transporter emitters, whoops!
- Moved dorsal pulse phaser turrets into a more forward position.
- Added docking airlocks and sensor strips on the previously empty saucer rim
- Minor changes to the shape of the primary and secondary shuttle bays, and added secondary shuttle bay landing pad
- Made main deflector slightly concave instead of flat
- Made secondary deflector deeper inset in front of saucer
- Lengthened exterior troughs for aft dorsal torpedo tubes
- Straightened secondary hull "strakes"
- Added some darker panels on the bottom of the secondary hull
- Moved RCS thrusters on nacelles to the outsides of the nacelles, where they make more sense
- Enlarged forward and aft torpedo launchers
- Changed design of the primary impulse engines
In addition to those changes to the actual kit, I'm also putting a lot more detail into the build of this one, insetting escape pods, docking ports and other surface details. I even found several tiny flathead screwdrivers that match the sizes of the windows on Durandal when printed out, and before cutting out the parts, used the screwdrivers to press the windows in for added texture. Oh, and I'm raising all of the phaser strips too.
Anyway, on to the pictures:
First, I cut out the bottom profile of the ship, which happens to work perfectly as a support, because the saucer and nacelle berths are level. I glued it to cardboard that happens to be about a deck thick at this scale, and will add a lot of durability to the model.

Next comes the upper saucer, which has to be cut out in semi rings to achieve the convex shape.

To keep the surface of the saucer smooth, I glue a strip of paper beneath the one that includes surface detail. This way, when I add the second piece, the edges fit flush together.

Here you can see the result.

And then just repeat for the rest of the pieces.

Here is the captain's yacht, still just the Aeroshuttle that Voyager had, I figured Starfleet might as well have some standard captain's Yachts instead of designing brand new ones for each starship class.

And of course the berth for the yacht is on the bottom.


Here you can see the majority of the upper saucer is done, including a lot of recessed escape pods, windows, and some raised phasers.


Post edited by Paragon on
Tagged:
Additional credits
- Icons from Font-Awesome
- Additional icons by Mickael Bonfill
- Banner background from Toptal Subtle Patterns
© Scifi-Meshes.com 2001-2024
Posts
Anyway, on to pictures.
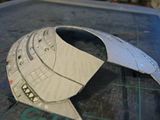
With the majority of the top saucer done, it was time to move on to the top of the secondary hull. This photo is of one piece that includes the structure of the rear section, inside of the nacelle berths, and upper sides of the nacelle pylons. The shape is achieved simply by running an x-acto along the line you want to fold, lightly scoring the paper without cutting it.
Then I attached it to the frame, with the front of the nacelle berths fitting nicely into the holes in the back of the saucer.
Here's the top of the secondary hull, as well as one of the upper decks of the primary hull. Lots of layered parts here for texture. The arrowhead-shaped part will also cover up the bit of mismatch between the nacelle berths and saucer.
As you can see.
Here is one of the new impulse engines. Unlike before, these are on level with the saucer rim, akin to those on the Galaxy and NX classes. The actual exhaust is somewhat inset too.
Here you can see I've added deck 2, which includes the new secondary shuttle bay. This one is wider and a little shorter, and has the landing pad in front of it too.
And here's the primary shuttle bay. I know, the two are reversed on the Sovereign class, but there's a lot less room up where the top one is, so it might as well be secondary. I can't think of any canon classes besides the Sovereign with two bays in those positions, or I might switch. Really, it doesn't matter though, moving on... :P
Here's the top of the saucer now with deck 2 and deck 1 added. The bridge proper is below the big blue oval. Forward of the bridge I imagine to contain a large conference room with a great view, excellent for holding formal dinners, entertaining important guests, and of course, holding important conferences. Aft of the bridge is the captain's ready room, a smaller conference/briefing room, and a large strategy room. Probably a bathroom too, the bridge crew does poop, right?
Here is the lowest deck on the primary hull (besides the torpedo launcher I guess), cut out and with side formers being attached. I finally added windows to the sides of it.
Here is the secondary hull. I wish I had remembered to take pictures of each individual section of it, but just like the saucer, they're all glued together with a strip of paper underneath to attach them, so the edges are flush. The second and third pictures show the slightly re-formed deflector in place, with a hole for the yacht berth. I also included more detail on the deflector sensor.
And here you can see the bottom deck and secondary hull now attached.
In the back are the secondary impulse engines.
In case anyone was wondering, I designed this model in photoshop. A lot of parts took some experimentation. The majority of the shape of the top of the saucer was taken from a Sovereign class paper model. After drawing all the details onto the parts, I just print them off with an inkjet printer, onto 110 lb white card stock. Usually with a single sheet the models end up plenty durable, but recently (including with Durandal) I've been making the parts double thick for extra strength. It also makes some of the layering of details easier; I just cut out the escape pods on the top sheet, for example, and then align the second sheet below so the details are in the right place.
how do you decide dividing it into parts for the build?
Anyway, the nacelle is divided into four main parts, the two halves of the nacelle, the bussard, and the exhaust (didn't take a picture, of the exhaust, sorry). I built trucks on the rails on the nacelle pylons, and then closed the nacelles around them
I also coated the entire model in glue (just regular Elmer's) because I did the same thing with a Defiant model that I build just before building Durandal Mk2. The Defiant model has retained it's original color, and hasn't worn anywhere, meanwhile the old Durandal has yellowed along edges, become worn in places I typically hold it, etc. The thin layer of glue gives the model a slight sheen, and actually makes it feel more like plastic. I also added some Future floor wax to parts of the ship that "glow" like the impulse engines, deflector, warp grilles, bussards, etc. It has to go on AFTER the glue coat though.
Do the nacelles move, is that why they're in two positions on the pylons?