Greetings!
Welcome to Scifi-Meshes.com! Click one of these buttons to join in on the fun.
Quick Links
Jet,Turbo,Light,Flame Exhausts Tutorial C4d-3d
Bear with me. This is written from C4d. Our my original thinking of how to make them. Is my second ever TUT.
Just thought I would share How I did it though I am a newcomer(Very) to CG-3d apps. But have not really seen any tuts and the few posts I have seen were questions for or were defunct tuts (unavail.)
For like the Original Viper from TOS BSG this is how I did it.
-this should translate though through most 3d apps I presume-
DEMO of Animation exhaust.
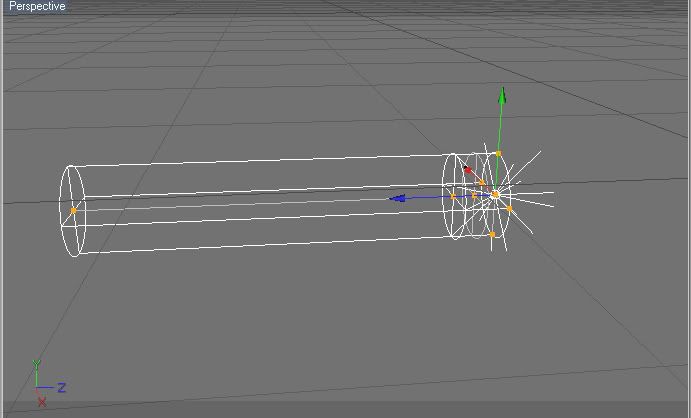
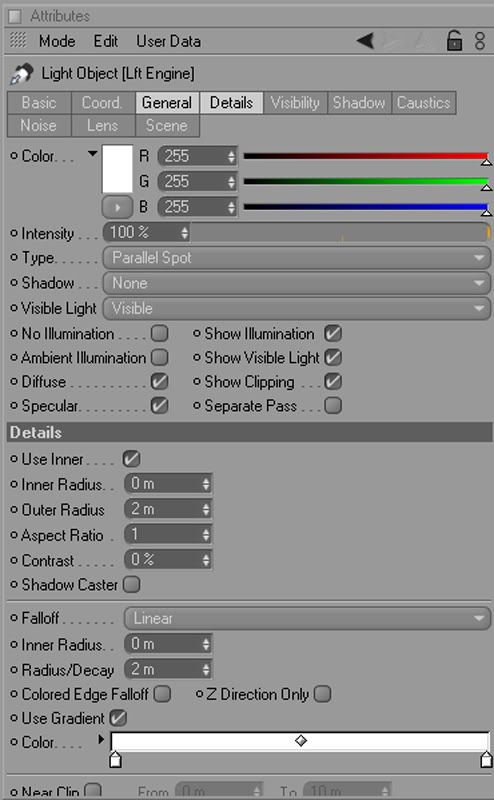
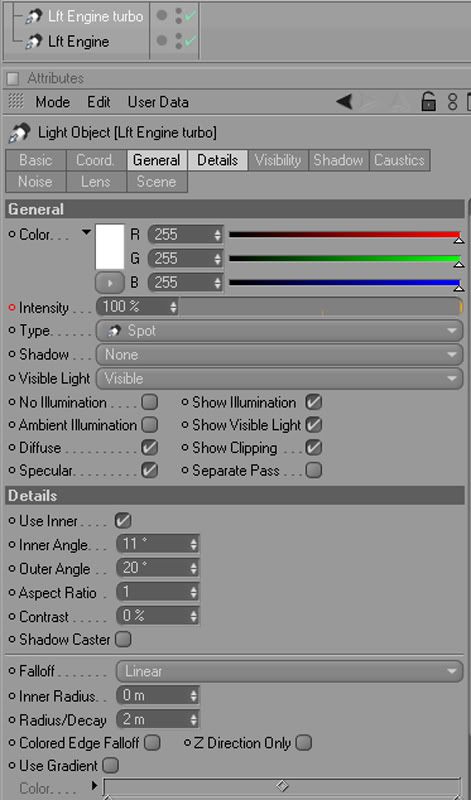
1. Start off with 1 parallel spotlight.make it visible light.
Set your radius and length for need. Set your falloff ( I used Linear
with a decay of 2 m) This is to keep the light from lighting up surrounding objects or withing that decay distance.
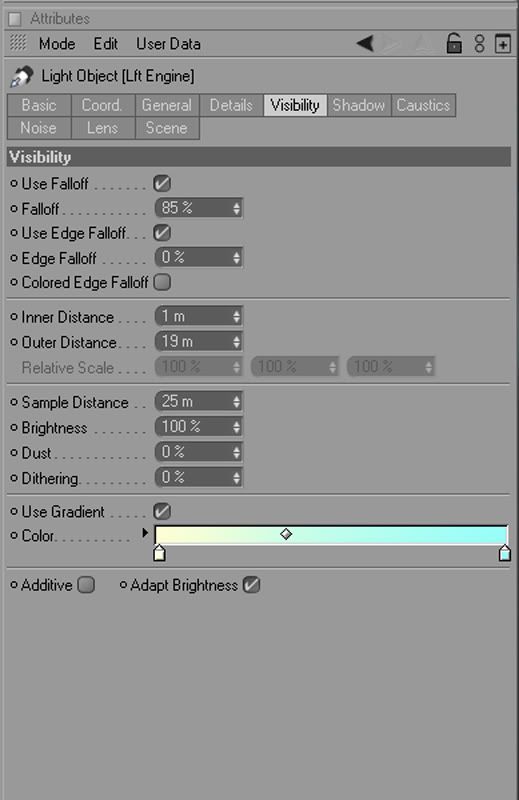
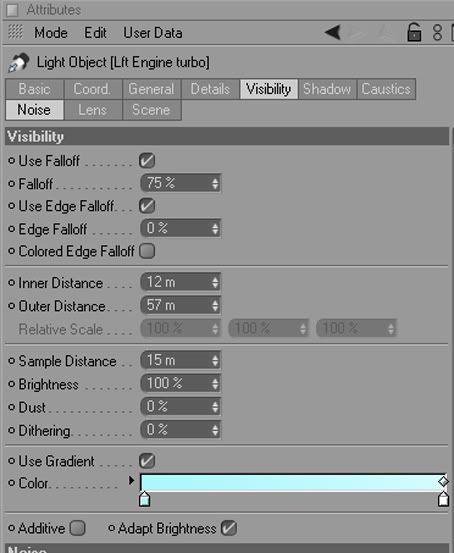
2. Set your Visibility attributes. Use Falloff to obtain how much of the length of Parallel spot to fade off from tip. Edge falloff is for width falloff. You can also apply a gradient to the light as I have.
Set your distances also if you have not.
NOW for the Turbos!
1. Create a second Light and make it a spotlight. Set to visible.
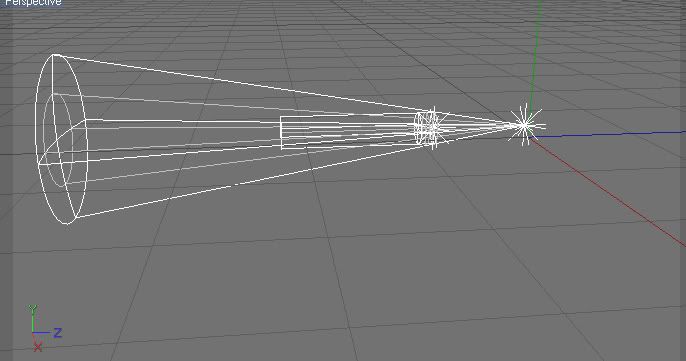
Set your angles to for how spread out it is.( you may need to position it further back than the Parallel spotlight to match up)
2. Set your Visibility attributes. Use Falloff to obtain how much of the length of spot to fade off from tip. Edge falloff is for width falloff. You can also apply a gradient to the light as I have.Set your distances also if you have not.
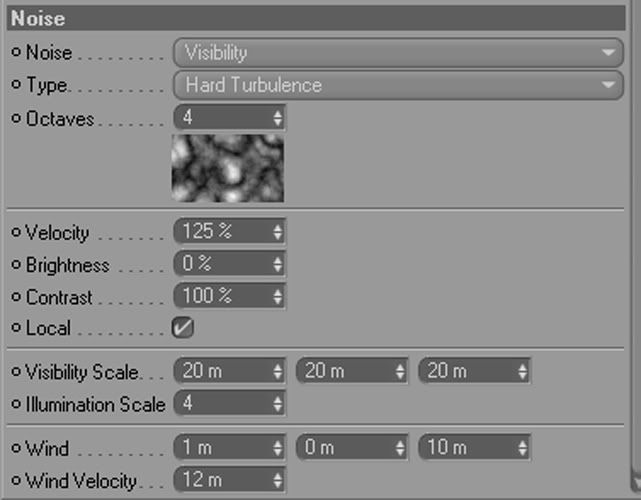
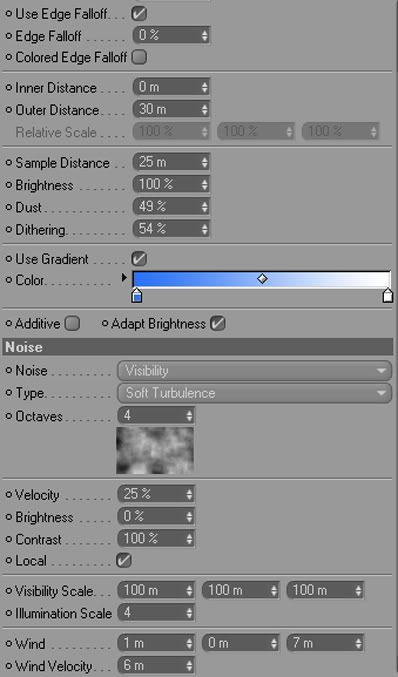
3. Add the Noise. Here are my settings. Velocity is Noise animation speed. Visibility scale is to set scaling for all 3 axis- X-Y-Z
Wind is the Direction per axis- X-Y-Z. and Wind velocity is the speed in those directions.
That's it for the Exhaust Turbos. I will add the next part as soon as I get the images made.
Don't forget you can animate-keyframe many parameters such as intensity etc to get effects.
Now for the Jet Flame exhaust I used on the MK II Viper Model.
--After watching seas.3 & 4 of re-imagined BSG, I noticed they used different types in different scenes/episodes. This is not a recreation of any but my own make for it.
Demo of Jet flame exhaust
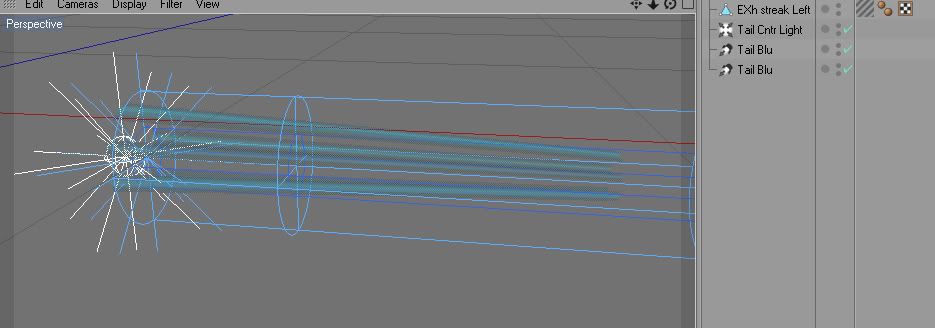
The Setup. 3 lights and an altered cylinder.
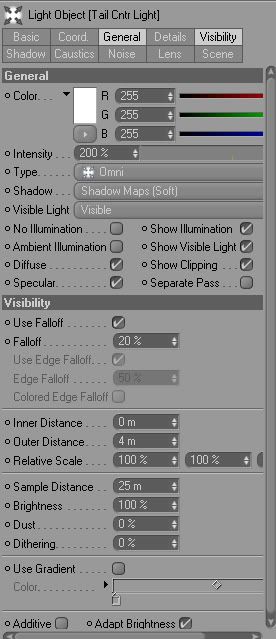
Begin with Center light.I used shadow maps (Soft) so no need for Detailed falloff like Inverse sqare or linear. Here are the Attribute settings. (may need to add as an exclusion to other objects- in Scene tab of Light- to keep it from adding light to other objects in scene)
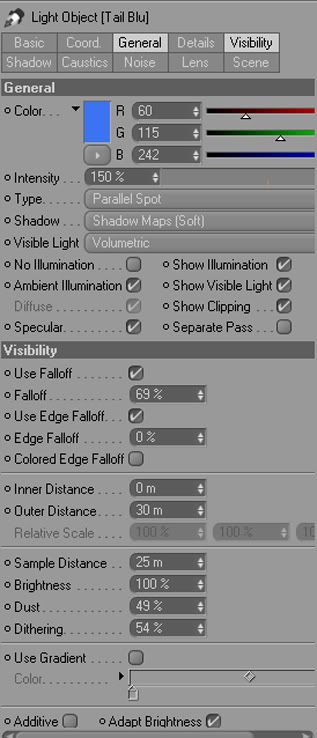
Next we will add a parallel spot light with these attributes. Be sure to set your distances/radius to fit your exhaust mesh.
Okay now we will duplicate the parallel spotlight and add these attributes, a gradient and noise with wind.
This will give the animated effect without keyframing.
Now for the streaks.
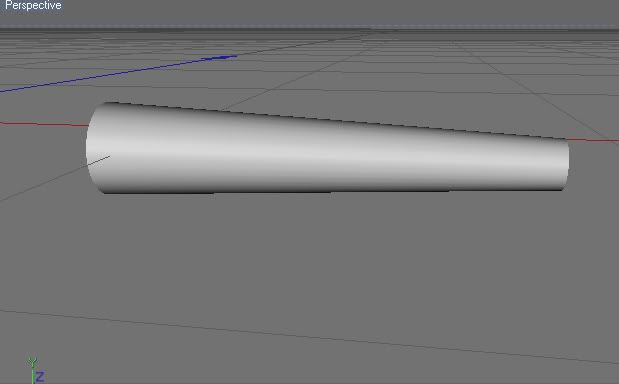
For this I used a cylinder primitive object.No caps used- Size it to fit your exhaust (radius) length make it 2x to 3x length you want for your streaks.With the front matching radius of your exhaust, you will want to downsize the cylinder at the far end- make object editable and use tool (loops selection to resize the end radius about 1/3 of the exhaust size.)
Next just adding material.
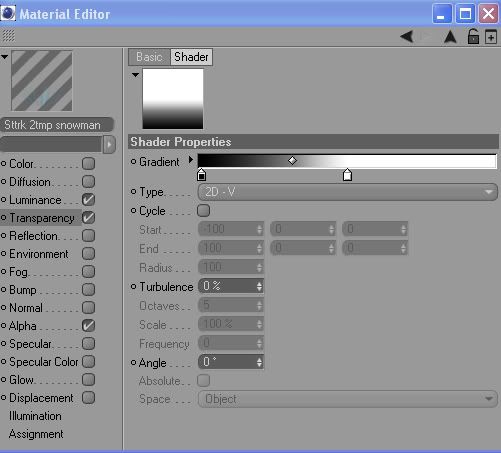
Starting with Luminance, you want to create a gradient map. A 2d U type. see images.
You will want to copy/duplicate this or add same image map to the alpha channel/settings.
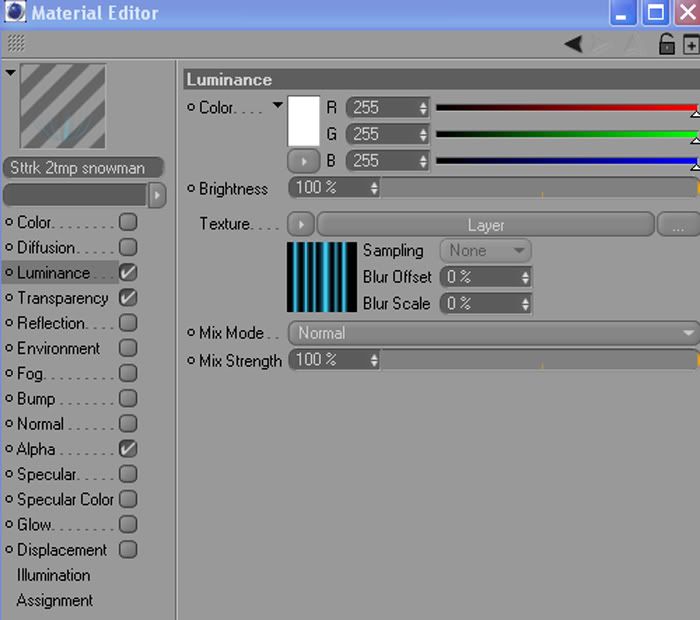
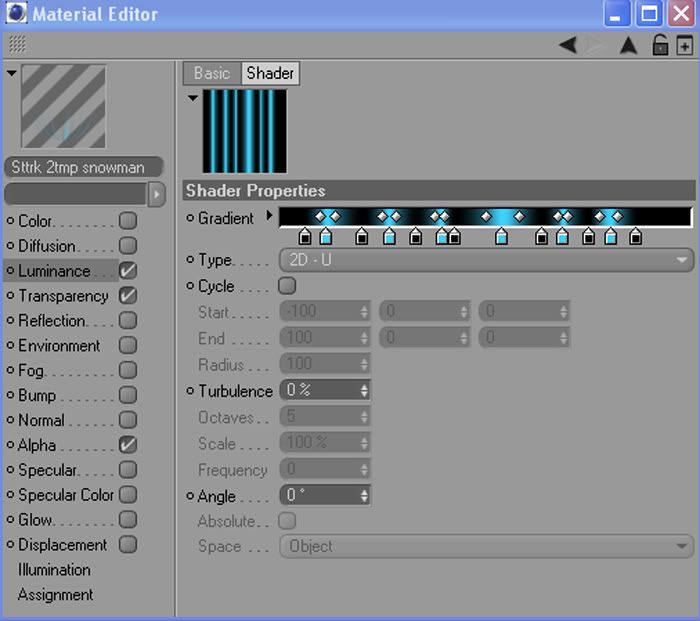
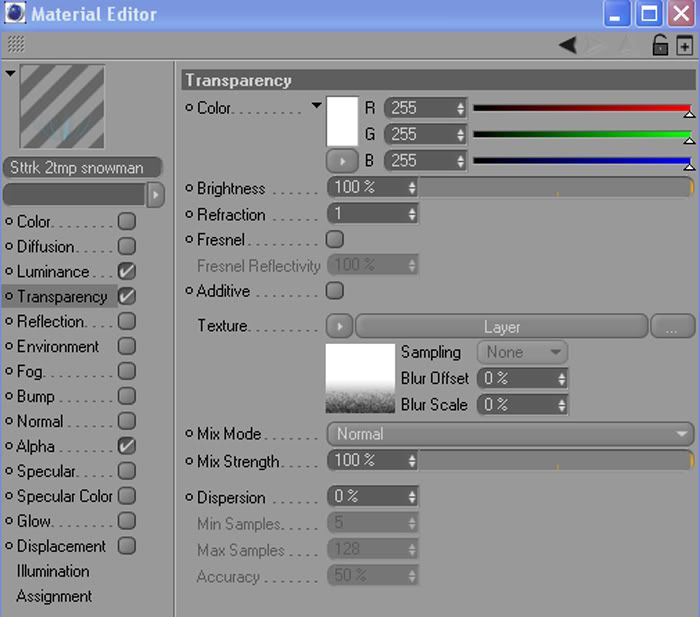
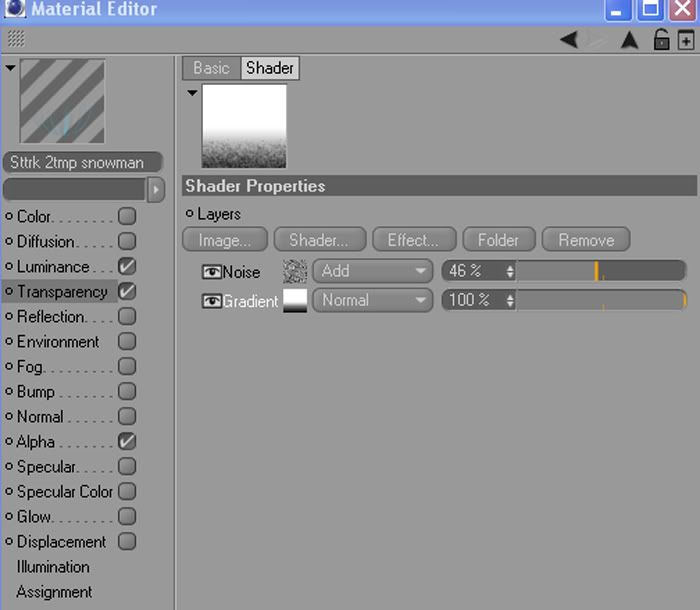
Then we add a transparency map to shorten/lengthen the streaks. see image.I also made another layer and added some noise to it.
Can also keyframe the offsets of the material to get the streaks to rotate or keyframing the transparency
gradient to lengthen/shorten the length of streaks.
If you got any questions PM me or add it to thread.
Just thought I would share How I did it though I am a newcomer(Very) to CG-3d apps. But have not really seen any tuts and the few posts I have seen were questions for or were defunct tuts (unavail.)
For like the Original Viper from TOS BSG this is how I did it.
-this should translate though through most 3d apps I presume-
DEMO of Animation exhaust.
1. Start off with 1 parallel spotlight.make it visible light.
Set your radius and length for need. Set your falloff ( I used Linear
with a decay of 2 m) This is to keep the light from lighting up surrounding objects or withing that decay distance.
2. Set your Visibility attributes. Use Falloff to obtain how much of the length of Parallel spot to fade off from tip. Edge falloff is for width falloff. You can also apply a gradient to the light as I have.
Set your distances also if you have not.
NOW for the Turbos!
1. Create a second Light and make it a spotlight. Set to visible.
Set your angles to for how spread out it is.( you may need to position it further back than the Parallel spotlight to match up)
2. Set your Visibility attributes. Use Falloff to obtain how much of the length of spot to fade off from tip. Edge falloff is for width falloff. You can also apply a gradient to the light as I have.Set your distances also if you have not.
3. Add the Noise. Here are my settings. Velocity is Noise animation speed. Visibility scale is to set scaling for all 3 axis- X-Y-Z
Wind is the Direction per axis- X-Y-Z. and Wind velocity is the speed in those directions.
That's it for the Exhaust Turbos. I will add the next part as soon as I get the images made.
Don't forget you can animate-keyframe many parameters such as intensity etc to get effects.
Now for the Jet Flame exhaust I used on the MK II Viper Model.
--After watching seas.3 & 4 of re-imagined BSG, I noticed they used different types in different scenes/episodes. This is not a recreation of any but my own make for it.
Demo of Jet flame exhaust
The Setup. 3 lights and an altered cylinder.
Begin with Center light.I used shadow maps (Soft) so no need for Detailed falloff like Inverse sqare or linear. Here are the Attribute settings. (may need to add as an exclusion to other objects- in Scene tab of Light- to keep it from adding light to other objects in scene)
Next we will add a parallel spot light with these attributes. Be sure to set your distances/radius to fit your exhaust mesh.
Okay now we will duplicate the parallel spotlight and add these attributes, a gradient and noise with wind.
This will give the animated effect without keyframing.
Now for the streaks.
For this I used a cylinder primitive object.No caps used- Size it to fit your exhaust (radius) length make it 2x to 3x length you want for your streaks.With the front matching radius of your exhaust, you will want to downsize the cylinder at the far end- make object editable and use tool (loops selection to resize the end radius about 1/3 of the exhaust size.)
Next just adding material.
Starting with Luminance, you want to create a gradient map. A 2d U type. see images.
You will want to copy/duplicate this or add same image map to the alpha channel/settings.
Then we add a transparency map to shorten/lengthen the streaks. see image.I also made another layer and added some noise to it.
Can also keyframe the offsets of the material to get the streaks to rotate or keyframing the transparency
gradient to lengthen/shorten the length of streaks.
If you got any questions PM me or add it to thread.
Additional credits
- Icons from Font-Awesome
- Additional icons by Mickael Bonfill
- Banner background from Toptal Subtle Patterns
© Scifi-Meshes.com 2001-2024