Greetings!

Welcome to Scifi-Meshes.com! Click one of these buttons to join in on the fun.

3ds max realistic clouds on a planet

Davide_sdDavide_sd4 Posts: 0Member
I'm trying to create a good planet in 3ds max, and i want to create a good cloud. Unfortunately my cloud appear flat, as you can see in the attachment; how can i give depth to my cloud?
I found some good cloud map at 8k resolution. Does anyone knows where i can find 16k map or higher?
57854.jpg
Post edited by Davide_sd on
«13456

Posts

  • christianSchristianS0 Posts: 0Member
    Hi,

    I really like your planet and clouds! The only thing that i don't like are the clouds near to the visible edge of the athmosphere. I would use an incidence-falloff/fresnel-effect to fade them to invisibility near to the edge.
    As for depth: you could add another layer with the same map and a slightly smaller radius (for the sphere). Rotate the second layer, maybe use a different size for the texture. The upper layer would cast shadows to the lower layer, which could give some more depth.
    Raising the radius of the layers in general would result in better visibility of the shadows that are cast by the clouds, which might also give more depth.
    In addition, you could try to use the same map in the bump slot to give the clouds a more solid appearance (although i like the look of the clouds already).

    cu,
    Chris
  • L2KL2K0 Posts: 0Member
    yep. bump and displace should help.
    specialy if you paint darker (to make them lower on the bump) some groups of clouds, making them flying at various altitudes
  • Davide_sdDavide_sd4 Posts: 0Member
    Thanks christianS, L2K.
    I added a falloff map with a fresnel type to the cloud, but there ins't many different (picture A).
    I added a Displacement Approx modifier to the cloud sphere and i added the cloud map to displacement slot (picture B).
    Do you have some other suggestions?
    ohh, what is the difference between Displacement Approx modifier and Displace modifier?
    57856.jpg57857.jpg
  • christianSchristianS0 Posts: 0Member
    Well, you should modify the falloff that way, that the clouds do not reach over the horizon of the planet...they should blend with the blue glow of the athmosphere...don't know no better way to describe it, sorry. I don't think the displacement is necessary. I would just use a larger radius for the cloud sphere to produce shadows that are better visible. Maybe playing with the shadow settings of the lightsource or adding ambient occlusion to the surface shader would also facilitate more prominent shadows.
    Besides that, the clouds are fine, in my opinion.

    cu,
    Chris
  • DeadlyDarknessDeadlyDarkness0 Posts: 0Member
    Use a bumps map on the clouds if you haven't already done so, and increase the cloud height as suggested (make sure to fiddle with the falloff map to compensate though, otherwise you'll get the ugly line).
  • Mr. WildeMr. Wilde197 Posts: 121Member
    Well I guess you're after something like this, which should be impossible to create with just bump maps.

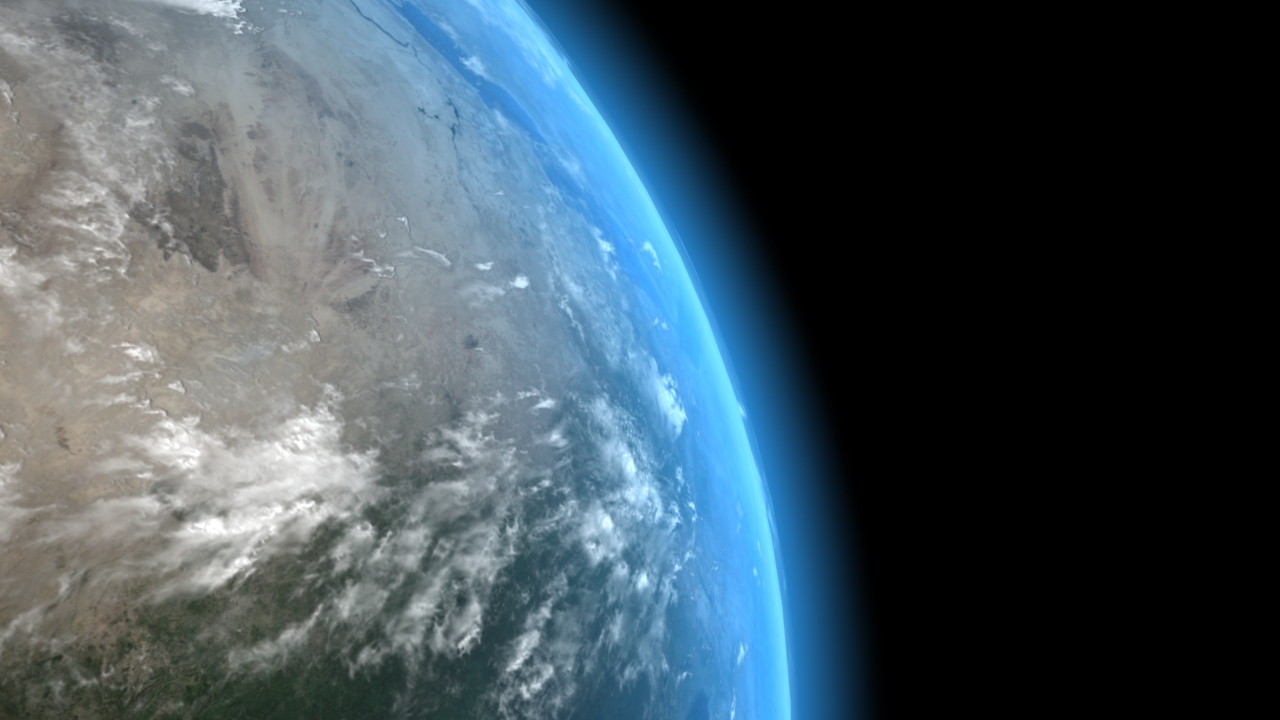
    http://www.vistawallpaper.org/vista-wallpapers/the-planet-earth.jpg
    http://www.allamericanpatriots.com/files/images/cumulonimbus-cloud-over-africa.jpg
    http://wanderingspace.net/wp-content/uploads/2007/08/earth-shuttle-docked.jpg

    I've been searching for methods and techniques to create such 3-dimensional clouds, as I always wanted to create an image with such a beautiful shot of a planet's clouds, but it's very hard to achieve. You could paint them (possible for stills), better create a matte painting using photographs of real high altitude clouds, you could use particles and volumetrics, you could give real geometry and displacement maps a try. Then it's probably worth a try to use the cloud bump map to create a normal map. I haven't tried that, but in theory you get much more depth out of it than with just a bump map.

    But as you see, a realistic Earth would need several layers of different clouds in different altitudes, and these clouds would have to be 3 dimensional themselves.
  • IRMLIRML253 Posts: 1,993Member
    I might have an idea on how to achieve this, I'll make some tests and try and post later on
  • Davide_sdDavide_sd4 Posts: 0Member
    yes, i think i'll try later to use several cloud layers at different altitudes.
    in the first picture i used a ray traced shadows; i'm sorry for the little pic, but it took a lot of time to my P4...lol...
    in the second i used a shadow map, but it's not realistic.
    I'll also try different falloff type to hide the cloud near the edge of the planet. Thank you for the suggentions! :thumb:
    57861.jpg57862.jpg
  • IRMLIRML253 Posts: 1,993Member
    don't bother raytracing your shadows, just use the cloud map to darken the surface, all you need to do is offset it by a couple of degrees to match your sunlight direction
  • spudmonkeyspudmonkey0 Posts: 0Member
    I got fed up with trying to make bump maps look right and ended up going the displaced object route with a very dense sphere with a displacement modifier applied and an alpha map to define the gaps. Gave me more control over what it looked like as I could see the effect in the viewport...
  • Mr. WildeMr. Wilde197 Posts: 121Member
    spudmonkey wrote: »
    I got fed up with trying to make bump maps look right and ended up going the displaced object route with a very dense sphere with a displacement modifier applied and an alpha map to define the gaps. Gave me more control over what it looked like as I could see the effect in the viewport...

    Hm, sounds good, do you have an example of how this looks like?
  • spudmonkeyspudmonkey0 Posts: 0Member
    Not right here, but the planet in my random WIP thread used that method to give you an idea of what it can look like
  • Davide_sdDavide_sd4 Posts: 0Member
    IRML wrote: »
    don't bother raytracing your shadows, just use the cloud map to darken the surface, all you need to do is offset it by a couple of degrees to match your sunlight direction

    I don't undestand very well what do you said; can you explain better?
    I added the fallof to the cloud.
    57863.jpg
  • aszazerothaszazeroth176 Posts: 209Member
    It looks pretty good, but you have some sampling error or whathaveyou somewhere since there are a lot of small black dots scattered among the denser cloud formations. You should also use atleast 16k maps for this kind of close-ups
  • Davide_sdDavide_sd4 Posts: 0Member
    Probably the small black dots are caused by bump map. I try to use a lower value for bump. Thank aszazeroth!
  • IRMLIRML253 Posts: 1,993Member
    Davide_sd wrote: »
    I don't undestand very well what do you said; can you explain better?
    if you invert the colour of your cloud map the clouds become black, if you use this to darken the earth's surface it looks almost exactly the same as shadows cast by the clouds, it should save you render time
  • IRMLIRML253 Posts: 1,993Member
    ok here's a test, it's much exaggerated for test purposes, but you get the idea

    trying clouds with displacements never really worked for me, if I wasn't using APS the sphere needed to be at least 5 million polys before detail showed up and even then it looked awfull, but this method uses less than 400000, it looks much better and renders much faster, fast enough to use radiosity as you can see in the first image

    I'll try and do some more experiments and get it looking good first, and then I'll share the method
    57877.jpg57878.jpg
  • Mr. WildeMr. Wilde197 Posts: 121Member
    Wow, that looks pretty incredible, even though slightly blurred.
  • Davide_sdDavide_sd4 Posts: 0Member
    ohh yeah, now i've understand! It's a good idea, really! :thumb:
    Thank IRML!!!
  • IRMLIRML253 Posts: 1,993Member
    Mr. Wilde wrote: »
    ...though slightly motion blurred.
    yeah I know what you mean, that'll disappear when it's scaled to normal size
  • IRMLIRML253 Posts: 1,993Member
    right I think I might have got this perfected now, here's 2 renders - one of my old earth and one with the new method for the clouds (the scale is still a bit exaggerated for test purposes)

    Earth%20Old%20Thumb.jpg Earth%20New%20Thumb.jpg

    it turned out pretty cool actually, not only does it look 3D but it looks softer and you can now simulate more complex shading in the clouds and also produce accurate shadows on the surface, the poly counts are way more acceptable than with displacements too

    davide_sd - I know this'll work in lightwave but I'm not sure if max will be as easy, can you apply functions to your image maps through the surface editor?
  • Mr. WildeMr. Wilde197 Posts: 121Member
    Cool, fantastic! I especially love the look of the clouds closer to the horizon. And the shadows look very nice.
    And I love that atmosphere glow. I have to rework my method a bit, I think. Is that straight out of LW?
  • IRMLIRML253 Posts: 1,993Member
    ^not quite - you could render it straight out of lightwave but the cloud edges might be a bit dark, you could maybe fix that with additive transparency but that might bring its own problems

    I'd say if you wanted to you could render it with a minimum of 3 layers and the only post work would be blending it together again, I've done 5 layers for that image though
  • Elokim-SupremeElokim-Supreme171 Posts: 0Member
    WOW! IRML this is the best earth render I've ever seen!
  • hoktarhoktar0 Posts: 1Member
    Wow that's amazing!
    I wish it was passible to create at least the first version in cinema 4d too :/
  • Davide_sdDavide_sd4 Posts: 0Member
    IRML wrote: »
    right I think I might have got this perfected now, here's 2 renders - one of my old earth and one with the new method for the clouds (the scale is still a bit exaggerated for test purposes)

    Earth%20Old%20Thumb.jpg Earth%20New%20Thumb.jpg

    it turned out pretty cool actually, not only does it look 3D but it looks softer and you can now simulate more complex shading in the clouds and also produce accurate shadows on the surface, the poly counts are way more acceptable than with displacements too

    davide_sd - I know this'll work in lightwave but I'm not sure if max will be as easy, can you apply functions to your image maps through the surface editor?

    AWESOME!!!! Incredible result. :thumb:
    I never heard about applying functions to an image maps in MAX; but i'm not an expert user...
    The cloud map you used in this render, did you found it somewhere or did you make it? I think it will be at least 16k, is it?
    Again, awesome render!
  • IRMLIRML253 Posts: 1,993Member
    yeah it's 16k, you can find them all over the net

    you'll have to be able to perform a levels adjustment on the image within max, either that or save out 20 adjusted textures from photoshop - I don't think that's a realistic option though, the memory used up by 20 8k or 16k maps would probably bring most PCs to a standstill
  • MelakMelak332 Posts: 0Member
    That shouldn't be a problem, max allows you to define your own level adjustment curve for the channels individually.

    Whichever way you are doing it, it looks great! might also be useful to make things look greasy and dirty.
  • IRMLIRML253 Posts: 1,993Member
    ok cool, well the cloud map is greyscale so I guess you click the mono button on that to make things easier?

    so can the black point and white point of the map be changed? to make this work easiest you'd need to be able to have the black point controlled by a UV map - you can do this with nodes in lightwave but I'm not sure about max

    if you can't then it means you have to create 20 different surfaces and edit the levels individually - but that's still better than saving out 20 separate maps from photoshop right?
  • MelakMelak332 Posts: 0Member
    What exactly do you mean, controlled by a UV map? Can you show an example of how the levels need to be modified either indivually or by a map?
Sign In or Register to comment.