Greetings!
Welcome to Scifi-Meshes.com! Click one of these buttons to join in on the fun.
Quick Links
Local TutorialSpud's quick and easy and slightly cheating window modeling guide
I'm a cheater.
Yep, you heard it here first.
Why?
I love shortcutting things to make them look better than they are.
Why?
I have a low poly modeling background in more recent times and I hate poly wastage.
Any number of times I see a model where people are never going to get close enough to it to see the level of detail that is applied to certain areas. Windows is the classic...
Why?
You see something that has a load of faces, chamfers, insets and so on that really aren't required unless (and it's a BIG unless) you are going to be rendering the window close up at a high resolution.
If you are going to use a closeup you are often better modeling that part on its own in high detail to save yourself some CPU cycles. Also, when you are rendering from afar you want to trim the poly count where the mesh density is high but not really affecting how that part looks from a distance.
So, cheating is the way to go then...
You could texture the windows, but that seems to be against current fashion, and in fairness a modeled object will often look better than an bump mapped version at mid range.
So, you want to do this quickly then and not add huge amounts of detail.
Booleans are probably out because you spend a lot of time welding verts, turning edges and generally cleaning up the aftermath.
So, here's how to cheat, whilst still getting a good effect. This technique can be applied to curved surfaces, but I have shown it on a flat surface for simplicity. You can also do many, many windows at the same time and they will always all be flush with the face(s) that the window is on/in
Impressed?
These steps show how to make two windows and are written up as they were done. Total time to model was about 30 seconds
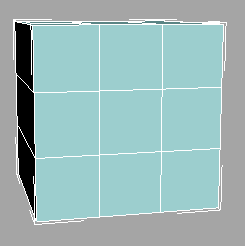
Step 1.
Create a cube with a couple of segments to it
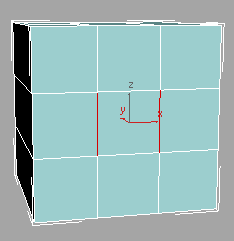
Step 2.
Convert the cube to an editable poly and select two edges, one for each window
Step 3.
Extrude the edges using a depth of 0 and a width that meets your requirements

Step 4.
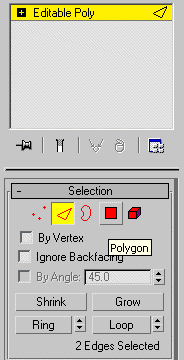
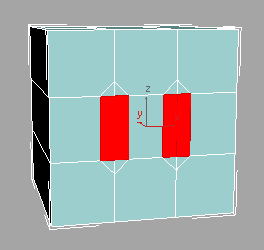
In the Editable Poly roll-out, hold control and click the polygon sub-modifier
This will select the faces as per this image
Step 5.
Extrude the faces to the required height or depth
Job, as they say, is a good un. Or done if you prefer.
"Now then!" I hear you cry. "I'm doing a Trek ship and want rounded windows"
Well now, what a fussy swine, eh?
I said the windows were simple, but now you want to add complexity.
I don't know...
Oh, ok then...
Repeat steps 1 to 3 above.
Because I didn't want too much complexity for this, I welded the top and bottom verts. You don't have to do this, but it creates a cleaner mesh.
It's entirely up to you.
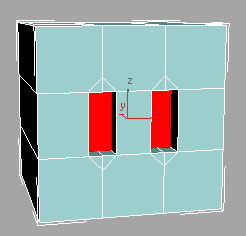
Step 4.
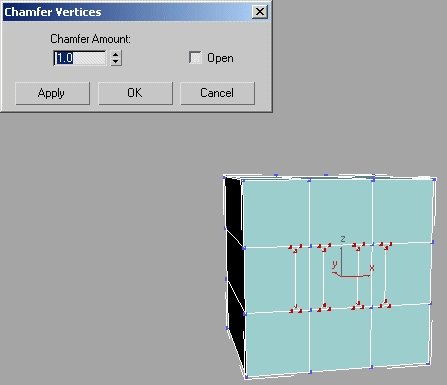
Select the corner verts of the window and chamfer them to the required size
Step 5.
Select edge mode again and use the control+polygon sub-modifier trick again
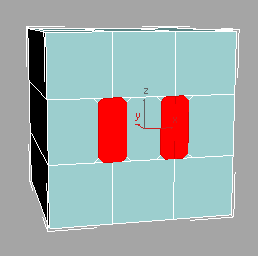
Step 6.
Extrude the selected faces
Ok, slightly smoother corners.
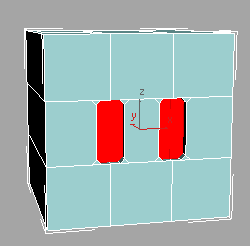
If you want something even smoother then you can weld some of the spare verts (or not as the case might be. It's up to you) and chamfer each pair of corner verts to create 4 verts per corner.
And again to create 8 verts per corner.
It's up to you.
Hope you find this useful")
Yep, you heard it here first.
Why?
I love shortcutting things to make them look better than they are.
Why?
I have a low poly modeling background in more recent times and I hate poly wastage.
Any number of times I see a model where people are never going to get close enough to it to see the level of detail that is applied to certain areas. Windows is the classic...
Why?
You see something that has a load of faces, chamfers, insets and so on that really aren't required unless (and it's a BIG unless) you are going to be rendering the window close up at a high resolution.
If you are going to use a closeup you are often better modeling that part on its own in high detail to save yourself some CPU cycles. Also, when you are rendering from afar you want to trim the poly count where the mesh density is high but not really affecting how that part looks from a distance.
So, cheating is the way to go then...
You could texture the windows, but that seems to be against current fashion, and in fairness a modeled object will often look better than an bump mapped version at mid range.
So, you want to do this quickly then and not add huge amounts of detail.
Booleans are probably out because you spend a lot of time welding verts, turning edges and generally cleaning up the aftermath.
So, here's how to cheat, whilst still getting a good effect. This technique can be applied to curved surfaces, but I have shown it on a flat surface for simplicity. You can also do many, many windows at the same time and they will always all be flush with the face(s) that the window is on/in
Impressed?
These steps show how to make two windows and are written up as they were done. Total time to model was about 30 seconds
Step 1.
Create a cube with a couple of segments to it
Step 2.
Convert the cube to an editable poly and select two edges, one for each window
Step 3.
Extrude the edges using a depth of 0 and a width that meets your requirements
Step 4.
In the Editable Poly roll-out, hold control and click the polygon sub-modifier
This will select the faces as per this image
Step 5.
Extrude the faces to the required height or depth
Job, as they say, is a good un. Or done if you prefer.
"Now then!" I hear you cry. "I'm doing a Trek ship and want rounded windows"
Well now, what a fussy swine, eh?
I said the windows were simple, but now you want to add complexity.
I don't know...
Oh, ok then...
Repeat steps 1 to 3 above.
Because I didn't want too much complexity for this, I welded the top and bottom verts. You don't have to do this, but it creates a cleaner mesh.
It's entirely up to you.
Step 4.
Select the corner verts of the window and chamfer them to the required size
Step 5.
Select edge mode again and use the control+polygon sub-modifier trick again
Step 6.
Extrude the selected faces
Ok, slightly smoother corners.
If you want something even smoother then you can weld some of the spare verts (or not as the case might be. It's up to you) and chamfer each pair of corner verts to create 4 verts per corner.
And again to create 8 verts per corner.
It's up to you.
Hope you find this useful
Post edited by spudmonkey on
Additional credits
- Icons from Font-Awesome
- Additional icons by Mickael Bonfill
- Banner background from Toptal Subtle Patterns
© Scifi-Meshes.com 2001-2024
Posts
Nice tute, Spud.
Insulting because I didn't think of it.:doh: