Greetings!
Welcome to Scifi-Meshes.com! Click one of these buttons to join in on the fun.
Badges


McC
About
- Username
- McC
- Joined
- Visits
- 46
- Last Active
- Roles
- Member
- Points
- 373
- Posts
- 704
- Blender
- Blender
- GIMP
- GIMP
- Inkscape
- Inkscape
- Krita
- Krita
- Badges
- 8
-
SDF-1 Macross
@ashleytinger Wins the prize! It is, indeed, the titular ship from Superdimensional Fortress Macross.
(I've now edited the following into the first post, with some more information about my overall plan for this project.)
Specifically, I'm doing a direct replica of the 1:4000 Hasegawa model kit of the ship as seen in Do You Remember Love?. It's got some inaccuracies when compared with the movie (many of which aren't present on the 1:3000 toy, based on pictures I've amassed), but I'll worry about those after I finish capturing all of the parts.
I'm still working on the next part, piece J1 (and its mirror counterpart, J2). There's a large chunk still to do, which is the mount for one of the smaller forward cannons that'll go in that big empty space toward the back there.


-
SDF-1 Macross
Now that Coro's done, it's time at last to start working on something new! And for that, I've decided to take a crack at modeling one of my favorite ships of all time.
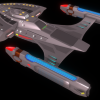
Latest, for thumbnail:

Because it's not necessarily what one would call a "mainstream" (i.e. Star Trek, Star Wars) ship, I'm keeping the identity of the ship a mystery until someone correctly guesses it! The prize goes to @ashleytinger! It is, indeed, the SDF-1 Macross from Superdimensional Fortress Macross (which was also chopped up, merged with two other anime series, and redubbed with a heavily modified story to become Robotech). Specifically, it's the ship as it appeared in the movie adaptation Do You Remember Love?, which is the version of the ship I first fell in love with.
This is a slightly unusual project, because I'm not just modeling the ship as one might for high-fidelity VFX...I'm also trying to very precisely replicate the Hasegawa 1:4000 scale model kit of the ship to serve as a "backup" that I can 3D print replacement (or duplicate!) parts from if I screw something up when I eventually get around to assembling and painting the physical model kit.
My plan is to do this in two passes. The first is to model all of the kit pieces as precisely as I can, so I have the aforementioned "backup" that I can use to 3D print replacement parts for the physical model kit if (when) I screw something up. To do that, I'm using some 10-micrometer (0.01mm)-precision calipers and a little "helping hands" gizmo with both 2x and 3x magnifying glasses attached.
The second pass, once the first is completed, will use the first pass's pieces as foundational geometry to create a higher-fidelity model such as one might expect for live-action VFX (or, y'know, as best I can manage), which will also involve fixing any inaccuracies as I go along adding detail. Whether or not I then back-propagate these updates into the 3D print pieces...well, we'll see! The Hasegawa 1:4000 kit has got some inaccuracies when compared with the movie (many of which aren't present on the Yamato/Arcadia 1:3000 toy, based on pictures I've amassed), but I'll worry about those after I finish capturing all of the parts.
I'm trying to model everything as non-destructively as possible (making heavy use of boolean and bevel modifiers), to make refinements and revisions easier at this stage.
This is the first completed piece. Not very exciting yet, but it's a beginning all the same. The shader material is currently just a very generic set of metal textures, along with a manipulated AO input as a mask for some grunge in the recessed areas.

-
U.S.S. Coronado, a Seven Year Mission
Spent a little more time massaging all of the emissive shaders, with an initial focus on the room interiors, then running and signage lights, and the finally on the deflector, warp nacelles, and bussard collectors to make them more physically correct and in-line with one another. The net result, though frustrating to get to, I think was well worth it.
Special note: the balance of window visibility and other emissive surface brightness in full direct sunlight is not intended to match what we normally see on the TV shows and in the movies, but rather what you might actually see if looking at this ship. You rarely see illuminated rooms in buildings or on cruise ships in broad daylight, for example.


-
U.S.S. Coronado, a Seven Year Mission
One @seanr requested on Discord (I'll see about doing some shaded area shots this evening!):

The bay interiors are unfinished right now, because I don't have any particular plans for them, but it shouldn't be too hard to finish them properly if I get the urge to do so. The black "tarmac" areas on both the Specter and upper bays are meant to extend into them, for reference; that jarring shift from dark to light is just a byproduct of the unfinished interior textures.
And @admiral horton's requested orthos:


-
U.S.S. Coronado, Katana Class Starship
Little remained after all the stuff in the last post, but I wasn't quite done yet!
I experimented with ventral registry, which I ultimately decided against. Dorsal regsitry's big enough to span that middle spar, but ventral isn't. Tried different placements other than centered, but didn't care for them.

Revised my room interiors to vary what you can see through the windows -- either quarters or hallways now, instead of just quarters everywhere, depending on what part of the ship it is. Totally rebuild both the quarters textures alongside the hallway ones to provide more variety.

Also rigged up the rooms to respond to different alert statuses, controlled by a single "alert status" parameter that drives shader changes. Yellow, red, and blue (for landing) alerts:


From here, I did a whole deep dive into the branched path tracer, instead of using the regular path tracer, to finally find a good balance of render speed and noise level (or rather, denoising artifact level). After a lot of iterations and experiments with progressively more or fewer subsamples in different combinations, I settled on 90 AA, 3 diffuse, 2 glossy, 2 transmission, 2 mesh light, and one of everything else to provide a clean look I was happy with, without taking hours to render. That combination, for the render angle I was testing, only takes about 9 minutes, in fact!
Now it was time to zero in on a final render "look". I started from enotobian's blog post on his post-processing method and did what I could to adapt it to Blender as a starting point, then iterated on it from there.
When I was finally happy with my results...I called it done at last!


Additional credits
- Icons from Font-Awesome
- Additional icons by Mickael Bonfill
- Banner background from Toptal Subtle Patterns
© Scifi-Meshes.com 2001-2024