Greetings!
Welcome to Scifi-Meshes.com! Click one of these buttons to join in on the fun.
Quick Links
3DMacross Plus YF-19
Hey guys and gals,
This is a WIP of my current project, I'm doing a Hasegawa 1/48 YF-19 from the Anime OVAs/Movie Macross Plus, but the twist is that it's fully transformable
The bulk of this adventure will be told in my personal blog: https://eosmusashi.wordpress.com, so feel free to visit!
I'll upload mostly images from the WIP which started in 2014, and will update it as I make new ones.
Feel free to ask questions about the process!! I'm fairly new to CG creation, I've been mostly an animator my whole professional life, so I grabbed Blender 3d two years ago, and I've been learning it since then.
LATEST UPDATE:
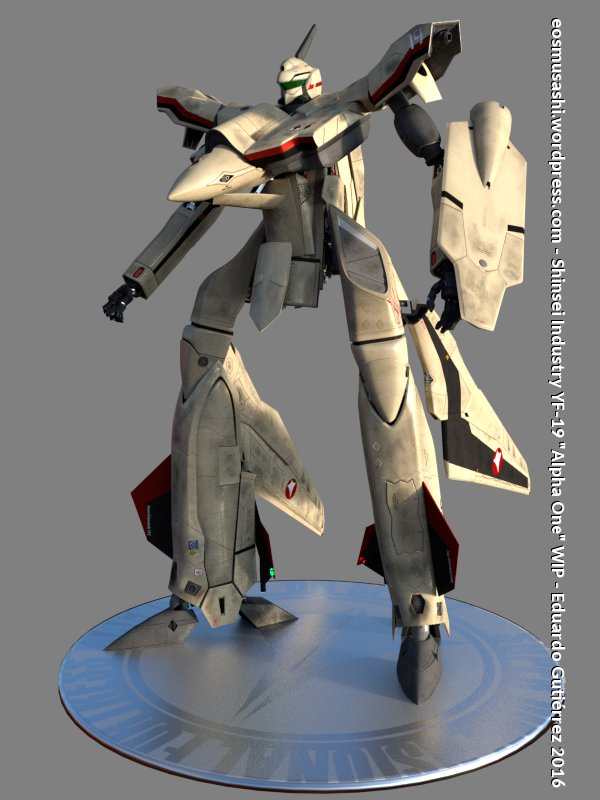
Post edited by eosmusashi on
Tagged:
Additional credits
- Icons from Font-Awesome
- Additional icons by Mickael Bonfill
- Banner background from Toptal Subtle Patterns
© Scifi-Meshes.com 2001-2024
Posts
The triangular door on the back was only on one side, but I had been modelling it mirrored. I figured I would get rid of the right one afterwards, but then I started wondering if I wasn't going too hi-poly and complex. So one thing led to another, and I decided to start again from the beginning, using a more efficient lo-poly system and then smoothing the meshes, and doing things like the panel lines as normal maps instead.
Old version left, new version right
New version left, old version right
Here's where I also decided to cut it into separate parts for transformation. Originally I was just going to model the plane, non-transformable.
Quick transform test using the separate pieces:
Seat
Inside of cockpit
Stick, Thruster and Rudder pedals
Landing gear
Wing spoilers
Gun
Comparison to the Hasegawa model
[video]
Arm mechanisms modelled and added
Flight surfaces
Arms too skinny so re-shaping them
Hand modelling
Inner inlet joint
Knee joint
Battroid mode tests
GERWALK mode rig
I had to add colours to the bones because Jesus Christ
Control shapes created
Some posing
Yup!! Thanks for the tip!
Assigned bright colours to the different parts to test the intersections while transforming
Added a position light
Folded configuration in Battroid mode
Mechanism of doors to close gaps
Increased details on the head
Same goes for the backpack thrusters in Gerwalk/Battroid, which you designed to look completely different then how it appears in the anime, and from what I can remember of the model (I own the Arcadia one, while its a friend that owns the other versions), its still different. In that the vents on the backpack aim 'down' while in Battroid mode and are mounted at a near 45 angle piece that looks like a hump on the back. While your version is completely flush to the back, and there isn't a hump shape.
Thanks for the comments! The arms are beefed up a bit more in the next part of the modelling/rigging process, but I could only make them as wider as the mechanical size allowed me without trespassing anything important. Since I'm trying to solve this as realistically as possible while keeping the proportions from the Hasegawa plane, there's a lot of compromise going on.
Yeah, the backpack was a nightmare
Added some more detail to the shoulder plate thrusters, based on the movie
Modelled intakes
The beefed up arms fitting in that small area
Increased resolution of the flaps and spoilers
Realized the engine thrusters looked too low resolution so fixing that
Added a heat shield cover to make up for the small size of the backpack compared to the toy
Updated thrusters
Feet mechanisms according to the VF-19 Variable Master File book
Now on to some comparisons of the changes done to the mesh! I love these ones
Just...wow. That's some awesome work so far. I can't wait to see this in action. Looking forward to updates. :thumb:
I guess some people enjoy this part... I didn't. :mad:
I had to start writing notes on the texture parts to remember what was what:
Drawing panels
Integrating the diffuse colour with the normal map and adding a specular map
We need to grab a few folks from Fractal's thread....
And I concur with UV unwrapping being the worst. :P
Testing some shading with lighting
I'm updating a lot of progress nowadays because this is old stuff I had posted a while ago on my blog, but once I get up to date to where I'm at, I'll try to keep it consistent, if a bit less chunky
Posing with the gun like he's an IRA member
Shoulder inside
Details
I'll take a look! I think there are some more renders later on of the feet, so I'll try and see what's wrong there.
Cockpit UV mapping
I tried a colour system to see things easier in the image map
Paneling and texturing begins
The turbine can be clearly seen above the 'toe' of the foot in a way that looks really odd, as some of the thrust from it would be hitting the actual 'toe' itself, and the hydraulics linking to it, if its exposed. I think there's supposed to be a solid, if flexible 'sleeve' of some kind that fits over the hydraulics and on either side of the toe & heel, to keep the thrust pointing down, and/or so it doesn't wash over exposed parts.
IT'S NOT ROBOTECH IT'S MACR... just kidding, thanks man.
I've done a bit of fixing ever since that pic, but the problem still needs work to be actually stupid-less, as in the mechanisms for the feet were taken from the Variable Fighter Master File book, which don't have the exhaust as a moving part, but as a fixed thing that is part of the engine (the feet act as the variable nozzles to direct the exhaust fumes) but then, once it's planted as feet in GERWALK, they have to rotate quite a lot to stand up in that shape. Then, the same feet go through the fuselage, no matter how much I try making it look like the cartoon.
So my solution was to move the mechanisms of the feet, with the feet, down in that transformation mode, so the feet can stand on the ground, but the exhaust of the turbine is now pointing the wrong way. Dang it! Either I make it a moveable part when in that mode, so it doesn't go through the feet mechanisms, or I come up with some hidden plates and stuff to hide the issue. Haha! And that's how obsessive fixes work. Thanks for the note!
Best part of the cockpit is the VEC (Virtual Environment Cockpit), a live projection of the outside on screens underneath the seat so it gives an open surrounding feel of the exterior. I just loved that from the YF-19, and this is how I came up with it for my version:
I created a camera from the point of view of the pilot, but facing down with a very wide lens, so it covered the whole area of the screens. Then I rendered a frame of the bottom without the plane, just the background.
Then, from that exact same camera, I did the UV unwrap of the screens geometry, and applied that render as a texture. Blender supports image sequeneces as textures, so it's only a matter of rendering the animation from that camera, and then applying the image sequence as texture to the screens.
Another, ehem, picture I tested to look for more details and trying to make it look seamless
Test with an HDRI background:
Transparent layer for the HUD
This animation took forever to render!