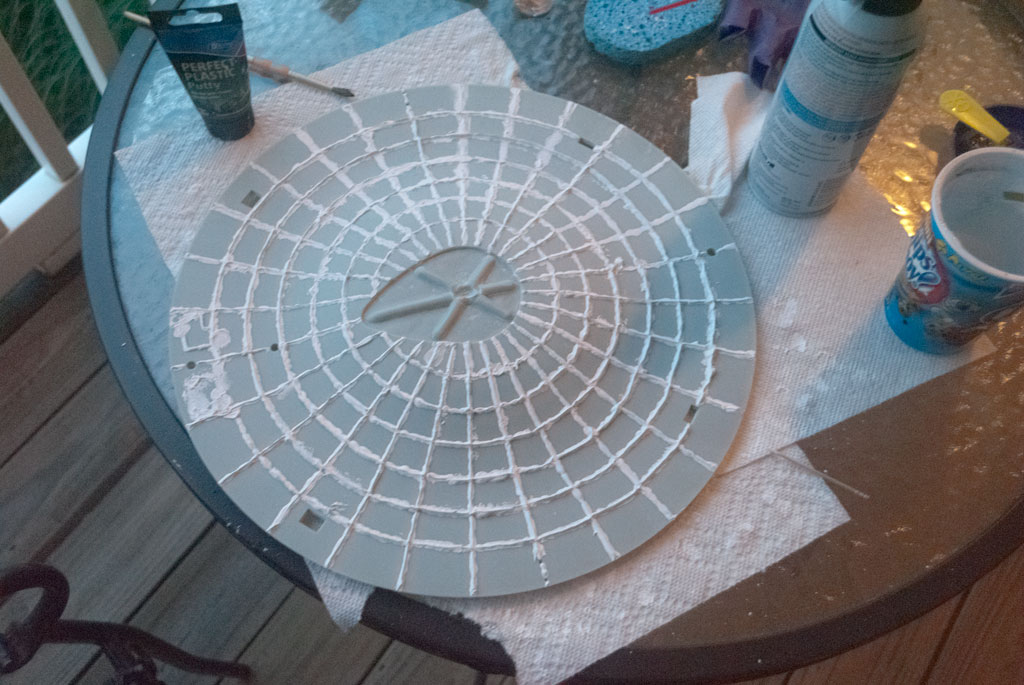
Since finishing my Optimus Prime about a year and a half ago, I got the itch to build a physical model again. I have started on Polar Lights 1/350th TOS Enterprise. I want mine to be as close to the studio model as possible, so I elected to fill in the recessed gridlines with putty. A LOT of work, let me tell ya. Just finished sanding the upper saucer down, and I think it's looking smooth. I hope to get some primer on it tonight or tomorrow.
That's a lot of work for making your model, essentially, less detailed. But I understand where you're going with it.
It's gonna be interesting to follow this.
For all my finished Trek fan art, please visit my portfolio
Seems like a great project!
The TOS Enterprise did have a hull grid, but in her case that's something that would need to be added using pencil lines, not carved into the surface.
Finally got rid of all the gridlines on the upper saucer with the Dupli-color Filler Primer. However, while applying MANY coats, I worked on the shuttlecraft. Here is the progress so far.
Nice work. That's a tiny shuttle. I know it's to scale with the ship, I'm just saying it's tiny. Sometimes, doing work on something so small can be really tough, but it looks like you're handling having no difficulties.
Except for the eye strain after painting and decaling. Ha. I almost stayed permanently cross eyed.
I don't blame you. I'm looking at a penny, thinking of the size, and trying to imagine putting decals on a shuttle that small. Thinking about it almost makes you go cross eyed, without actually doing it.
Finally got rid of all the gridlines on the upper saucer with the Dupli-color Filler Primer. However, while applying MANY coats, I worked on the shuttlecraft. Here is the progress so far.
I so want one of these or one of those ones Steve Neil was selling, issue is where to put the thing. Got me looking at one of the 1/1000s I bought back on 08 to find it is missing the deflector spire, guess there was a void and that part did not fill in.
I really do not get the grid lines on the 1/350 kit, the way they cross over other elements like those triangle things on the bottom etc.
Oh! Lighting! getting all the bells and whistles.. this thing gets expensive! But I've seen them at competitions, and they look great! Saving up for one myself!
Very nice. Yeah, I've heard filling in and sanding the grids is a lot of work.
I probably have 20 hours in just the top saucer alone after trial and error. The bottom saucer is even harder to fill in the grids, but I'm almost done with it.
Minor update. Bottom saucer has it's first coat of primer. Unfortunately, the gridlines are still very visible here and there, but covered in other places. I'll have to do a lot of touch up work to get them all gone. Then I'll do the last little bit with high build primer to fill in the small imperfections. The top saucer is fully filled and primed, ready for the paint coats.
I'm sure you can see them clearly in person, but the lines aren't visible in the photo. (I even enlarged it) You're doing great work on getting rid of them. :thumb:
Incidentally, has anybody ever figured out where that hole in the front of the saucer comes from? I've only ever put it on one of my CGI models and I still don't know why I did. I've watched every episode of TOS (most of them multiple times) and I've never seen a hole there.
Another small update. These darn gridlines are holding me back from building the rest of the ship. I assume once they are gone, the build will go much more quickly.
Using Perfect Plastic Putty did not work out well for me. After sanding I was left with micro potholes all over the gridlines, and the PPP seemed to not ever get flush with the main hull, even after sanding smooth. The primer coat revealed completely unacceptable visibility of the gridlines still there.
So at the suggestion of Ross W, I believe it was, I tried Acrylic Modeling Paste. Now, this stuff is not intended for model building or filling seams, but it seems to do the job. I found this at Hobby Lobby in the materials for painting canvas and oil painting. It is non toxic and water washup. So far the gridlines seem to be much better filled than the Perfect Plastic Putty gave me. Very easy to sand as well. We'll know for sure when I get it all sanded and hit with another layer of primer.
Posts
It's gonna be interesting to follow this.
The TOS Enterprise did have a hull grid, but in her case that's something that would need to be added using pencil lines, not carved into the surface.
Looking good! and good luck with it!
Are you going to light it ??
Thank you. Yes, it will be fully lit.
Are you going to use the lighting kit that was released for this model or do your own thing?
I will probably use the lighting kit. It's my first attempt to light a model.
Cool, it looks like a nice kit.
Except for the eye strain after painting and decaling. Ha. I almost stayed permanently cross eyed.
Manage what? I am unsure what you are referring to.
Probably referring to the application of decals and other detailing on that shuttlecraft.
I really do not get the grid lines on the 1/350 kit, the way they cross over other elements like those triangle things on the bottom etc.
Just last weekend I filled in those grid lines near the triangle foot pads on the bottom saucer. It was difficult.
I probably have 20 hours in just the top saucer alone after trial and error. The bottom saucer is even harder to fill in the grids, but I'm almost done with it.
Incidentally, has anybody ever figured out where that hole in the front of the saucer comes from? I've only ever put it on one of my CGI models and I still don't know why I did. I've watched every episode of TOS (most of them multiple times) and I've never seen a hole there.
Using Perfect Plastic Putty did not work out well for me. After sanding I was left with micro potholes all over the gridlines, and the PPP seemed to not ever get flush with the main hull, even after sanding smooth. The primer coat revealed completely unacceptable visibility of the gridlines still there.
So at the suggestion of Ross W, I believe it was, I tried Acrylic Modeling Paste. Now, this stuff is not intended for model building or filling seams, but it seems to do the job. I found this at Hobby Lobby in the materials for painting canvas and oil painting. It is non toxic and water washup. So far the gridlines seem to be much better filled than the Perfect Plastic Putty gave me. Very easy to sand as well. We'll know for sure when I get it all sanded and hit with another layer of primer.