Greetings!
Welcome to Scifi-Meshes.com! Click one of these buttons to join in on the fun.
Quick Links
PracticalLarge Blood Angels Terminator


And so it begins...

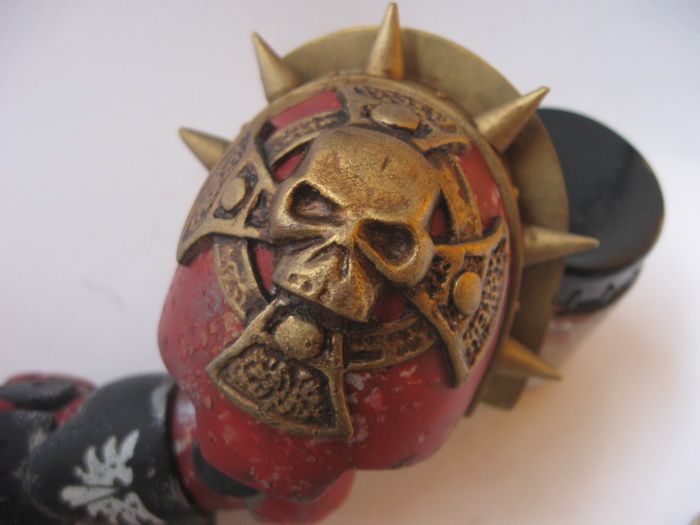
The painting of Cassar's (commissioned from a CMON frequenter) awesome sculpt.
Today I've added the brass etchings and some resin detail. If all goes well, I can undercoat the pieces tomorrow.
I'm not too sure about the resin skull on the back though, I might get rid of that...
In general I think it doesn't need that much more in terms of little glued-on tidbits. I think I'm going to add more detailing with self-made decals and freehand.
Post edited by Meph on
Tagged:
Additional credits
- Icons from Font-Awesome
- Additional icons by Mickael Bonfill
- Banner background from Toptal Subtle Patterns
© Scifi-Meshes.com 2001-2024
Posts
Some progress. I mounted and undercoated most parts. The legs are still giving me a headache though. I added a large etched brass aquila, which I pre-bent, but I'm now at attempt numer three and the top-right corner still is popping off. If this last gluing attempt doesn't do it I'll be forced to snap it off completely and rework the bending...
Oh, and I added a pic with the FW marine head, it kinda shows the scale difference.
ROFL! Go go gadget!
DCB: Yup, superglue... What do you mean by kicker? No midgets to physically abuse my model I hope...
Here's one I'm using at the moment - https://hobbyking.com/hobbycity/store/uh_viewItem.asp?idProduct=8456 - although the pump is a little inconsistent. Can't complain too much for a few bucks though.
You might also want to get some debonder (if you don't already have any) if you are needing to remove previously glued bits.
lol @ strawberry scented though. ^^
Off to a good start on the big guy Meph, ... Don't know if it crossed your mind to light this one ? ... he's a good size, and has a perfect part with his back armour to house a power source independent with no wires ...
To hollow out the body Armour at the back use that top section plate, and the rear vents as entry points, ... obviously those resin sections would be drilled out, so you just replace those parts with styrene sheet that you can get from all good models stores (Evergreen styrene) ...
Back in the day when I was doing physical models, I used to light some Star Wars vehicles with L.E.Ds & Fibre Optics, .... The first time I attempted it I had an electrician friend guide me when I was doing the light rig ... but its simple when you've done a couple ...
A lot more work though, especially since this one has solid parts you'd have to hollow out and Physical models are unforgiving if you screw them up, ... also probably not a good Idea to try it with this one, if you're not used to lighting models etc .... just a thought though ...
I know he's going to look awesome regardless if he turns out like your earlier Blood Angel :thumb: ...
Jas
Good idea about the lighting, although indeed I'm not going to risk this beautiful sculpt... the possible disaster...It's too scary a thought!
Although I'm pretty sure that Cassar (the guy at CMOn who sculpted it) would be more than willing to implement the required internal space on possible future projects... :devil:
On another forum where I posted this, someone suggested to pin the nasty Aquila corner with a, well, pin and cover the pin with a sculpted purity seal; Which might be a nice alternative to the superglue activator...
Whaddayathink?
I've been sidetracked to magnetize some small terminators and doing some work on the other vehicles.
Also, that top-right corner of the Aquila keeps popping of his leg and is driving me crazy!!!!! I think I'll pin that brass into place and hide the pin with a purity seal. Or maybe dab around with superglue activator but then I'd still need to find/buy some first...
I should have heeded that advice a long time ago... Now let's see what it does over the following days.
The plasticard-copy would've been a good alternative though. Finally this thing can move forward if the sucker stays on now. Hurrah!
And also, the demon in progress... The horns still need drybrushing and I'm thinking of giving the runes a light blue colours, as if glowing, and also give them a healthy coat of glow-in-the-dark paint.
But the LEDS have run into a problem. When first having bought those UV LEDS, the guy at the shop told me they were 1V, so I prepared for a setup of 9 LEDS on a 9V battery on 3 x 3 LEDS wired in series to spread the voltage. But a test setup resulted in no light whatsoever.
A mate of mine, with his infinite LED wisdom, informed me that they are probably between 3.2 and 3.8V but that much voltage that means I can probably only setup 3 LEDS max on a 9v battery. That would give me nowhere near enough light I fear and the base of the thing won't allow for more batteries...
For the LEDs, you could use a low voltage plug pack/wall wart. You could get up to 24V through one of those, although you'd need to make sure the amperage was low enough. If you wanted to stick with batteries, you could nix that holder and wire up 2 or 3 x 9V cells in series. To do that you might need to build the base up a bit higher to give you some more room in that hollow in the underside.
Long time no update, but I've just been lagging behind on taking pics. I haven't solved the LED issue yet, the lack of space inside the thing is a bit worrying. Also, time-wise, I might have to ditch the LEDs altogether and just go for a clean base. In any case the UV paint does shine quite brightly in even low light conditions.
So here's the bust, more or less finished I feel. There's glow-in-the-dark paint on his bulging veins, his eyes, the silver and copper disc, and the glowing runes on his horns. purely from an aesthetic point of view, it might look better with dark inlays for the runes, but the light paint job does work its wonders in the dark.
I applied a metallic coat and some rust patches. I just sealed it with some satin varnish and when that's dry, the salt is going on. If that manages to dry out this afternoon, I'll undercoat both the Stormraven and the Termy today, huah!
That stuff you put on for your chipped paint effect always reminds me of cat litter.
Some shading and subtle highlighting done. I'm not too sure i'll give it another highlighting at this point as once the salt is gone, the red will need some touch-ups in any case.
I also gave it a dark red wash.
Seriously, that's looking great. I always love pictures of you painting stuff, you do such top-notch work. :thumb:
waterboarding so your torturing him then.