Greetings!
Welcome to Scifi-Meshes.com! Click one of these buttons to join in on the fun.
Quick Links
PracticalBlood Angels Army Project (pic carpet bombing ftw!)


A project that's actually little over 4 month in the making already but it slipped my mind to also post it here over at SFM. But have no fear! I'll copy/paste my progress here to bring it up to date and continue then in real-time, Jack Bauer style.
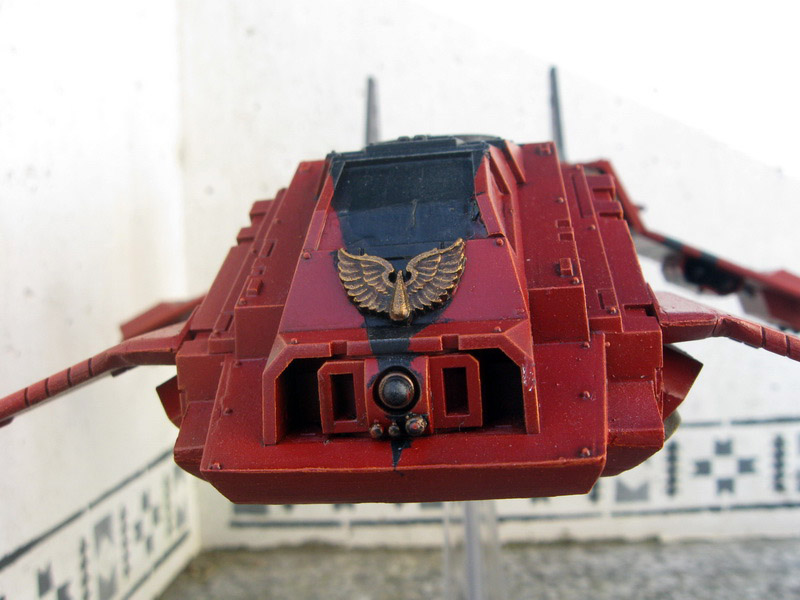
So here goes, the biggy of the army, a Land Raider Crusader to ferry the Captain, Reclusiarch and Sanguinary priest (all in termy armour), plus their body guard of a 5-man close combat Terminator Squad.
It's lightly converted with the Forgeworld BA doors and some Dremel'ed and remodeled battle damage. i also used some extra resin and etched brass details here and there.
Funny thing how regular thin masking tape is exactly the same with as Land Raider tracks. ^^
It took quite a few hours to assemble properly actually. The plan is to use the weathering skills learned with my big Marine on this vehicle so no rush, patience is the key.
First steps after assembly, a black undercoat and a base coat of roughly 50/50 Mechadendrite Red and blood red, mixed with some Vallejo airbrush thinner and a little bit of Klear to give some strength to the paint. That GW paint gun is a lovely tool to apply base coats. No tricky mechanics to clean afterwards...
Post edited by Meph on
Tagged:
Additional credits
- Icons from Font-Awesome
- Additional icons by Mickael Bonfill
- Banner background from Toptal Subtle Patterns
© Scifi-Meshes.com 2001-2024
Posts
Also included are some photo's of a mate of mine's SW Crusader, he's building and painting it at the same time as me. A perfect way to spend a Sunday afternoon away from professional life. ^^
The Razorback received the most attention, vehicles are so much fun to work on. ^^
I basecoated with a mix of Mechadenrite Red and Blood red, together with some thinner and Klear. Then I airbrushed some gentle shading and highlights, followed by a drybrushing with the foundation paint orange. To soften up the dusty drybrushing, as well as add some colour depth I airbrushed on a layer or three of a roughly 35% Baal red wash, 15% Red Ink and 50% Klear.
I'll probably give the edges a gentle drybrushing again to bring out the edges a bit more.
I wanted something to break up the large red surfaces a bit, other than giving the odd plate a different colour. The extra brass and resin detailing will give variation in any case, as well as the weathering still to follow, but I felt it need a little 'extra'. As red wunz go fasta but he's already red there was only one thing I could do. Almost on instinct I spent the better part of an hour meticulously applying masking tape and voila, racing stripes.
It came out looking surprisingly well I must say and just needs some tiny touch-ups. The stripes somehow do seem to suit the look of the Razorback. ^^
And I thought I'd post a few pics of the honour guards, all of them received some minor conversions.
And some of the Sanguinary guard. The colour appears a lot lighter on the camera, in reality it's more of a dark bronze. I'm going to go for a dark look with a lot of the detailing also metallic, I want to give them a statuesque look. I'm not I'll even put on the wings though as I feel they're a bit to thick, large and clumsy for jump troops. I think I'll paint the wings dark anyway so I can see when they look like before I make the final decision.
Some more weathering and finishing the details, which are time consuming but have to be done before the weathering continues.
The Land Raider that a mate of mine's doing, less pics because his progress is a bit slower. ^^
The Razorback. I'm especially proud of how the plate on the dozer blade turned out and the silver wings.
And progress on the thing I hate the most, the painting of the black, for all the metallics and detailing. A cursed job it is.
And from now on, events occur in real-time...
bong
bong
bong
If you get a warning on chrome or Firefox, you can click on the diagnostics page and see that the domain actually never was truly infected with malware and never spread any. But just to be on the safe side, I deleted ALL websites hosted there and I'm currently in the process of getting the domain whitelisted by Google again.
So again, viewing the pics on my domain poses NO risk at all. Sorry for the hassle folks.
Love your 40k stuff, makes me want to actually get some physical stuff to paint, rather than just doing everything digitally all the time.
Yeah, physically painting something and seeing come completion is hugely satisfying, and very relaxing to do as well. It can do wonders to be 'plugged out' for a while, once in a while...
I have to say though I was never a fan of the beaks. Even back in the Rogue Trader days when that was the status quo I always thought they looked odd. I guess it was some sort of medieval knight reference, but it just never gelled stylistically for me.
nice painjobs though :thumb:
Well, I for one am a huge fan of their very dark and brooding medieval universe and the contradiction of that the Imperium has come the unenlightened, religious and opressive society that the Emperor didn't want.
The artwork always had a cartoony quality to it but the more the universe 'matured' the more 'realistic' and gritty the artwork became. I'm especially fond of Fantasy Flight's 40K RPG's. Over the last few years I've been reading a lot of the novels written by the 'good' writers of the Black Library, like Dan Abnett, Ben Counter, Graham McNeill, William King and to a lesser extent; James Swallow. Good stuff, very moody and evoking storytelling from those guys. Worth checking out if you're looking for some new stuff to read.
And oh, I'm a big fan of the beaky helmets, I tried to get as many as possible on the miniatures of the rest of the army. A:lso, those MkV semi-beaky helmets are featured a lot in the mini's I bought.
@Homerpalooza: Cheers man, and how right you are, awesome it is. ^^ Watch out with arbitrarily doing that though, that's how Bush got elected...
Keep an eye out for a PM, will be sending you one soon ....
Jas
But progress is slow... I feel like outsourcing to a North Korean sweat shop to paint on all the black for the metallics and details.... I seriously hate that part
I originally started with blood angels, but soon decided to go for 'own chapter'... Course, I got four companies in before I decided their third colour scheme wasn't doing any good... Decided a little while back to start again from scratch but I'm waiting for them to build a new roof on my workshop before I can move back in there, and then I've got to build a cityscape for the Leviathan before I move to the space marine fortress, where they will finally get a place to be on display... Who knows, by then I may have won the lottery and will have the house big enough to put them in the annexe...
DCB, if you're ever in the area and want to swap unpainted heads...
Ah, the racing stripes were actually pretty easy. Just the careful application of some Tamiya masking tape over the black undercoat, before the spraying of red. ^^
And... beakies FTW! Muhahahaha!
And DCB... nothing's holding you back to start again ey.
Ah well, the second expansion for DOW2 is coming out soon. ^^ I've been playing the beta and oh boy, the IG are fun! Yay!
In the interest of my economy I decided to magnetize the heavy weapons guy so I can just switch arms and missile launcher. And I must say, it was very easy do do actually...
Also, some progress on the Land Raider. I decided to give a light spray with some thinned dark brown oil paint over a coat of varnish to give it a nice weathering/inking but the mix seemed to have been a bit too thin. Just after spraying it it looked real neat around all the rivets and in all the recesses and just, but after drying out there's almost nothing visible. I'll add further oil paint weathering by hand I think.
For the arms it's very simple, just find a drill bit that's the right size for the magnet. I first made a small notch using the tip of a modeling knife where I want to start drilling, then I drilled a small pilot hole using a pin vice and a medium-sized 'tiny' drill' (a bit bigger than the one on the pic), and then the full size hole using a hand drill. I found the best way to handle that clunky hand drill is to put it on your lap, bracing it against one thigh and then slowly drill with your right hand while holding the mini against the drill with your left. Since you're drilling very slowly, this goes ok and is quite accurate. More accurate I feel than clamping the mini in a vice and holding the whole weight of the drill on the mini.
For the cyclone it's a similar process. I drilled quite a deep hole in that torso so I could fit two magnets in there for some more magneto-power. and then covered he hole with some green stuff to make it flush again. mind you, this is a very thin layer, you can see the magnet's edge just where the groove of that little top armour plate is. And then, as you can see from the pics, the magnets I used fit neatly inside the missile launcher itself. that was the handy bit about the plastic cyclone. I assembled the cyclone after the torso magnets were in place and left off the front section. Then you just put the magnet in, right-side up, and put it on top of the termy to dry-fit. Take it out, a drop of superglue in the cyclone's middle section, put the magnet back it and put the missile launcher on the termy as usual. The magnet will position itself neatly while the glue's still wet., with the minimum adjustment needed. And when that's dry, glue the front back on. the cool thing is that those little magnets are strong enough to hold the cyclone on even with +-3mm between them, and the little plastic mounts of the terminator body and cyclone hold it neatly in place. It's not the strongest of bonds though although you can pick up the model by the cyclone, but I wouldn't flick it very hard...
Oh and on a general note, I found that the handiest way to put the magnets in the holes is, for the first magnet; a drop of glue in the hole and then just stick the whole little stack of magnets in the hole and then you can just slide off the stack while leaving one magnet in, that way the magnet sits nicely level and flush. Pushing in one by finger tends to be less level.
And when that's dried I just put on a single magnet on the already glued one so it's centered and right-side up, put a bit of glue in the hole of the second part and push the part onto the magnet, squeezing it in. And then slide off the part. Worked like a charm.