Greetings!
Welcome to Scifi-Meshes.com! Click one of these buttons to join in on the fun.
Quick Links
Practical1:72 Taiidan Interceptor (Homeworld)
 PetarB0
Posts: 0Member
PetarB0
Posts: 0Member
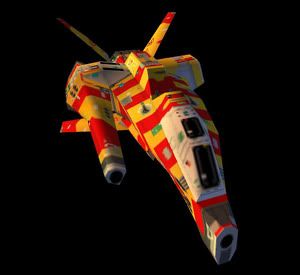
Like many gamers and science fiction fans, I loved Homeworld when it first came out. With designs clearly inspired by two of my favourite SF Illustrators - Peter Elson and Chris Foss, there were a lot of ships which looked 'the business'. And as a modeller (practical + 3D), I always knew I wanted to scratchbuild one, the problem was which one?
I settled on the Taiidan Interceptor. I like the idea that the ship was designed like an medieval night, lopsided with a big whopping weapon on one side, like a jouster's lance. The crazy colour scheme would really stick out nicely too from the drab greys that so many other unimaginative SF subjects seem to stick to.
What I also really liked about the Homeworld ship designs was they had a certain heft and weight to them - they really looked like they could be spaceships, with plenty of room for thrusters, fuel etc. Unlike the dinky little things in, say, Battlestar Galactica, which are designed tiny so the 1:1 props fit on a sound stage for shooting. In a 3D virtual environment, there's no such restriction.
A big shout out to Jon Aaron Kambeitz who I believe designed this. This is my favourite design from the first Homeworld. I had hoped to work on Homeworld 2... sadly it all happened a bit too quickly before I could get organised. However I can still get some consolation from building some of the ships to hold in my hands!
So here's my interpretation so far in styrene, epoxy and polyester putty, with a few bits and pieces from old kits.
While it's far from finished, I thought some of you might enjoy seeing the progress. I'll post updates hopefully on a weekly basis now.
Thanks for looking!
PS: Been around for awhile... but I've never felt I had the time to contribute until now. Great to see such a fantastic community develop. Look for my WIPs in the appropriate 3d forums soon. Almost finished my Taiidan Scout in 3DS Max!

Post edited by PetarB on
Tagged:
Additional credits
- Icons from Font-Awesome
- Additional icons by Mickael Bonfill
- Banner background from Toptal Subtle Patterns
© Scifi-Meshes.com 2001-2024
Posts
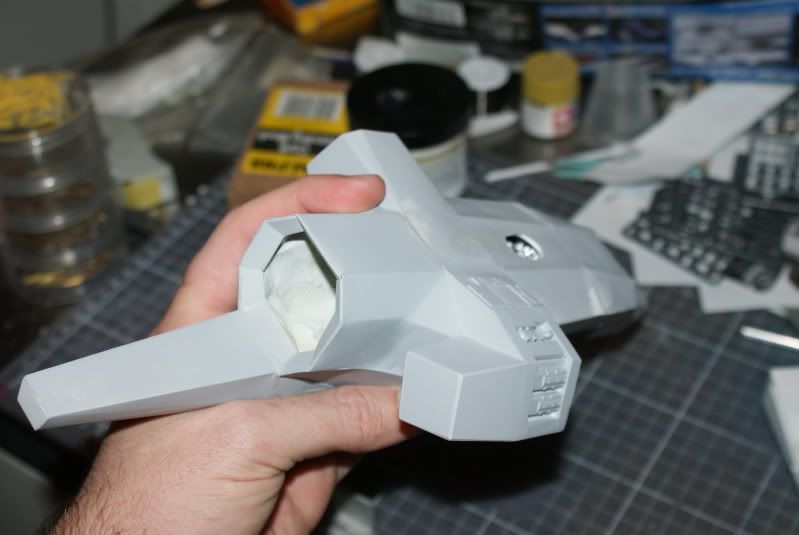
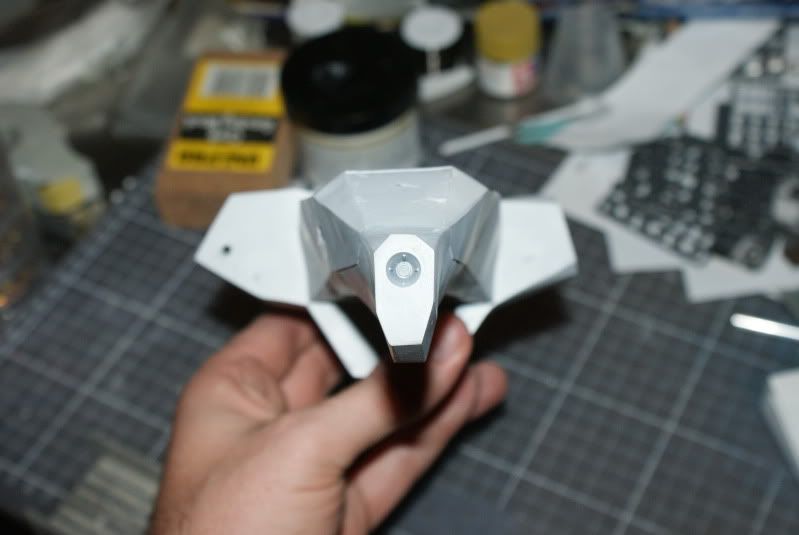
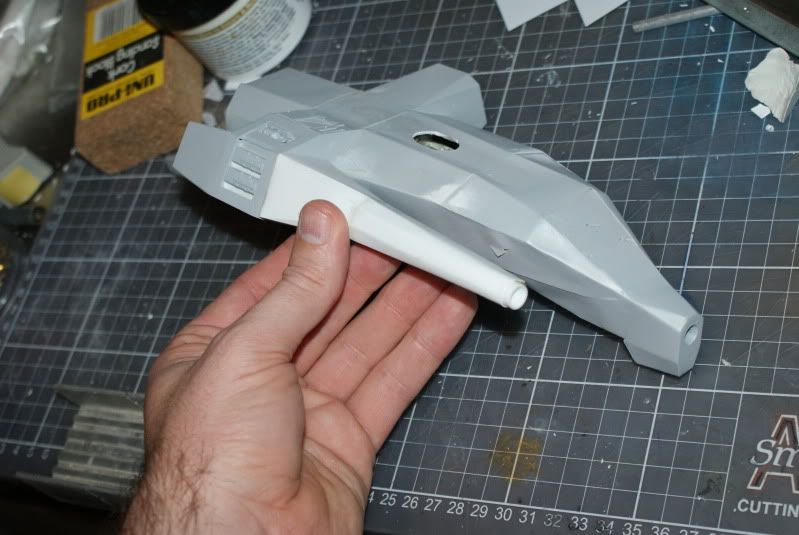
I finished the fuselage, which included top bulkheads and the bottom intake. Big relief to finalise that, as I'm keen to start detailing and scribing:
Next up, I started work on the cockpit area. I built the shape out of sheet styrene. But once I did I realised it would be way too flimsy without filling it somehow. Here the styrene mold being peeled off the 'bondo' (car filler) I put in it.
Then, after some drilling and hollowing:
And finally, after a bit of milling, and knifework, it was ready for fitting:
In the last picture you can see the first big mistake I made, in not securing the fuselage properly, the mill skipped its track and went over, damaging the area just outside and under the canopy. Not a huge fix, or fatal, but still annoying. That'll take around half an hour to fix, I'm thinking. It could have been a lot worse!
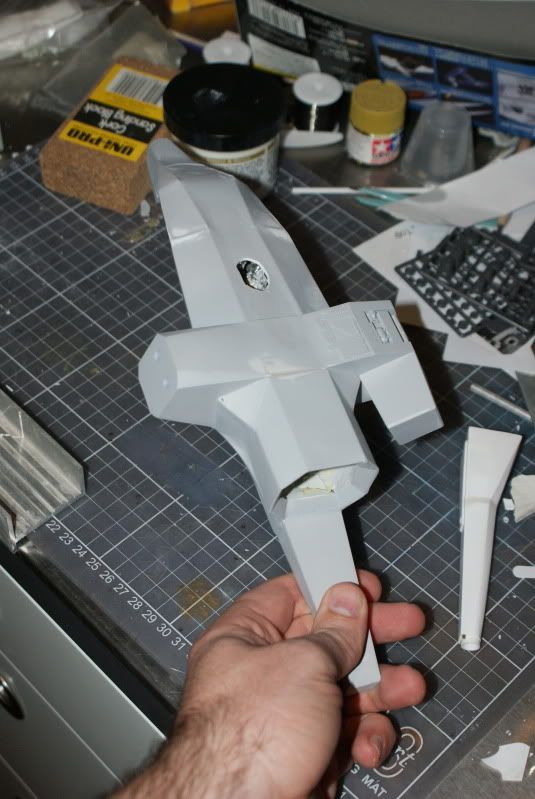
I'm pleased with the weekends progress. Next weekend will be the detailing which should be a lot of fun. Thanks for looking!
Matters were not helped by one of my children stepping on this while it dried outside. Don't ask how that could have happened!
This is a one-off, no kit I'm afraid.
Anyway, tonite I'll take a shot at the little winglets... and hope to put some paint on it next weekend, we'll see how we go!
I missed last weekend. I had hoped to have more done in terms of painting but... I forgot what a pain yellow is in terms of coverage. It just doesn't seem to go over any sort of undercoat well, regardless of the type of paint. I've experimented on the wings, which you can see on the final pics.
The the very last pic is the engines which I've found from Adler's Nest, they are awesome pieces of turned aluminium. I actually had a turn at putting them in, but I wont post pics yet... it was embarrassing! I hope to have them in next update.
This is the last we will see the interior of the cockpit for some time - in the final pics you can see it sealed up - it will be sealed until the piece it finished, it will be the last thing to be uncovered due to the paint routine.
The first pic shows some homebrew photo-etch.
You can see from the base colour of the wings that I've decided to go with the default yellow red. I think it's for the best. I can't wait to have the entire thing yellow, but next update should have red and yellow all blocked in. The masking job for the paint will probably be the most complex I've ever done, but I'm looking forwards to the challenge...
Thanks for looking!
After I put the dark grey on, however, things looked a lot better!
And suddenly - colour everywhere!
There was a couple of accidents with overspray you can see, however, some judicious use of decals should cover them quite nicely!
Matters were NOT helped by the masking tape being the same colour as the first colour paint layer!
I think, the people just sit with open mouths in front of their monitors, scrolling forward and backward through the pictures, unable to say anything
Man, this is AWESOME!!!!
Nice.
Although I do hope that the wing attachments are sturdier than they look.
Anyway, here are some final pics.
Thanks for looking!
Y'know, if you take some photo's with moody lighting, you could make jaw-dropping compositions in Photoshop...
Hmmm, but since you've already shot him in front of a green screen.... eeenteresting...