Greetings!
Welcome to Scifi-Meshes.com! Click one of these buttons to join in on the fun.
Quick Links
3DAntares Class workthrough
 Rizzo_the_Spacerat26
Germany, HanoverPosts: 9Member
Rizzo_the_Spacerat26
Germany, HanoverPosts: 9Member

Hello,
iam new to the forum and i want to start my first project after a real long time. I use Blender 3d and this thread will be about the S.S. Xhosa. An Antares Type freighter from Star Trek.
Iam actually here to showcase how i do stuff. I would like to show what iam doing and maybe/hopefully get some feedback on how to do stuff better. I take any improvement on any aspect of the entire workflow. From Imageing, to modeling and then textureing and shading. Especially the last 2 are a mystery to be up until know. This is a hobby for me. So sometimes i do a lot sometimes i do nothing :-D
So Step 1 Preparation for modeling
1.1 Get reference Images
- I took the number 121 of the eaglemoss magazine and scanned the front rear, top and side view of the ship with the highest resolution my scanner can.
- I resized the images in a more managable size, both pixels and file size.
1.2 Aligning the refernce images
- As Blender is now out in 2.8, so it seems that backround images are now done via empties.
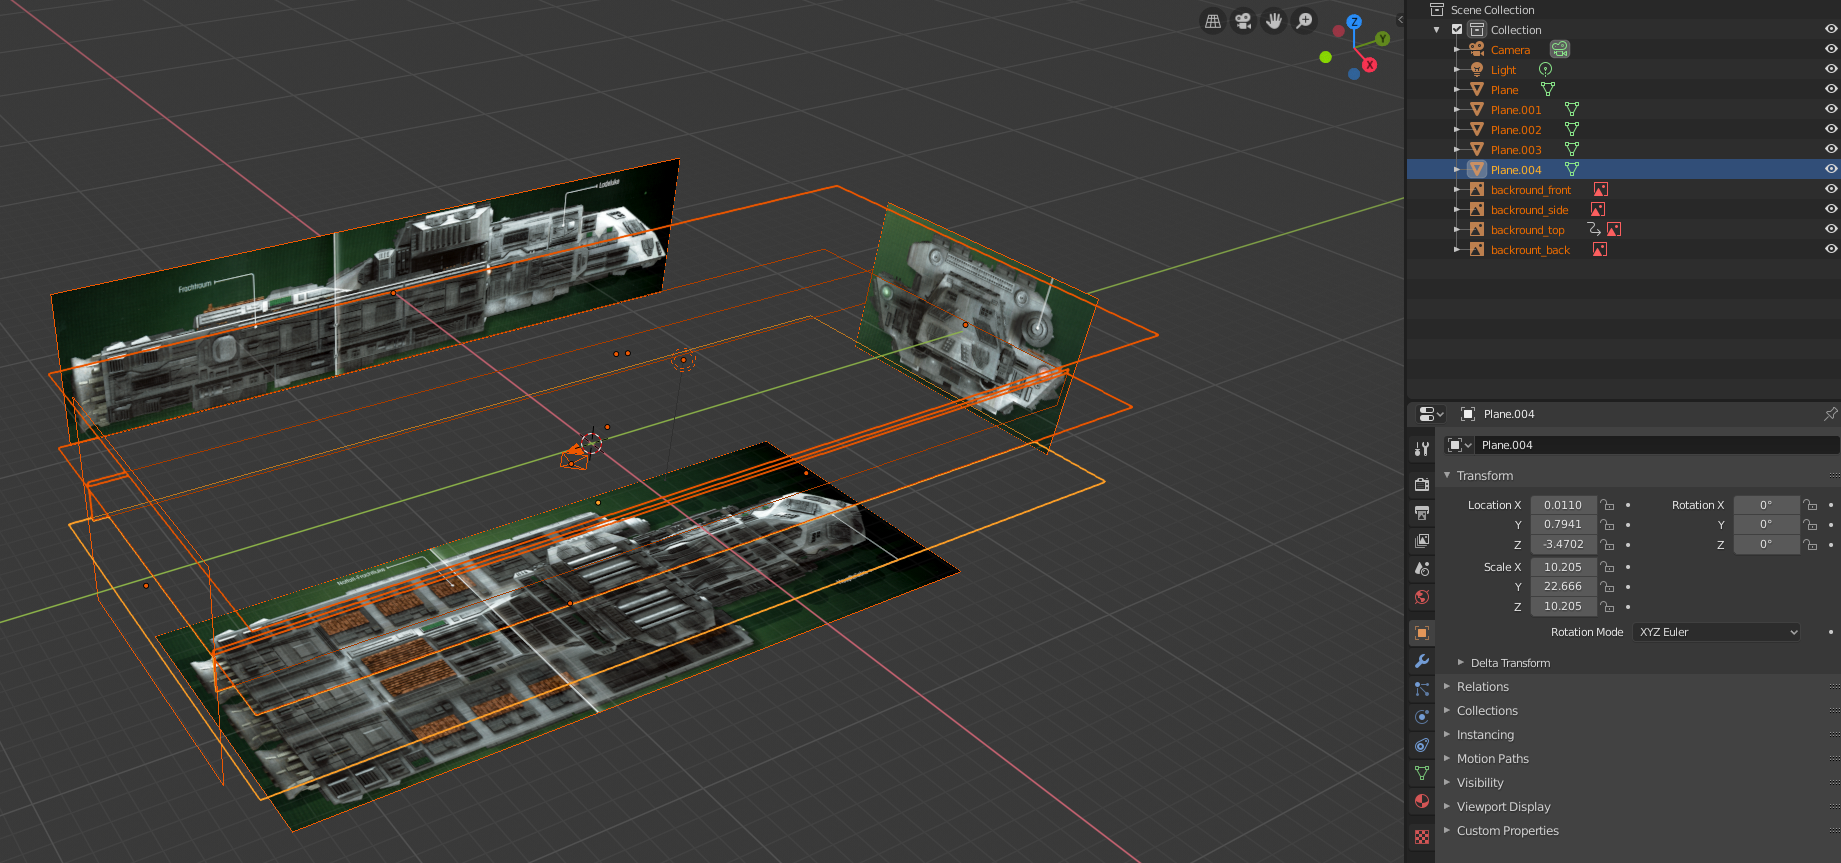
- I includes the images and as usual. The magazine pictures look like they are scaled to each other but they aren't. So i use a method by adding planes to the scene and identifying points which are easy identifiable where the front, rear top and side view must intersect. If this is done correctly one should have a good set of backround images like seen in the screenshot below.
iam new to the forum and i want to start my first project after a real long time. I use Blender 3d and this thread will be about the S.S. Xhosa. An Antares Type freighter from Star Trek.
Iam actually here to showcase how i do stuff. I would like to show what iam doing and maybe/hopefully get some feedback on how to do stuff better. I take any improvement on any aspect of the entire workflow. From Imageing, to modeling and then textureing and shading. Especially the last 2 are a mystery to be up until know. This is a hobby for me. So sometimes i do a lot sometimes i do nothing :-D
So Step 1 Preparation for modeling
1.1 Get reference Images
- I took the number 121 of the eaglemoss magazine and scanned the front rear, top and side view of the ship with the highest resolution my scanner can.
- I resized the images in a more managable size, both pixels and file size.
1.2 Aligning the refernce images
- As Blender is now out in 2.8, so it seems that backround images are now done via empties.
- I includes the images and as usual. The magazine pictures look like they are scaled to each other but they aren't. So i use a method by adding planes to the scene and identifying points which are easy identifiable where the front, rear top and side view must intersect. If this is done correctly one should have a good set of backround images like seen in the screenshot below.
Post edited by Guerrilla on


Tagged:
Additional credits
- Icons from Font-Awesome
- Additional icons by Mickael Bonfill
- Banner background from Toptal Subtle Patterns
© Scifi-Meshes.com 2001-2024
Posts
It's a good first project, easy base shape and lots of greebles on top.
i decided to block out the main parts which later can exists alone so the individual mesh does not get to complicated.
Especially when to much geometry is in one object working with modifiers tends to get messy and i lose oversight which quickly leads myself in losing interest :-/ I like it clean, seems like an occupational habit which comes with my real life job :-D
subspace antenna (the "cone" like shape on one side) and the engine exausts will be added later.
It must be something new for 2.8, because I don't think 2.79 does. It definitely doesn't with the way I display them, they only show up in orthographic views.
2.8 changed the way references are handled. It's basically planes but you can set them to only be visible from one side and to only show up in orthographic or perspective view (or both if you prefer that). I usually have them not visible in perspective view but I believe, that's a matter of taste.
The one thing I do however is turn of being able to select them. Otherwise, they tend to get in the way a lot :-D
This is something happening to me all the time. I planned them to be the lasts, at the end they are the first to be finished
The casing itself is a cone with subdivision. Same thing about the cone like structures in the middle.
The details are done once and then duplicated via arrays and rotated around empties (thats what Blender uses as the modifier for the relative offsets)
I duplicated everything. Hide the originals if i need to modify later. For the duplicate i applied all modifiers and joined the objects. Then i made three of them. I still have to work out why parenting objects doesn't work for me anymore. It creates unwanted behaviour
You can also rotate each of the object around the main "cone" by selecting the object you want to rotate first, then the cone (so that the later is the active element) and change the pivot point to "Active Element" on the header. This will make everything rotate around the cone, with no need to create other objects (I always disliked empties). You then have to rotate the cone again back to its original position, but that's very easy to do from the transform panel.
Also, when you duplicate your objects, are you linking them? By duplicating without linking (shift+D) you repeat the entire geometry and modifier stack into a new object, which has to be calculated from scratch as if it were a different geometry. If you do link them (alt+D, or ticking the 'Linked' box on the tool window) Blender doesn't copy over the entire object data, but rather it just references the original model. That way, if you modify one you modify them all at the same time, and the file size is greatly reduced.
Is there a difference between linking and parenting? I copied (ctrl-d) and then ticket "parent" and selected the original mesh. But in this moment averything goes havoc. I applied all transforms before i did that but it does not seem to have any effect. I am still searching the magic checkbox so it will do what i want
For example, on this scene I have a cart where a lot of items are placed.
If I just move the cart, the objects remain on their original position. If I wanted to move them all together, I'd have to select them all individually and then move them, which is very time consuming.
Now, if I make the cart the parent object to all of those smaller items, by just selecting and moving/rotating/scaling the cart, all objects will follow along. This is easily done when you have several objects already in the scene by selecting the objects you want to become childs, then finally select the one you want to become parent, and do 'ctrl+p' -> 'set parent to object'. Dotted lines will appear between the objects to make the linkage easy to see.
If you want to break a parentage, select a child object, and do 'alt+p' -> 'clear and keep transform'. If you just clear without keeping transform, the object will return to its original position/rotation/scale, disregarding any change you might have done since it had become a child.
As you can see this has nothing to do with cloning or linking objects together, but it is something that will be useful to you once the ship is complete to make sure all parts move together along with the main hull piece.
Also, are you using default Blender 2.8, or have you swapped some of the shortcuts around? I ask because ctrl+d isn't a command, and on my version at least I see no "parent" tick when copying objects.
had to pause a while because of other things to do. I started detailing the ship out. I completly underestimated the amout of stuff going on on this hull o.O
Iam still not sure how to model the front section. Its still in basic shape.
Well the original seems to be just a basic shape with added greebles, so I'd say, you're on the right track. You could do some hull plating beneath the greebles but I think most of the detail will come from some nice dirt textures
This is the result of 2 evenings of my free time and heavy reuseage of parts (thats also what the original creater did what i noticed by doing this :-) )
And it just does not seem to end.......
I hear you on being overwhelmed by that level of detail. There's a reason I generally prefer the flowing Starfleet designs over the greeble heavy ships. I leave those to others. Nevertheless, you're doing really great work on this and I hope you continue with it.
"Okey its an easy basic shape, nothing to oganic or to much roundiungs like the modern starfleet ships. Lets tackle this to learn modeling really, from beginning to end"
Now iam here and this is going to end one way or the other :-D
Note to myself. A DY-100 (S.S. Botany Bay) would be much easier ;-)
http://www.ex-astris-scientia.org/articles/batris/batris-esv-ship.jpg
http://www.ex-astris-scientia.org/articles/batris.htm
BTW--nice ship here
https://www.trekbbs.com/threads/trek-ships-made-with-blender-wip-usually-non-canon.301079/