Greetings!

Welcome to Scifi-Meshes.com! Click one of these buttons to join in on the fun.

3DJJEnterprise based on Tobias Richter's work

x2egox2ego0 Posts: 0Member
edited March 2013 in Work in Progress #1
Greetings:

This will be my first thread in this forum dedicated to modeling the 09 Enterprise. Please bear with me as I am new to 3DS Max and I only have a limited amount of time a day to work on her. References will be gladly accepted and appreciated. Tobias has already given me the hi-res rotoscopes of his model, but I could use a lot more reference for the close up details. Well, I'll post a screencap of my start - not a render, because I still haven't figured out how to make a nice render in Max. Again, the aka for this thread reads: Noob modeling central.

Update: Changed pic to reflect current state of project
91615.jpg
Post edited by x2ego on
Tagged:
«134567

Posts

  • Chris2005Chris2005678 Posts: 3,097Member
    Looking good so far.
    AMD Ryzen 9 5900X
    Gigabyte RTX 3080 Gaming OC 12GB
    1TB NVMe SSD, 2 x 1GB SATA SSD, 4TB external HDD
    32 GB RAM
    Windows 11 Pro
  • evil_genius_180evil_genius_1804256 Posts: 11,034Member
    Yeah, it looks good so far. Nice start. :)
  • count23count23361 Posts: 781Member
    Pretty good start, just remember to check references other then Tobias' too. his is a good starting place, but never make a derivative of a derivative, you always lose detail in the copy.
    Formerly Nadesico.

    Current Projects:
    Ambassador Class
  • BuckaroohawkBuckaroohawk2 Posts: 0Member
    If you have the Blu-Ray discs of the movie, there's a great special feature that shows off the ILM model in spectacular detail. You can move around the model and zoom in for some nice close-ups. If your desktop or laptop can play the discs, you can get some very impressive screencaps from this feature to aid in detailing your own model. Hope this helps. Best of luck!
  • x2egox2ego0 Posts: 0Member
    Funny you should mention Blue-Ray. For the last week or two my wife and I were checking out the BR players. Just another reason to get one now;)
  • x2egox2ego0 Posts: 0Member
    Small update...
    90901.jpg
    TR4.jpg 239.5K
  • evil_genius_180evil_genius_1804256 Posts: 11,034Member
    That's looking really good so far. :)
  • RekkertRekkert4037 Buenos Aires, ArgentinaPosts: 2,302Member
    Looking great so far!
    For all my finished Trek fan art, please visit my portfolio
  • x2egox2ego0 Posts: 0Member
    Thank you for the encouragement guys. Since I am learning much of this (MAX) as I go, it can be a bit frustrating and slow. Here is my attempt at the Phaser cannons. I used booleans (cleaned them up a bit after cutting), but realized I could have just left the plane intact under the Phaser orbs. I might still do it again just to cut down on the polys.
    90951.jpg
    TR8.jpg 104.1K
  • evil_genius_180evil_genius_1804256 Posts: 11,034Member
    Yeah, learning software as you go can be fun. ;) However, the more you do, the more you learn.

    Nice work on the phasers. :)
  • Chris2005Chris2005678 Posts: 3,097Member
    Excellent progress.
    AMD Ryzen 9 5900X
    Gigabyte RTX 3080 Gaming OC 12GB
    1TB NVMe SSD, 2 x 1GB SATA SSD, 4TB external HDD
    32 GB RAM
    Windows 11 Pro
  • x2egox2ego0 Posts: 0Member
    Fleshing out the top saucer/bridge details. I tend to dwell a bit on the details and get sidetracked by learning how to do certain things.
    90975.jpg
    TR9.jpg 23.9K
  • Chris2005Chris2005678 Posts: 3,097Member
    x2ego wrote: »
    Fleshing out the top saucer/bridge details. I tend to dwell a bit on the details and get sidetracked by learning how to do certain things.

    I trust the solid light teal blue color is temporary... other than that, looking superb.
    AMD Ryzen 9 5900X
    Gigabyte RTX 3080 Gaming OC 12GB
    1TB NVMe SSD, 2 x 1GB SATA SSD, 4TB external HDD
    32 GB RAM
    Windows 11 Pro
  • evil_genius_180evil_genius_1804256 Posts: 11,034Member
    x2ego wrote: »
    I tend to dwell a bit on the details and get sidetracked by learning how to do certain things.

    Join the club (we have jackets. :D)

    That's looking really good do far.
  • x2egox2ego0 Posts: 0Member
    I am so envious of guys that can churn out detailed models in nothing flat. It takes me forever to show some progress. Had to do this part of the impulse engine a few times till I got it to where it is now.

    Chris: Yes the blue glow is just playing around ;)
    90985.jpg
  • x2egox2ego0 Posts: 0Member
    Starting on the body. Did a quick attempt at blocking it in, but decided to do a spline cage. I don't know if that's the right way to go, but there it is. I'll post a pic as soon as I have anything of substance to show.
  • x2egox2ego0 Posts: 0Member
    Well, the spline cage was a disaster. When I was creating it, it looked really promising. Once the cage was roughed out, I put a surface modifier on it. It was still looking good. But, when I converted the resulting editable patch into an editable poly, it turned into a mesh with thousands of polys. Trying to edit that was just not in the cards.

    Starting over on the body with box geometry. Stay tuned.

    Pics below: 1 - skinned spline cage
    2 - converted into editable poly with way too many polys
    90995.jpg
  • x2egox2ego0 Posts: 0Member
    Here's what I've got after starting over and beginning with a box. I'm happy with the progress so far.
    90996.jpg
    TR13.jpg 132.8K
  • tobiasrichtertobiasrichter333 Posts: 0Member
    YouA’re on the right track. ItA’s a very tricky shape - it takes a few tries to get it right.
    Stay with the box geometry for as long as you can. I only converted it to polys before I cut out the windows.

    Here are some grabs of my final boxes for the secondary hull. Hope that helps...
  • nightfevernightfever361 Posts: 585Member
    I made a spline cage too, but did not use it for patching. I just made it to get a 3 dimensional view of the body lines. With that it was much easier to get the vertices and polys to their right positions. But I had to start this a couple of times, though.
    You're doing a great job, keep it up.
  • x2egox2ego0 Posts: 0Member
    Greetings Tobias:

    It's an honor to have you grace my shipyard.

    Your wire frames are beautiful and will be studied in great detail, thank you for posting them. I can use all the help I can get.

    One thing I noticed right away is the fact that you have the splines following the hulls contours in a nice flowing fashion. I may have been too rigid in my approach by trying to keep most splines perpendicular. It makes more sense to follow natural lines. Thank you for that perspective.

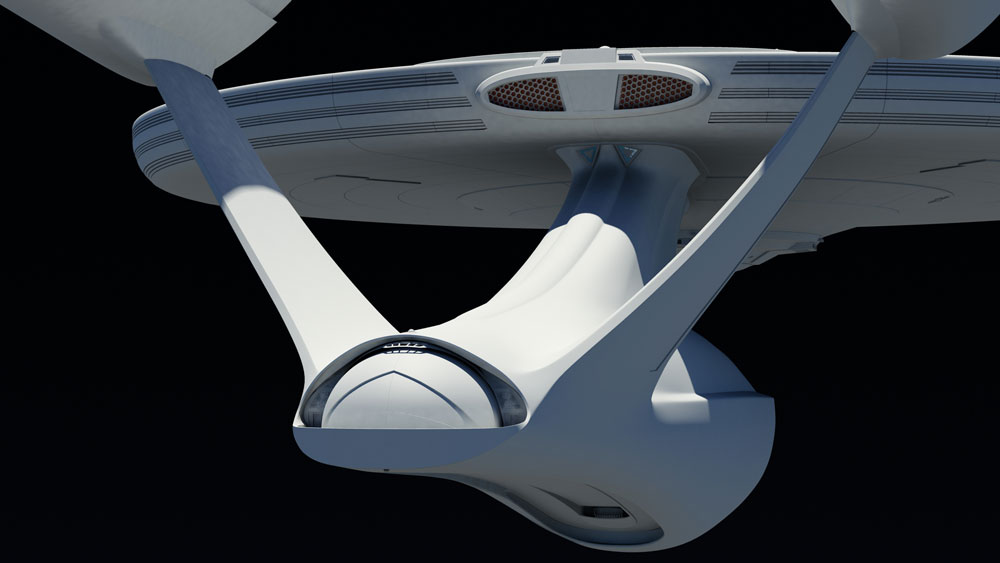
    Here is the latest hull render...

    The neck is not yet attached to the body...

    Hey Fever:

    Kinda like making your own rotoscopes, eh? I hope your avatar isn't a pic of that guy looking at my ship? It can't be all that bad:D
    91001.jpg
    TR15.jpg 337.5K
  • evil_genius_180evil_genius_1804256 Posts: 11,034Member
    That's looking great so far. Like Tobias said, it's a tricky shape, very complex. Nice work. :)
  • x2egox2ego0 Posts: 0Member
    Attached neck and nacelle struts to main body. This is all still rough and will be tweaked quite a bit, I'm sure.
    91013.jpg
    TR16.jpg 112.1K
  • evil_genius_180evil_genius_1804256 Posts: 11,034Member
    Rough or not, it's looking really nice so far. :thumb:
  • x2egox2ego0 Posts: 0Member
    Thanks Big E:)
  • x2egox2ego0 Posts: 0Member
    Been tweaking the hull, and it seems like a never ending process. Maybe I'm getting a bit tired, but sometimes the rotos get slightly out of whack with the model. I correct it, but it happens again. Maybe Gremlins in the box...
    91027.jpg
  • StarshipStarship465 São Paulo - BrasilPosts: 1,976Member
    YouA’re doing a fine job!
  • x2egox2ego0 Posts: 0Member
    Thank you, much appreciated.

    I just finished a major portion of the rear hangar section of the ship but am unhappy with the domed doors. I got them smooth, all right, but had to do it with too many polys. I'm going to try the domed doors again using less geometry. The tricky part is the up side down V shaped cut in the main doors. My first try consisted of a sphere, sectioning it to fit the shape of the doors, boolean cut and then clean up. Like I said - too many polys. Stay tuned for a pic later on tonight of my second attempt.
  • nightfevernightfever361 Posts: 585Member
    How many polys do you have on your doors? Mine has about 12k and looks rather good. Each side is cut in three parts.
  • x2egox2ego0 Posts: 0Member
    Well, my internet was down since last night, but I've been busy. Got the doors down from a ridiculous count to 3,614. That's without putting in the vertical slots yet. Even with them in, I should stay below 5,000 - I hope. No turbosmooth, just letting them be for now. Below is the wireframe and test render.
    91067.jpg
Sign In or Register to comment.