Greetings!
Welcome to Scifi-Meshes.com! Click one of these buttons to join in on the fun.
Quick Links
Hard Texturing: Because thereA’s More than One Way to Skin a Starship


NOTE: This is an intermediate level Blender tutorial. I have no idea how well it would translate to any other modeling program. Blender users will need a basic understanding of Blender and its interface before being able to follow this tutorial.
This tutorial deals with a technique I call “Hard Texturing.” I’m sure someone else has already figured all this out, and it’s called something else somewhere else by a lot of other modelers. But I don’t know those names, and I have to call it something, and “hard Texturing” is a pretty descriptive term.
I developed this method in response to a frustration I had trying to UV map Trek Saucers. I found it difficult to get the Aztec patterns on the saucers centered, and then lined up with other detailing. I disliked the endless attempts at unwrapping, wrapping, then previewing, and modifying jpeg files to make everything fit. I began to wonder if I could use the faces of the mesh itself to somehow represent the “paneling” on the hull of the ship. If I could just make the faces where I wanted them, if I could make the little square faces slightly different colors and specular values, then couldn’t I reproduce what I see on the studio and CGI models?
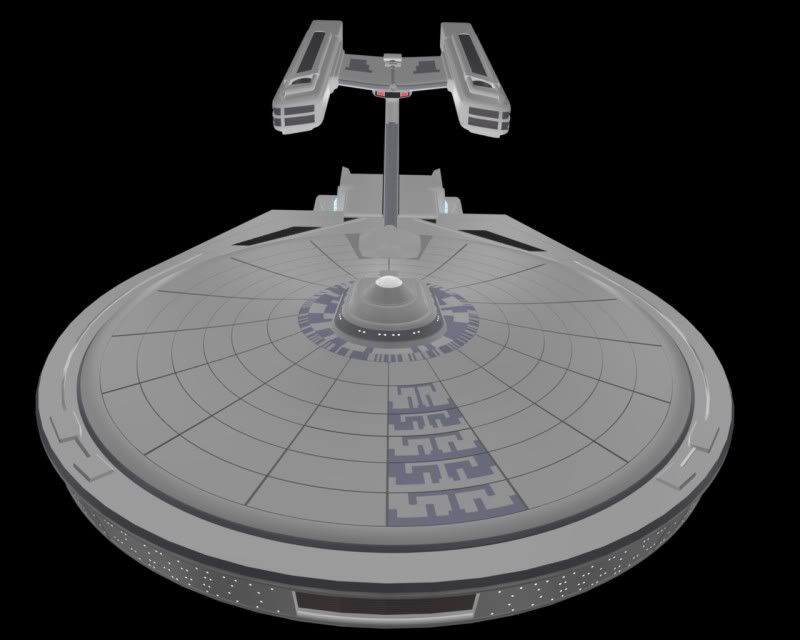
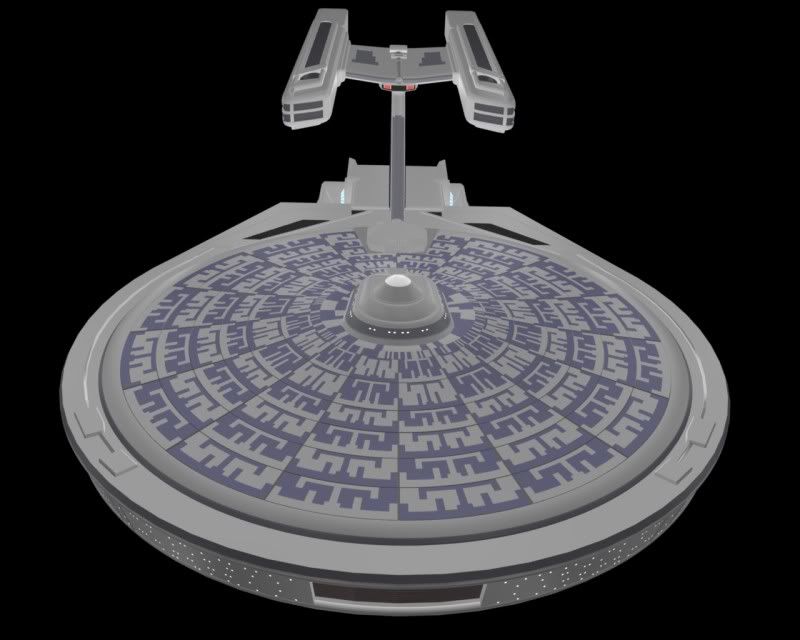
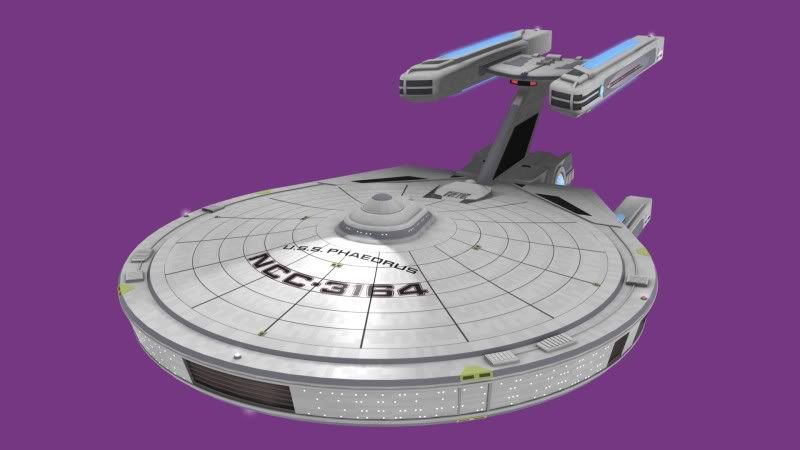
I figured it out, eventually, and even got some pretty good results:
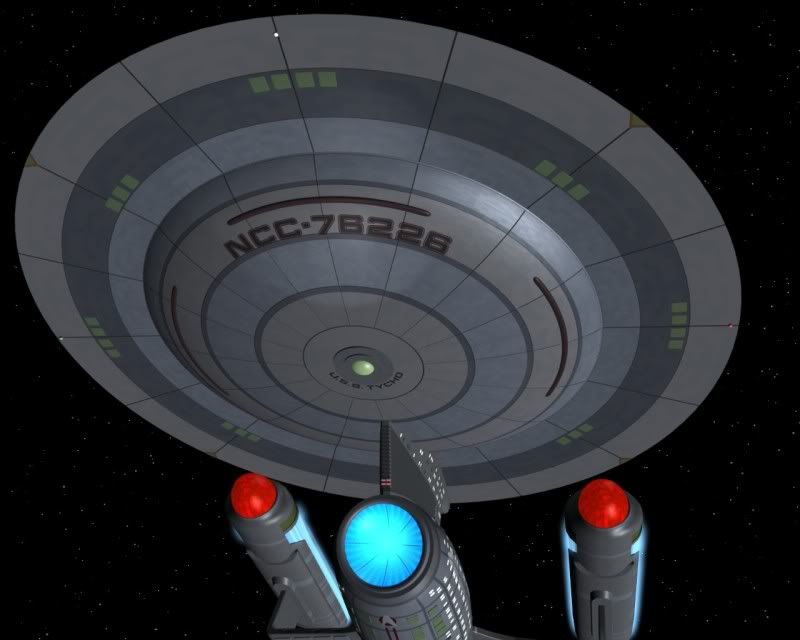
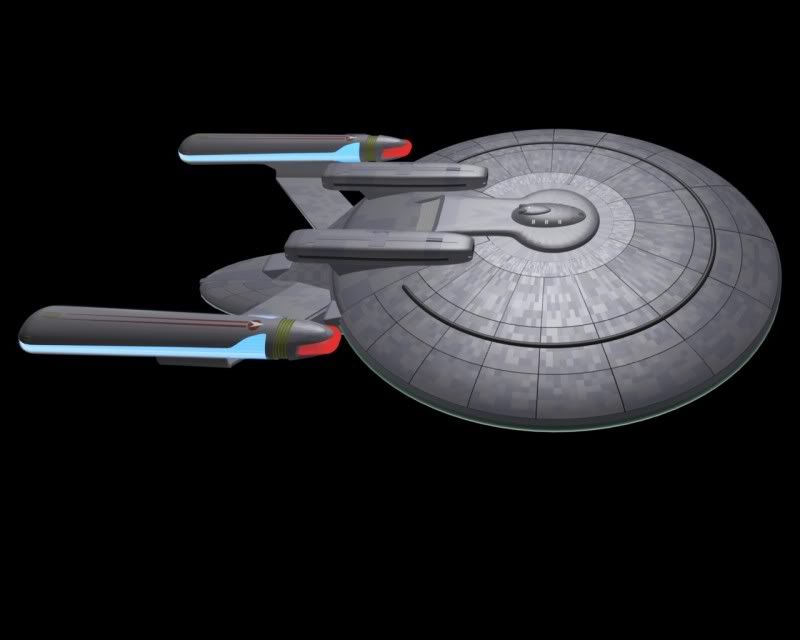
Let’s look at a very simple example of how this system works. Here is a picture of my Constellation Class model.
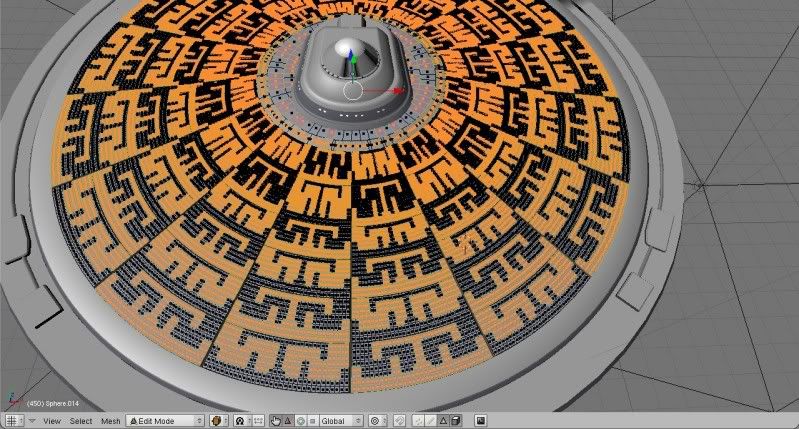
The mesh geometry of 23rd century ships, like this one, works very well for this type of texturing, so this will be a good example. I have already cut the deflector grid onto the top of the saucer, now I want to put an alternating Aztec pattern in each of the squares of the deflector grid, and also put a pattern up underneath the bridge.
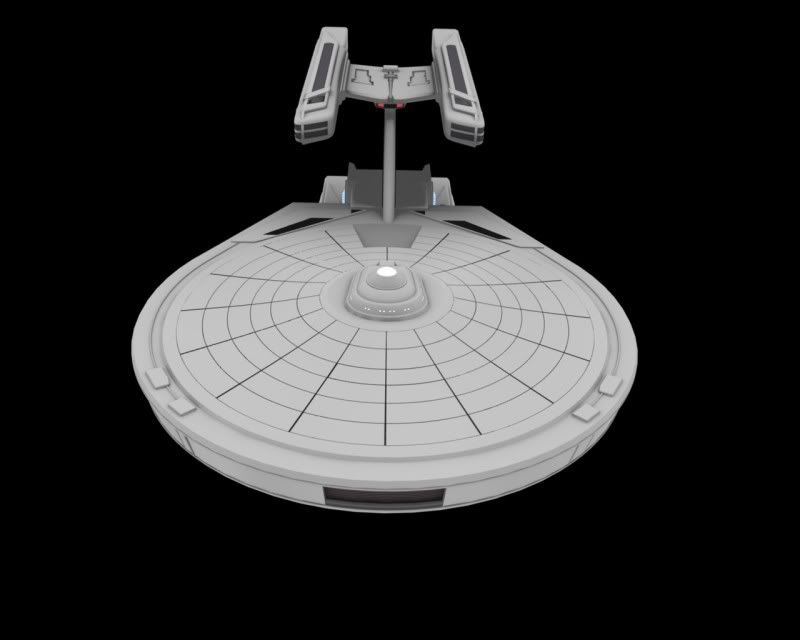
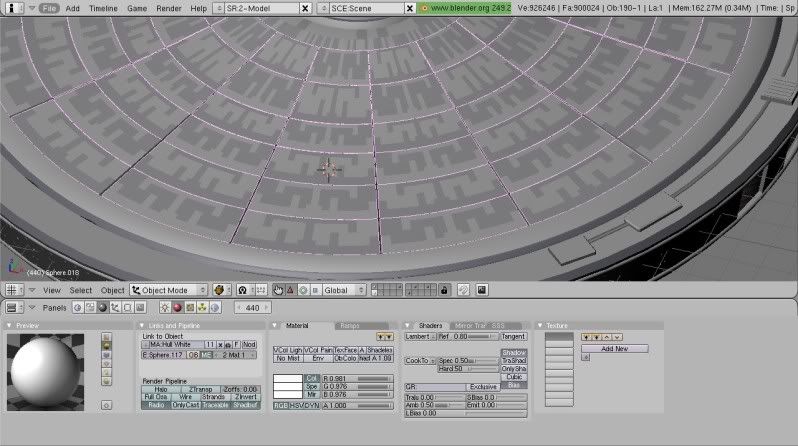
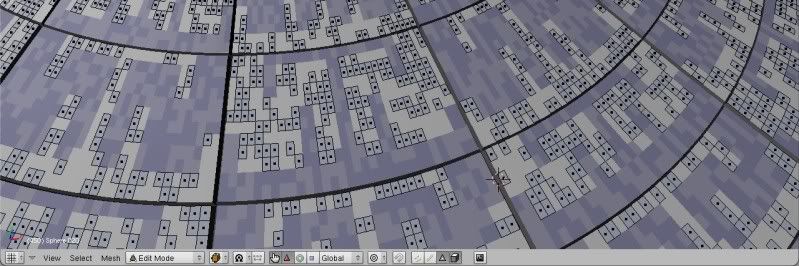
Here is a capture showing the faces on the saucer surface.
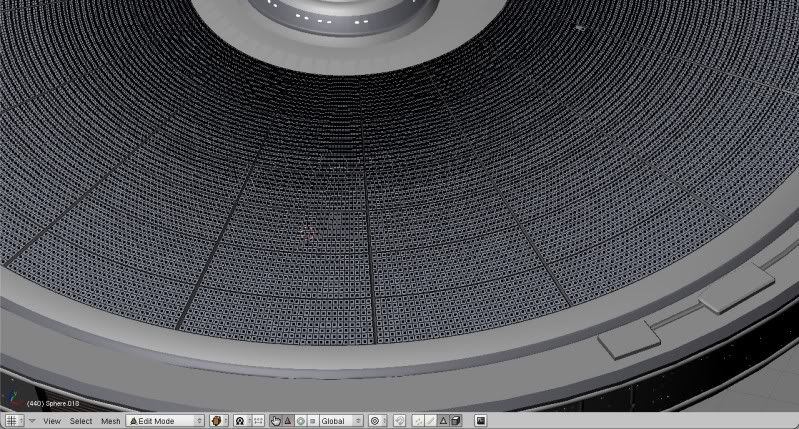
Notice that there are many more faces than necessary to model the shapes. This is because each one of those faces is going to be an individual “panel” when the ship is done being textured. I subdivided the surface until I have the right number of square faces to make my Aztec pattern out of each one of the squares created by the deflector grid. This will take some trial and error to figure out, but once you do it one or twice it becomes fairly intuitive. Generally, a section of grid should have about eight rows and eight columns, but there are many different configurations that you can get to work. These grids are more rectangular, so there are more columns than rows.
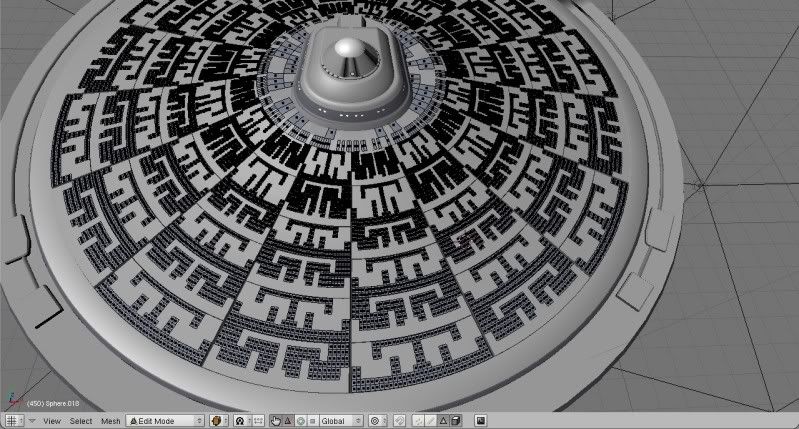
Selecting the individual faces, (using “B” to select multiple faces) I take some time and lay out the pattern I want. On the saucer, this will involve laying out an Aztec pattern. I lay out the Aztec pattern in each section of the grid.
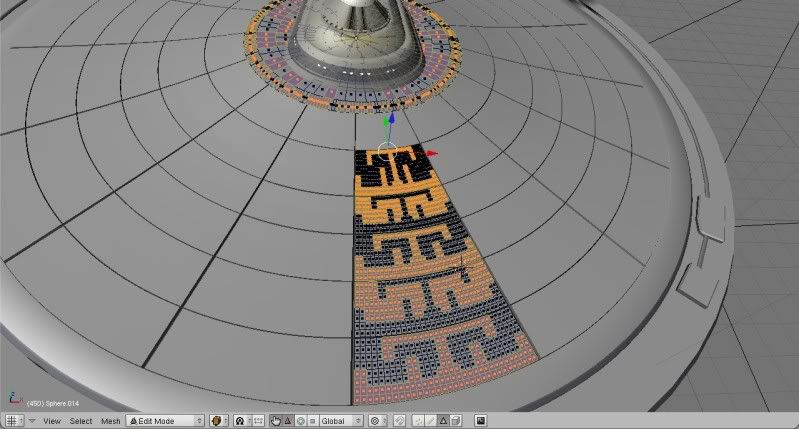
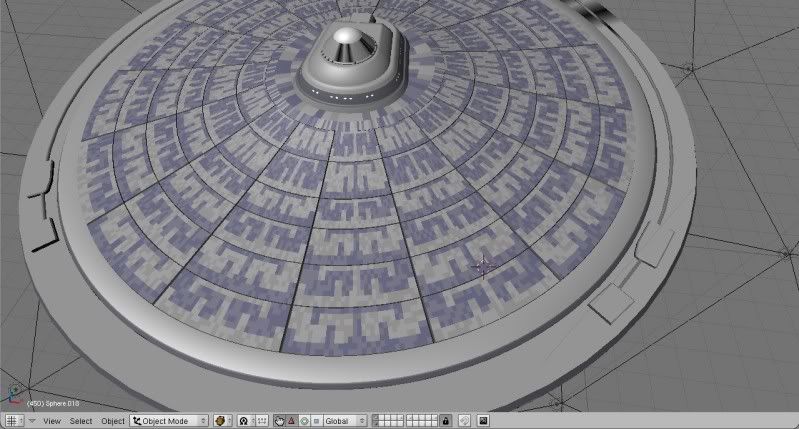
I start out making the darker color very dark, so I can easily see what I am doing.
This simple layout requires two basic colors, the “hull white” and the “Aztec Blue.” When I am done laying out the pattern, the finished design looks like this:
Note that if you have formed your saucer perfectly symmetrically, (as you always should) then you can use mirror and duplication to cut this work in half. Or in fourths, as you only have to complete A? of the saucer surface to make the whole top. When you mirror a section of saucer, and move it into position, you will probably have to invert the two colors to maintain the checkerboard pattern. To do this, simply select shading (F5) in the buttons menu.
In the links and pipeline box, it will show the two materials in your object (the saucer top.) With the first material selected, use the Browse Existing Choices button to change that group of faces to the other color.
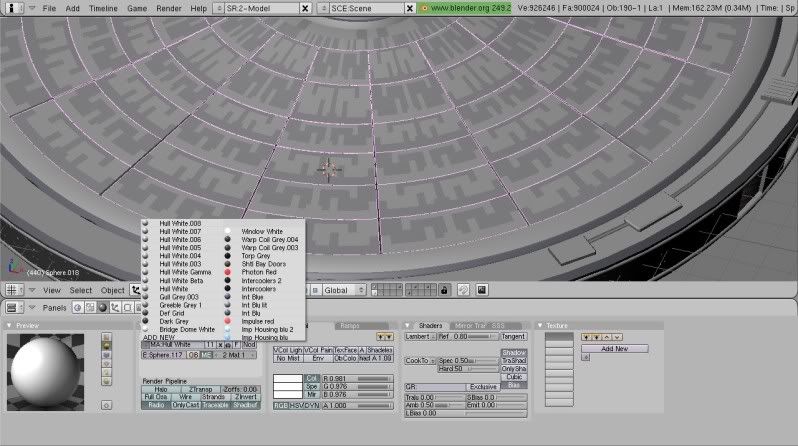
Now, click the arrow to move over to the other group of faces. Browse the existing choices again, and change those faces to their opposite color. This will maintain the alternating, checkerboard pattern, without having to actually manually “color in” the whole saucer.
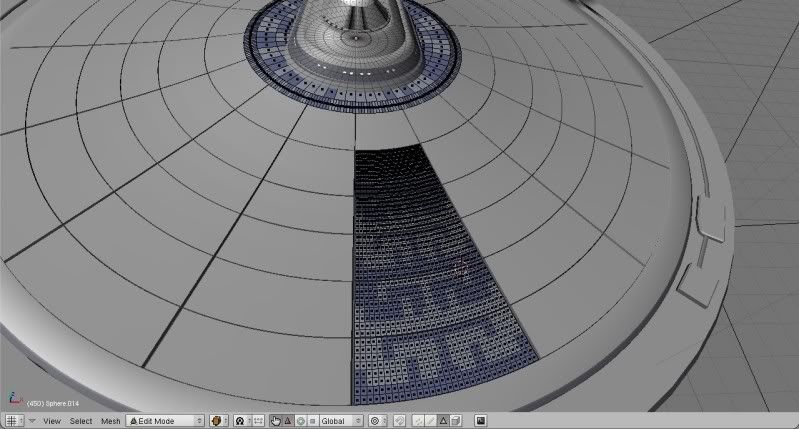
Of course, the pattern is too glaring, and needs to be toned down some. I edit the Aztec Blue Material until I am happy with the contrast.
Not bad, but still a little too plain. To up the effect another notch, we are going to create contrast within each individual color to try to simulate the tiny panels that such a large ship’s skin is made from, and to thereby give the ship a sense of scale. So we will divide each material into two separate materials that almost match, but do not. They will vary slightly in color and spec. Then we will mix these two materials randomly in the areas where the single material is now used. Here is a slight exaggeration of the end product.
Here’s how you manage to get there:
Make the whole saucer surface one object again. (Select all the parts and then press “J.”) Delete the extra Vertices. (“W” then select “Remove Doubles.)
Now select a single Aztec blue face on the saucer surface. Go to “Select--Similar to selection--Material” When you select this, aLL the Aztec blue faces on the saucer will be selected.
Press “P” to make these faces their own object.
Press the editing button, or F9, and in the links and materials sub menu, delete the reference to the hull material, as it no longer exists in this all-blue object.
Now, we want to randomly select half the faces in this Aztec blue pattern object. In edit mode, showing the mesh faces, you go to “Select—random.” You will get a percentage option; just choose 50 percent. Half of the faces on the object will be selected at random.

Press P and break these off into their own object.
Now take this new object, and in the material window add new. I typically name the new material something like “Aztec Blue Beta.” This shows that it will be the same as the first material, but tweaked just a little bit to give it a very light variation. Edit this new material. Bump its spec up to .6 or down to .4. Change the color a VERY, VERY small amount. Now combine the two objects back into one object, so the blue part of the saucer top will again be one object. Highlight ALL the faces and delete the extra vertices (“W--Remove Doubles”).
Repeat the procedure for the "hull white" portion of the saucer.
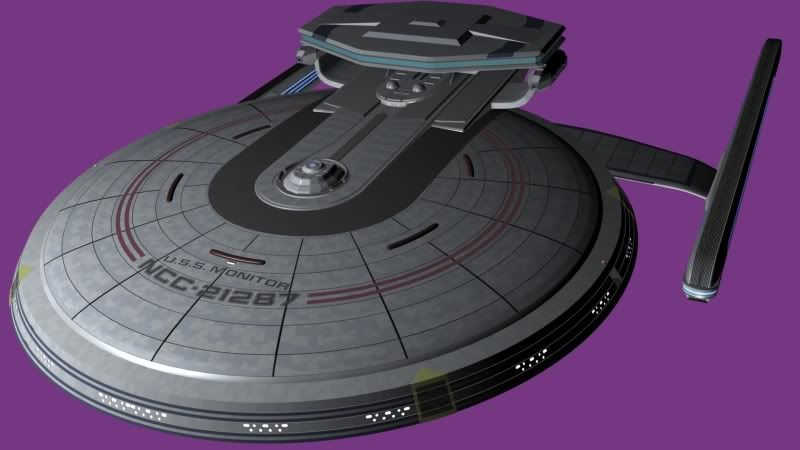
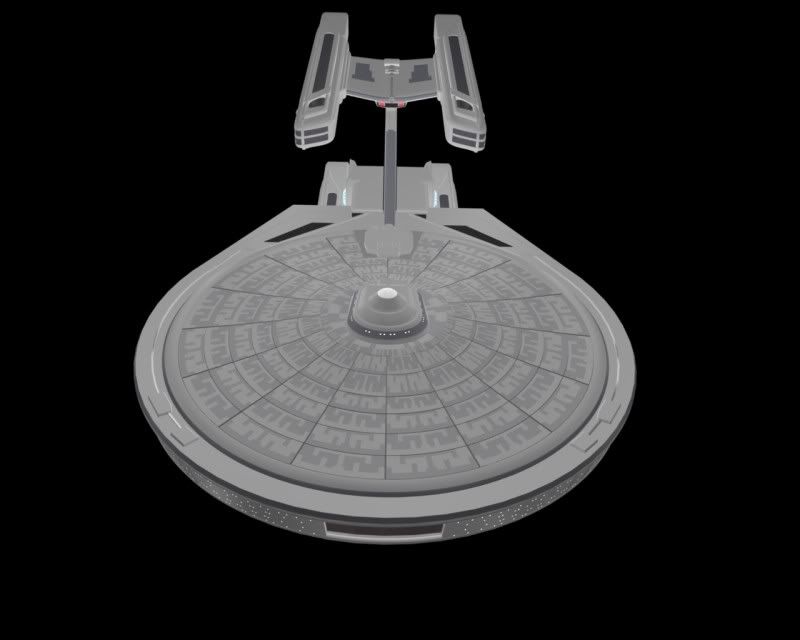
Put the whole saucer top back together, and once again delete the double vertices, as you did before. (Deleting the doubles is important, as it will keep the memory usage much lower, and keep the surfaces looking smooth.) When you are finished, you will have something like this:
It now looks like the surface is composed of blue tiles or panels, and white tiles and panels and that the light is glinting a little differently off of each panel. The additional detail in the surface makes the ship look massive and large, instead of a computer model.
Tweak the materials until you have the colors and the contrasts that you want.
Then you can apply the same technique to the other surfaces of the ship. Just make sure that the surface does not rely on any double vertices to make the final shape, becaue you will want to delete all double vertices on every surface.
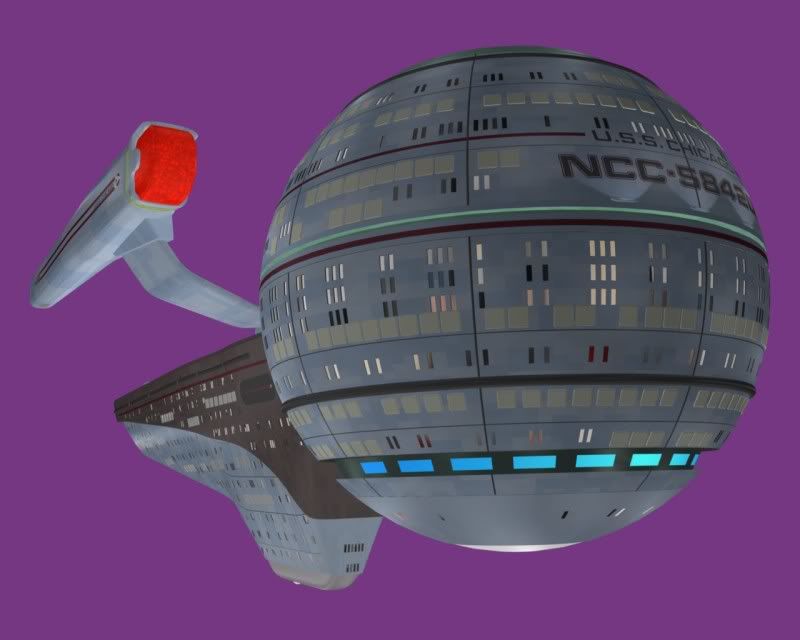
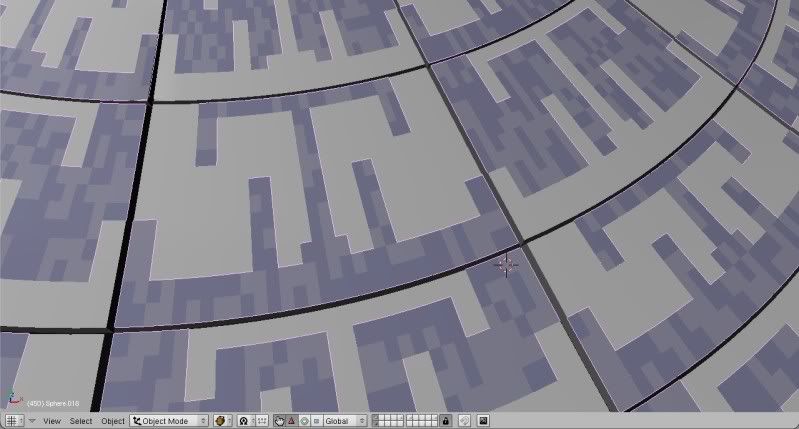
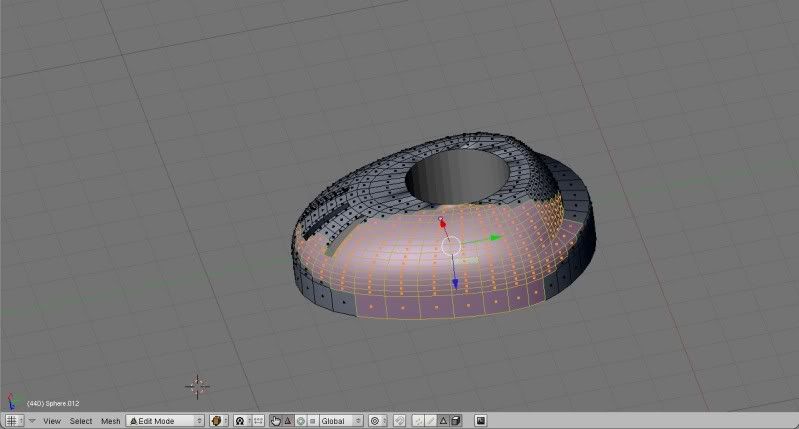
Watch me texture this spherical section of hull, for example.
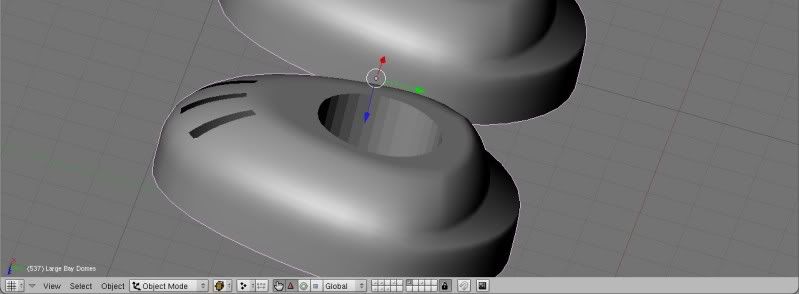
In edit mode, I select one face on the surface I want to texture. I press “control and num pad +” and hold these keys down untill all the ajoining faces are also selected. In the next picture you can see the face selection process "spreading out" over the whole contiguous object... selecting all the faces that are adjoining.
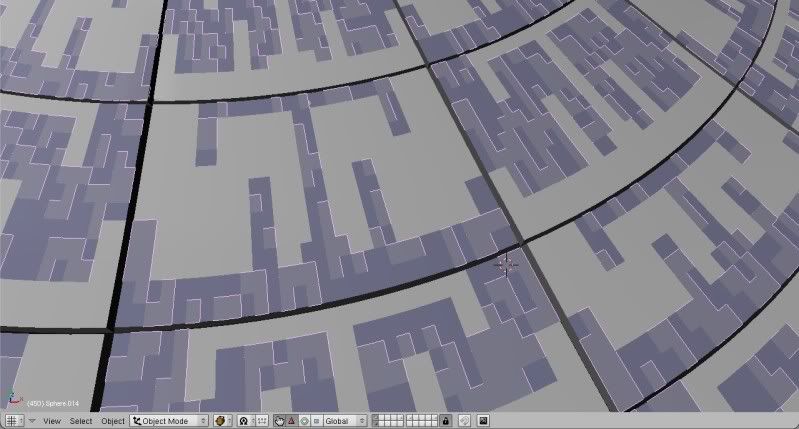
I cntrl-p it to its own object. I randomly select half the faces,
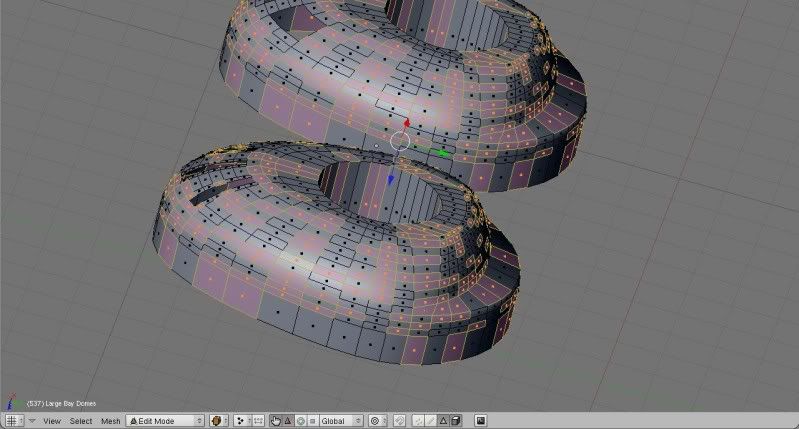
and separate them to their own object. I give the second set of faces the Beta version of the material, then recombine them, then delete all the extra verts. And the surface looks like this:
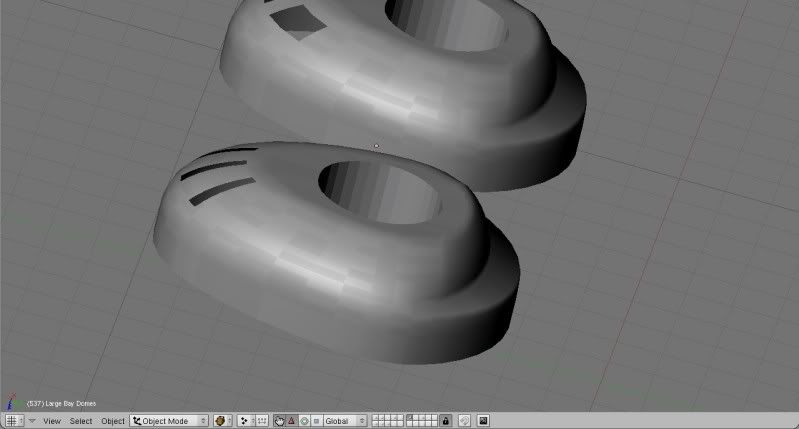

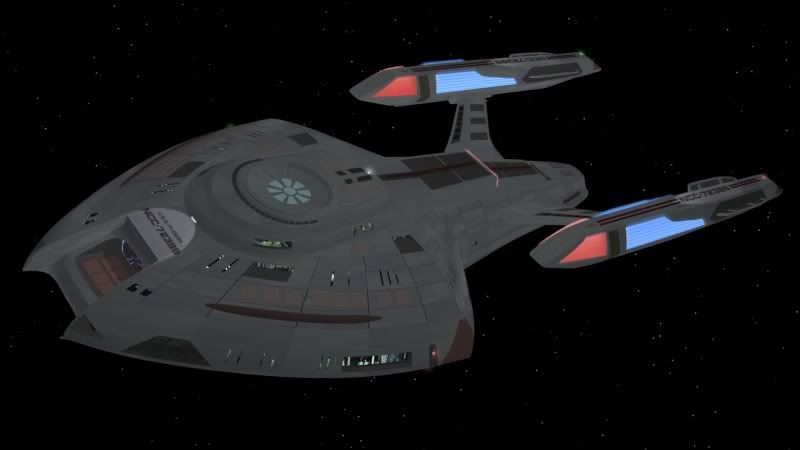
I can quickly go through the whole ship and surface every object in like manner. Before you know it your ship will look something like this:
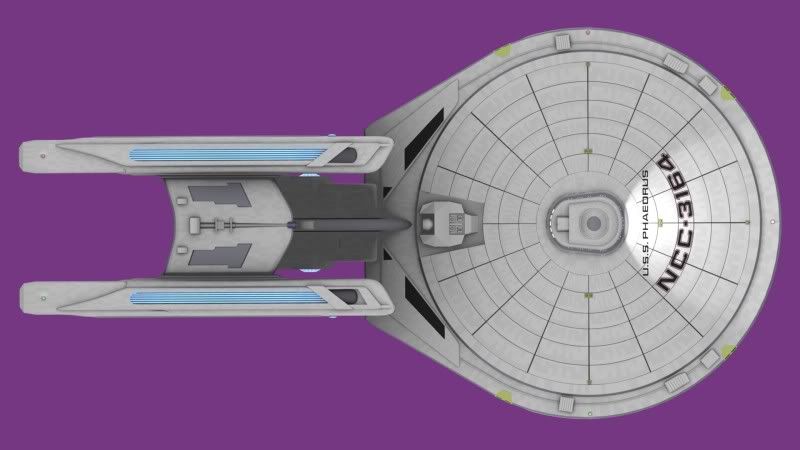
Depending on the ship, I may create two or even three versions of a given material. It depends on how much variation I want to see on the hull surface. But I notice that Blender likes each object to have less than about 14 materials, so work within that limitation. Try to keep the number of materals in an object to 12 or less, or it will cause problems or errors later.
If you vary the spec of the materials, then angled light will glint off the panels differently. This can be used to make the Aztec pattern show up or scatter in dramatic lighting:

Once you have the basic idea down, there are many ways to apply it.
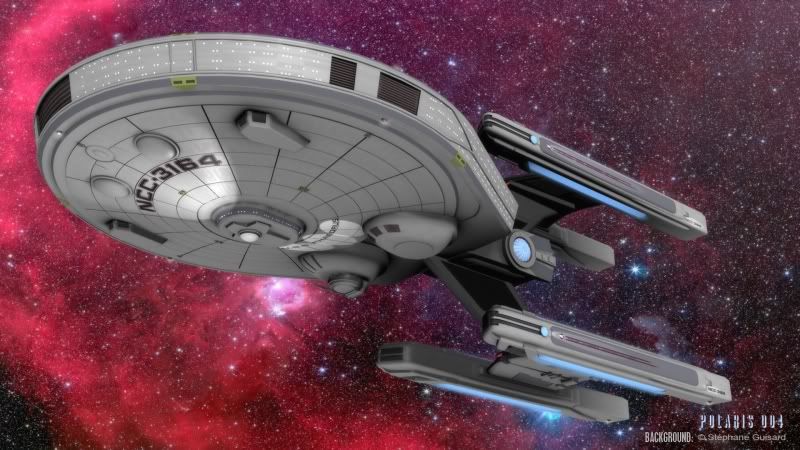
Here’s a still composite of the finished model, done by someone who actually knows something about lighting, Mycroft Maxwell:

He uses lighting to really set off the detail of the model, especially the texturing.
I really like the end results of this method, and I continue to apply it in different ways and learn new aspects of the technique all the time. I like not having to create texture maps, or worry about texture mapping elements I borrowed from other meshes. (Do I need to include a credit in my Readme, or on a screen shot, if I use someone else’s Aztec map?)
Drawbacks:
Of course, this method adds to the density of the mesh build. A LOT. Think of all the extra vertices and faces created in the process, and it becomes clear that this is exceedingly expensive from a memory standpoint. On slower computers this becomes a real problem. Even on a good, fast machine, it may not be possible to animate more than two or three ships in a scene without using compositing.
On some ships, this method will be less useful, depending upon the geometry of the underlying mesh. It works great for TMP era ships, and Next Gen ships, but some of the more recent hulls just have too much detail that goes “against the grain” of the mesh geometry. The Akira class, Defiant class, and Sovereign class are some examples. I have not tried to model these yet, but looking at them, it seems it would be very difficult to apply this technique and be able to match the screen appearances of these ships. But then, I’m not a particularly strong modeler, either. (Though I WAS able to pull off a pretty good Nova Class using this method.)
(Notice that the Nova class is a small ship, so I naturally made the "panels" of a relatively larger size. The larger the ship, the smaller the panels, and thus you have another tool for creating relative scales between meshes.)
I am just an amateur modeler dorking around with Blender. It is very likely that this is not actually a very good method of texturing to use. But if it sparks some ideas or ever comes in handy as a shortcut, then maybe this tutorial will be worth the time I put into it.
I welcome all comments and criticisms.
This tutorial deals with a technique I call “Hard Texturing.” I’m sure someone else has already figured all this out, and it’s called something else somewhere else by a lot of other modelers. But I don’t know those names, and I have to call it something, and “hard Texturing” is a pretty descriptive term.
I developed this method in response to a frustration I had trying to UV map Trek Saucers. I found it difficult to get the Aztec patterns on the saucers centered, and then lined up with other detailing. I disliked the endless attempts at unwrapping, wrapping, then previewing, and modifying jpeg files to make everything fit. I began to wonder if I could use the faces of the mesh itself to somehow represent the “paneling” on the hull of the ship. If I could just make the faces where I wanted them, if I could make the little square faces slightly different colors and specular values, then couldn’t I reproduce what I see on the studio and CGI models?
I figured it out, eventually, and even got some pretty good results:
Let’s look at a very simple example of how this system works. Here is a picture of my Constellation Class model.
The mesh geometry of 23rd century ships, like this one, works very well for this type of texturing, so this will be a good example. I have already cut the deflector grid onto the top of the saucer, now I want to put an alternating Aztec pattern in each of the squares of the deflector grid, and also put a pattern up underneath the bridge.
Here is a capture showing the faces on the saucer surface.
Notice that there are many more faces than necessary to model the shapes. This is because each one of those faces is going to be an individual “panel” when the ship is done being textured. I subdivided the surface until I have the right number of square faces to make my Aztec pattern out of each one of the squares created by the deflector grid. This will take some trial and error to figure out, but once you do it one or twice it becomes fairly intuitive. Generally, a section of grid should have about eight rows and eight columns, but there are many different configurations that you can get to work. These grids are more rectangular, so there are more columns than rows.
Selecting the individual faces, (using “B” to select multiple faces) I take some time and lay out the pattern I want. On the saucer, this will involve laying out an Aztec pattern. I lay out the Aztec pattern in each section of the grid.
I start out making the darker color very dark, so I can easily see what I am doing.
This simple layout requires two basic colors, the “hull white” and the “Aztec Blue.” When I am done laying out the pattern, the finished design looks like this:
Note that if you have formed your saucer perfectly symmetrically, (as you always should) then you can use mirror and duplication to cut this work in half. Or in fourths, as you only have to complete A? of the saucer surface to make the whole top. When you mirror a section of saucer, and move it into position, you will probably have to invert the two colors to maintain the checkerboard pattern. To do this, simply select shading (F5) in the buttons menu.
In the links and pipeline box, it will show the two materials in your object (the saucer top.) With the first material selected, use the Browse Existing Choices button to change that group of faces to the other color.
Now, click the arrow to move over to the other group of faces. Browse the existing choices again, and change those faces to their opposite color. This will maintain the alternating, checkerboard pattern, without having to actually manually “color in” the whole saucer.
Of course, the pattern is too glaring, and needs to be toned down some. I edit the Aztec Blue Material until I am happy with the contrast.
Not bad, but still a little too plain. To up the effect another notch, we are going to create contrast within each individual color to try to simulate the tiny panels that such a large ship’s skin is made from, and to thereby give the ship a sense of scale. So we will divide each material into two separate materials that almost match, but do not. They will vary slightly in color and spec. Then we will mix these two materials randomly in the areas where the single material is now used. Here is a slight exaggeration of the end product.
Here’s how you manage to get there:
Make the whole saucer surface one object again. (Select all the parts and then press “J.”) Delete the extra Vertices. (“W” then select “Remove Doubles.)
Now select a single Aztec blue face on the saucer surface. Go to “Select--Similar to selection--Material” When you select this, aLL the Aztec blue faces on the saucer will be selected.
Press “P” to make these faces their own object.
Press the editing button, or F9, and in the links and materials sub menu, delete the reference to the hull material, as it no longer exists in this all-blue object.
Now, we want to randomly select half the faces in this Aztec blue pattern object. In edit mode, showing the mesh faces, you go to “Select—random.” You will get a percentage option; just choose 50 percent. Half of the faces on the object will be selected at random.
Press P and break these off into their own object.
Now take this new object, and in the material window add new. I typically name the new material something like “Aztec Blue Beta.” This shows that it will be the same as the first material, but tweaked just a little bit to give it a very light variation. Edit this new material. Bump its spec up to .6 or down to .4. Change the color a VERY, VERY small amount. Now combine the two objects back into one object, so the blue part of the saucer top will again be one object. Highlight ALL the faces and delete the extra vertices (“W--Remove Doubles”).
Repeat the procedure for the "hull white" portion of the saucer.
Put the whole saucer top back together, and once again delete the double vertices, as you did before. (Deleting the doubles is important, as it will keep the memory usage much lower, and keep the surfaces looking smooth.) When you are finished, you will have something like this:
It now looks like the surface is composed of blue tiles or panels, and white tiles and panels and that the light is glinting a little differently off of each panel. The additional detail in the surface makes the ship look massive and large, instead of a computer model.
Tweak the materials until you have the colors and the contrasts that you want.
Then you can apply the same technique to the other surfaces of the ship. Just make sure that the surface does not rely on any double vertices to make the final shape, becaue you will want to delete all double vertices on every surface.
Watch me texture this spherical section of hull, for example.
In edit mode, I select one face on the surface I want to texture. I press “control and num pad +” and hold these keys down untill all the ajoining faces are also selected. In the next picture you can see the face selection process "spreading out" over the whole contiguous object... selecting all the faces that are adjoining.
I cntrl-p it to its own object. I randomly select half the faces,
and separate them to their own object. I give the second set of faces the Beta version of the material, then recombine them, then delete all the extra verts. And the surface looks like this:
I can quickly go through the whole ship and surface every object in like manner. Before you know it your ship will look something like this:
Depending on the ship, I may create two or even three versions of a given material. It depends on how much variation I want to see on the hull surface. But I notice that Blender likes each object to have less than about 14 materials, so work within that limitation. Try to keep the number of materals in an object to 12 or less, or it will cause problems or errors later.
If you vary the spec of the materials, then angled light will glint off the panels differently. This can be used to make the Aztec pattern show up or scatter in dramatic lighting:
Once you have the basic idea down, there are many ways to apply it.
Here’s a still composite of the finished model, done by someone who actually knows something about lighting, Mycroft Maxwell:
He uses lighting to really set off the detail of the model, especially the texturing.
I really like the end results of this method, and I continue to apply it in different ways and learn new aspects of the technique all the time. I like not having to create texture maps, or worry about texture mapping elements I borrowed from other meshes. (Do I need to include a credit in my Readme, or on a screen shot, if I use someone else’s Aztec map?)
Drawbacks:
Of course, this method adds to the density of the mesh build. A LOT. Think of all the extra vertices and faces created in the process, and it becomes clear that this is exceedingly expensive from a memory standpoint. On slower computers this becomes a real problem. Even on a good, fast machine, it may not be possible to animate more than two or three ships in a scene without using compositing.
On some ships, this method will be less useful, depending upon the geometry of the underlying mesh. It works great for TMP era ships, and Next Gen ships, but some of the more recent hulls just have too much detail that goes “against the grain” of the mesh geometry. The Akira class, Defiant class, and Sovereign class are some examples. I have not tried to model these yet, but looking at them, it seems it would be very difficult to apply this technique and be able to match the screen appearances of these ships. But then, I’m not a particularly strong modeler, either. (Though I WAS able to pull off a pretty good Nova Class using this method.)
(Notice that the Nova class is a small ship, so I naturally made the "panels" of a relatively larger size. The larger the ship, the smaller the panels, and thus you have another tool for creating relative scales between meshes.)
I am just an amateur modeler dorking around with Blender. It is very likely that this is not actually a very good method of texturing to use. But if it sparks some ideas or ever comes in handy as a shortcut, then maybe this tutorial will be worth the time I put into it.
I welcome all comments and criticisms.
Post edited by Polaris 004 on
Additional credits
- Icons from Font-Awesome
- Additional icons by Mickael Bonfill
- Banner background from Toptal Subtle Patterns
© Scifi-Meshes.com 2001-2024
Posts
IAâm not a Blender user, but itAâs applicable to other softwares, for sure!
Please let me know if you can advise on this, if time is not good, then thank you very much anyway for all your effort here, good fortune and luck to you for the future, cheers
Stoli (Ray )
Thanks to you both, for making my efforts feel appreciated. I'm very glad you found my method useful, and telling me so makes me want to continue to make such efforts in the future.
Stoli, I'm afraid I don't know very much about sketch-up, so I can't really advise you in any meaningful way.
Some time has passed since i wrote this tutorial, and I am starting to learn how to texture with more traditional uv mapping and such. I still find this technique very useful, and am confident I will continue to use it in the future. Actually, I find I cvan do some VERY interesting things when I combine this technique WITH UV mapping.
My concerns about needing to make so many faces and thereby upping the polycount of the model were somewhat unwarranted. It is true that splitting the surfaces into so many faces does up the polycount, but I find that the effect is a good deal lees then massively greebling a ship, for example. In other words, the high count on my Miranda Class or my Constellation class starshipss, for example, seem to have a great deal more to do with the massive amounts of greebles on the ship, as opposed to the extra faces created by this form of texturing. Of course, you still don't want to overdo it and create too many more faces than you need. I'm just saying that this method is not quite the polycount fiend I thought it was originally.
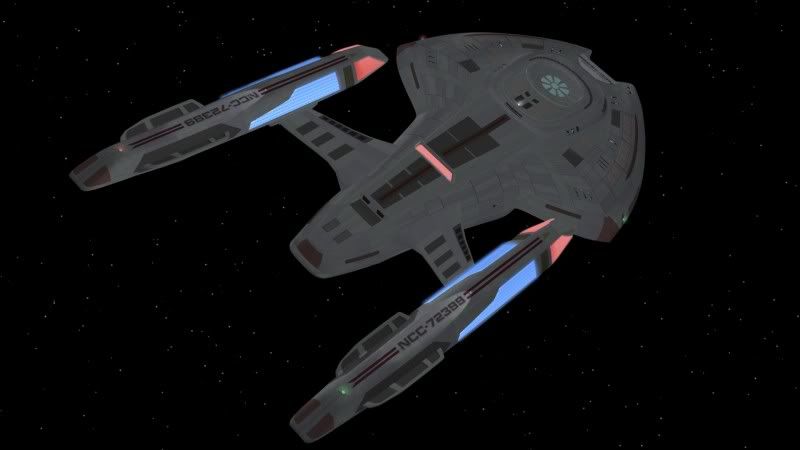
Here's the FSS Hephaestus, current render:
And advice?